You asked AI to build a contact form for you. It delivered clean, well-structured HTML in about 30 seconds. You copied it into your site, opened it in the browser, filled it out, clicked submit, and nothing happened.
Maybe you saw a blank page. Maybe the URL changed to something strange. You may have encountered an error you did not understand.
This is one of the most common problems developers and non-technical founders run into right now. AI tools have made it trivially easy to generate beautiful HTML forms. But they cannot give you the server-side infrastructure those forms need to actually work.
This post explains exactly why that happens and how to fix it in about five minutes without writing a single line of backend code.
The Problem With AI-Generated HTML Forms
When ChatGPT, Claude, or any AI tool generates an HTML form, it produces something like this:
<form action="" method="POST">

  <label for="name">Your Name</label>
  <input
    type="text"
    id="name"
    name="name"
    required
  />

  <label for="email">Email Address</label>
  <input
    type="email"
    id="email"
    name="email"
    required
  />

  <label for="message">Your Message</label>
  <textarea
    id="message"
    name="message"
    rows="5"
    required
  ></textarea>

  <!-- Honeypot spam protection -->
  <input
    type="text"
    name="_honey"
    style="display:none"
    tabindex="-1"
    autocomplete="off"
  />

  <button type="submit">Send Message</button>

</form>
This is perfectly valid HTML. The problem is that line:
action="/submit"That is telling the browser to send the form data to a URL
called /submit on your server. But if you are building a
static site, a landing page, or just a plain HTML file, there
is no server. There is no /submit endpoint. There is nothing
on the other end to receive the data.
When the user clicks Submit, the browser faithfully sends the
data to /submit and gets back either a blank page, a 404 error, or silence.
This is not a bug in your HTML. It is a fundamental limitation of how static websites work.
Why Static Sites Cannot Process Forms on Their Own
A static site is just files. HTML, CSS, and maybe some JavaScript. When someone visits your site, their browser downloads those files and displays them. That is it. There is no running program, no database, no code executing on a server in response to user input.
Form submissions require a server because something has to:
Receive the POST request when the user submits Validate the data Store it somewhere Send you an email notification Return a response to the user
None of that happens automatically. All of it requires server-side code running somewhere.
In the past, this meant you had to either build your own backend in Node.js, PHP, or Python, pay for a server to run it, configure email sending, handle spam protection, and maintain the whole thing forever.
For a simple contact form on a landing page, that is a massive amount of overhead. Most people either gave up or used a workaround like a mailto link that opens the user's email client, which is clunky and unreliable.
Today, there is a much better option.
The Solution: A Form Backend Service
A form backend service acts as the server that your static site does not have. Instead of pointing your form action at a URL on your own server, you point it at an endpoint URL provided by the service.
When someone submits your form, the browser sends the data to that endpoint. The service receives it, validates it, stores it, sends you an email notification, and returns a response to the user. All of it happens automatically. You never have to think about servers, email configuration, spam filtering, or database management.
Your static site stays completely static. You just change one line in your HTML form.
Fixing the Form With Formgrid
Formgrid is an open source form backend that works with any HTML form on any website regardless of where it is hosted.
Every submission becomes a tracked lead in your dashboard with a status, a notes field, and a follow-up reminder. Submissions also land in Google Sheets automatically with no Zapier required.
Here is exactly how to connect your ChatGPT-generated form to Formgrid in five minutes.
Step 1: Create Your Free Formgrid Account
Go to formgrid.dev and sign up using Google or email. No credit card required.
The free plan includes unlimited forms and 25 submissions per month, which is more than enough to get started.
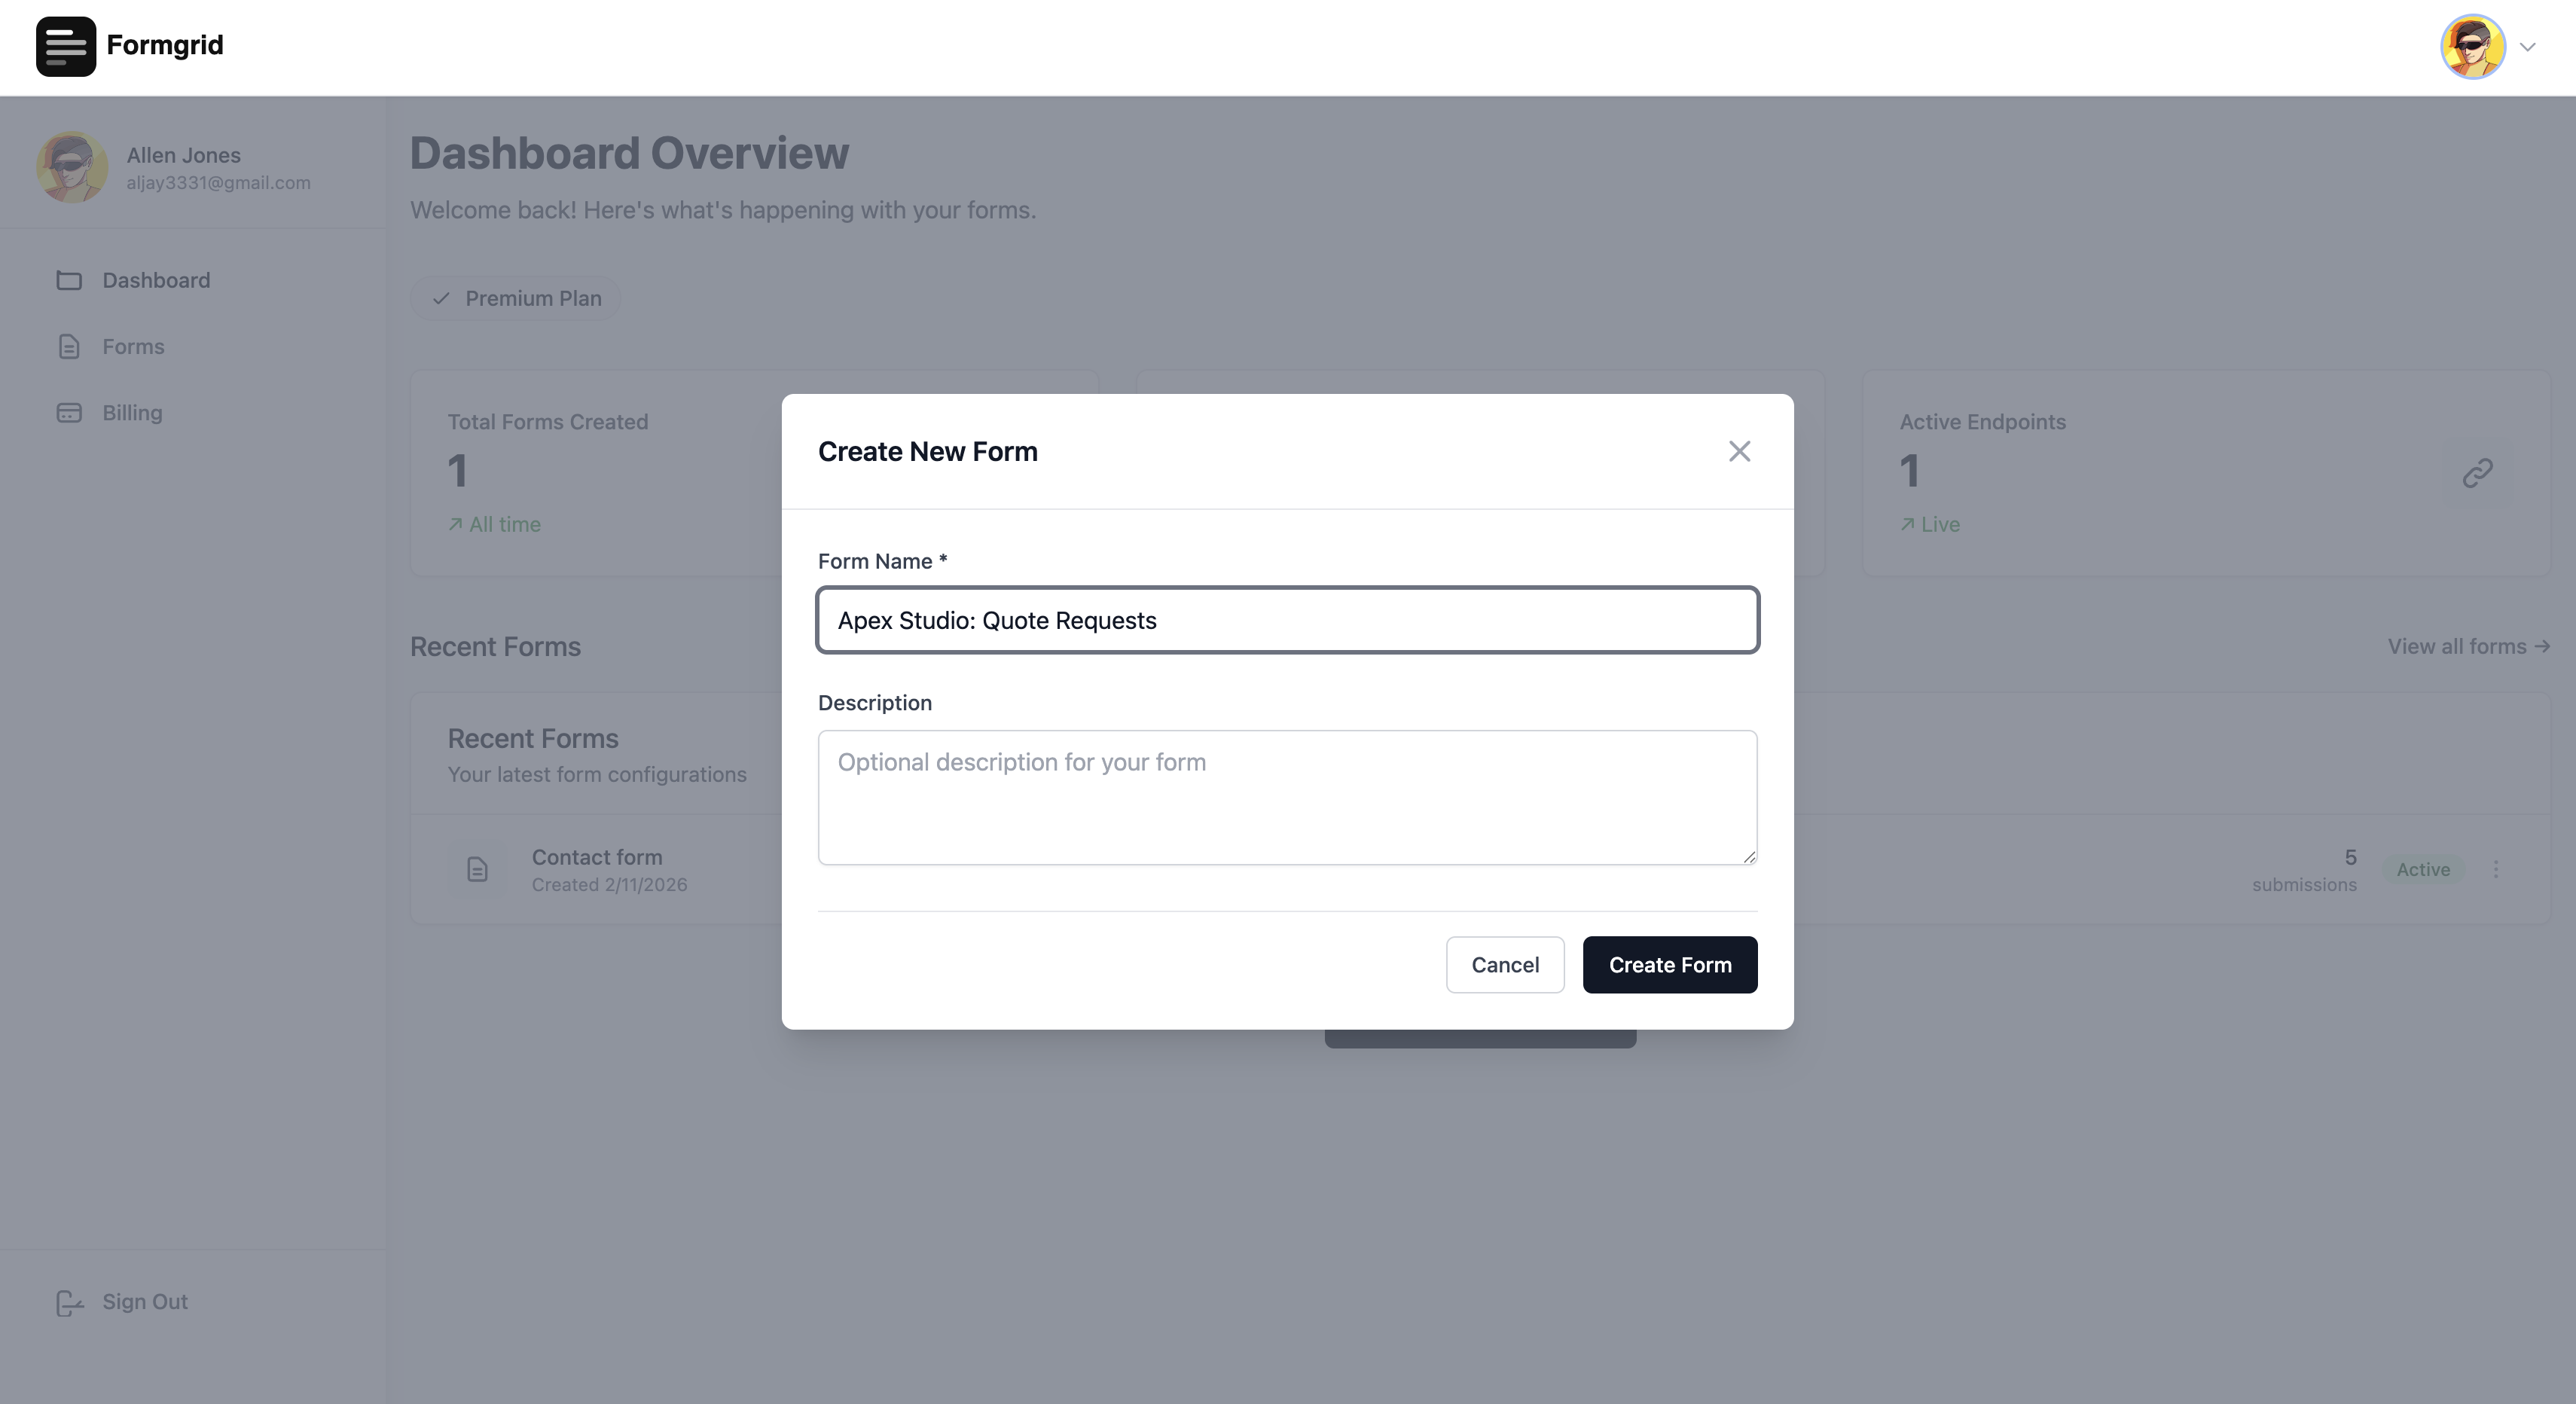
Step 2: Create a New Form
Once you are in your dashboard, click New Form. Give it a descriptive name like "Contact Form" or "Quote Request". Click Create Form.
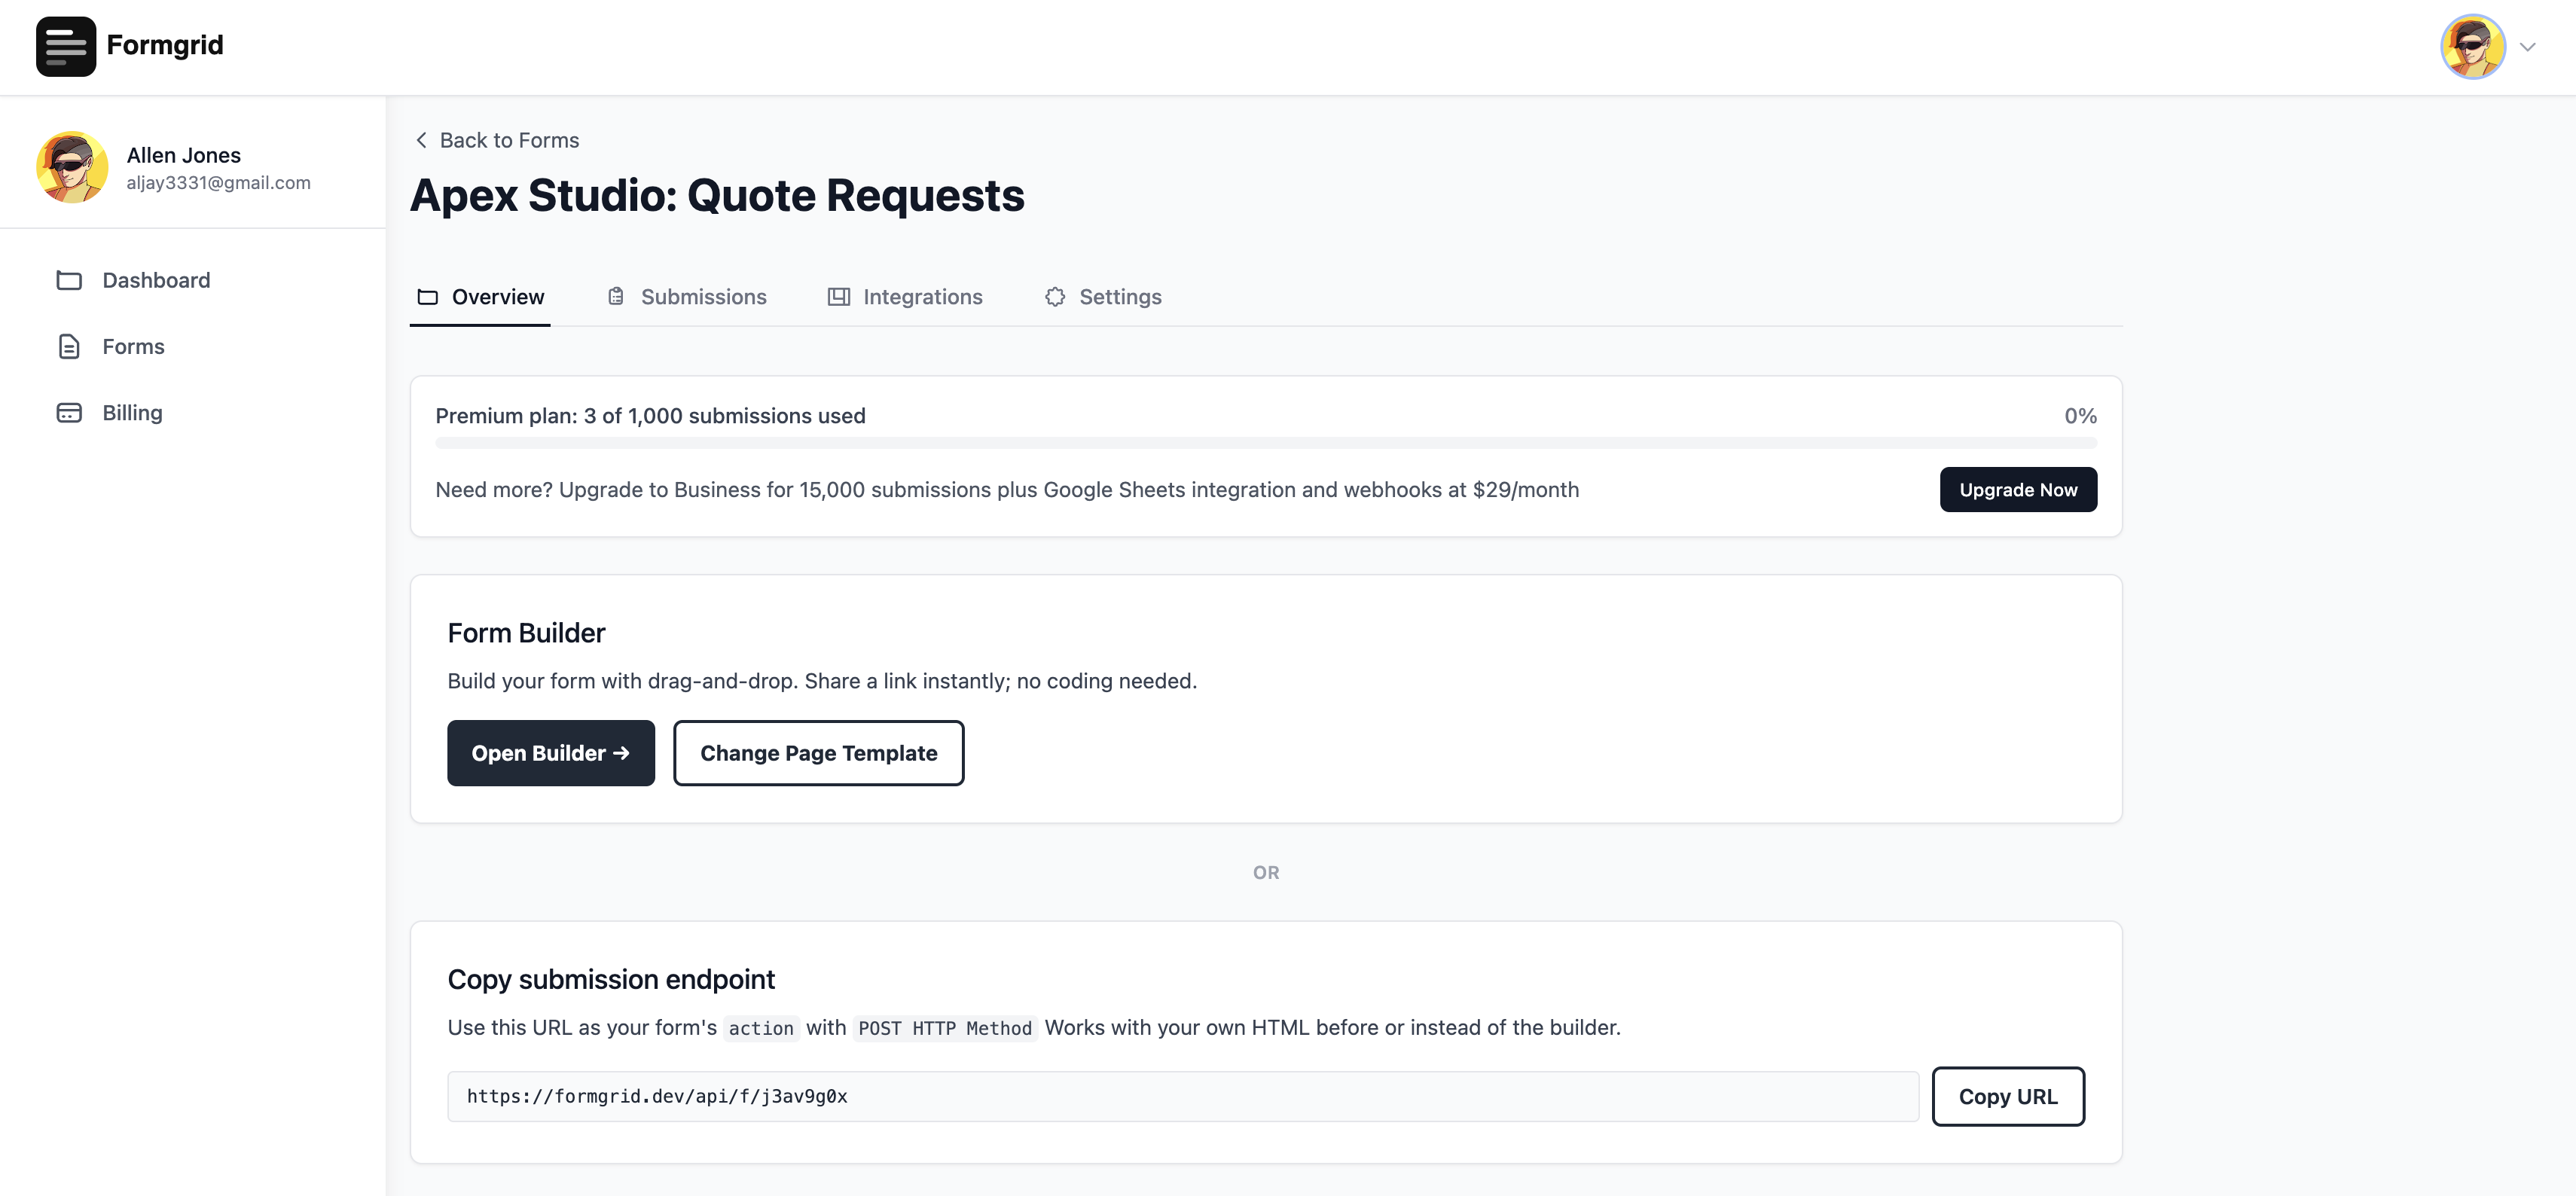
Step 3: Copy Your Endpoint URL
After creating your form, go to the Overview tab. You will see your unique endpoint URL. It will look like this: https://api.formgrid.dev/forms/your-form-id/submissions
Copy this URL. This is the address your form will submit data to.
Step 4: Update Your HTML Form
Find the action attribute in your ChatGPT-generated form:
<form action="/submit" method="POST">Replace it with your Formgrid endpoint URL:
<form action="https://api.formgrid.dev/forms/your-form-id/submissions" method="POST">That is the only change you need to make. One line. Everything else in your form stays exactly as ChatGPT generated it.
Step 5: Add a Honeypot Field
While you are in the form code, add this hidden field anywhere inside your form tag:
<input
  type="text"
  name="_honey"
  style="display:none"
  tabindex="-1"
  autocomplete="off"
/>
This is a honeypot field. Real users never see it or fill it in. Bots that automatically fill every field they find will fill it in, and Formgrid will reject that submission silently. It filters out the vast majority of spam with zero friction for real users.
Step 6: Test It
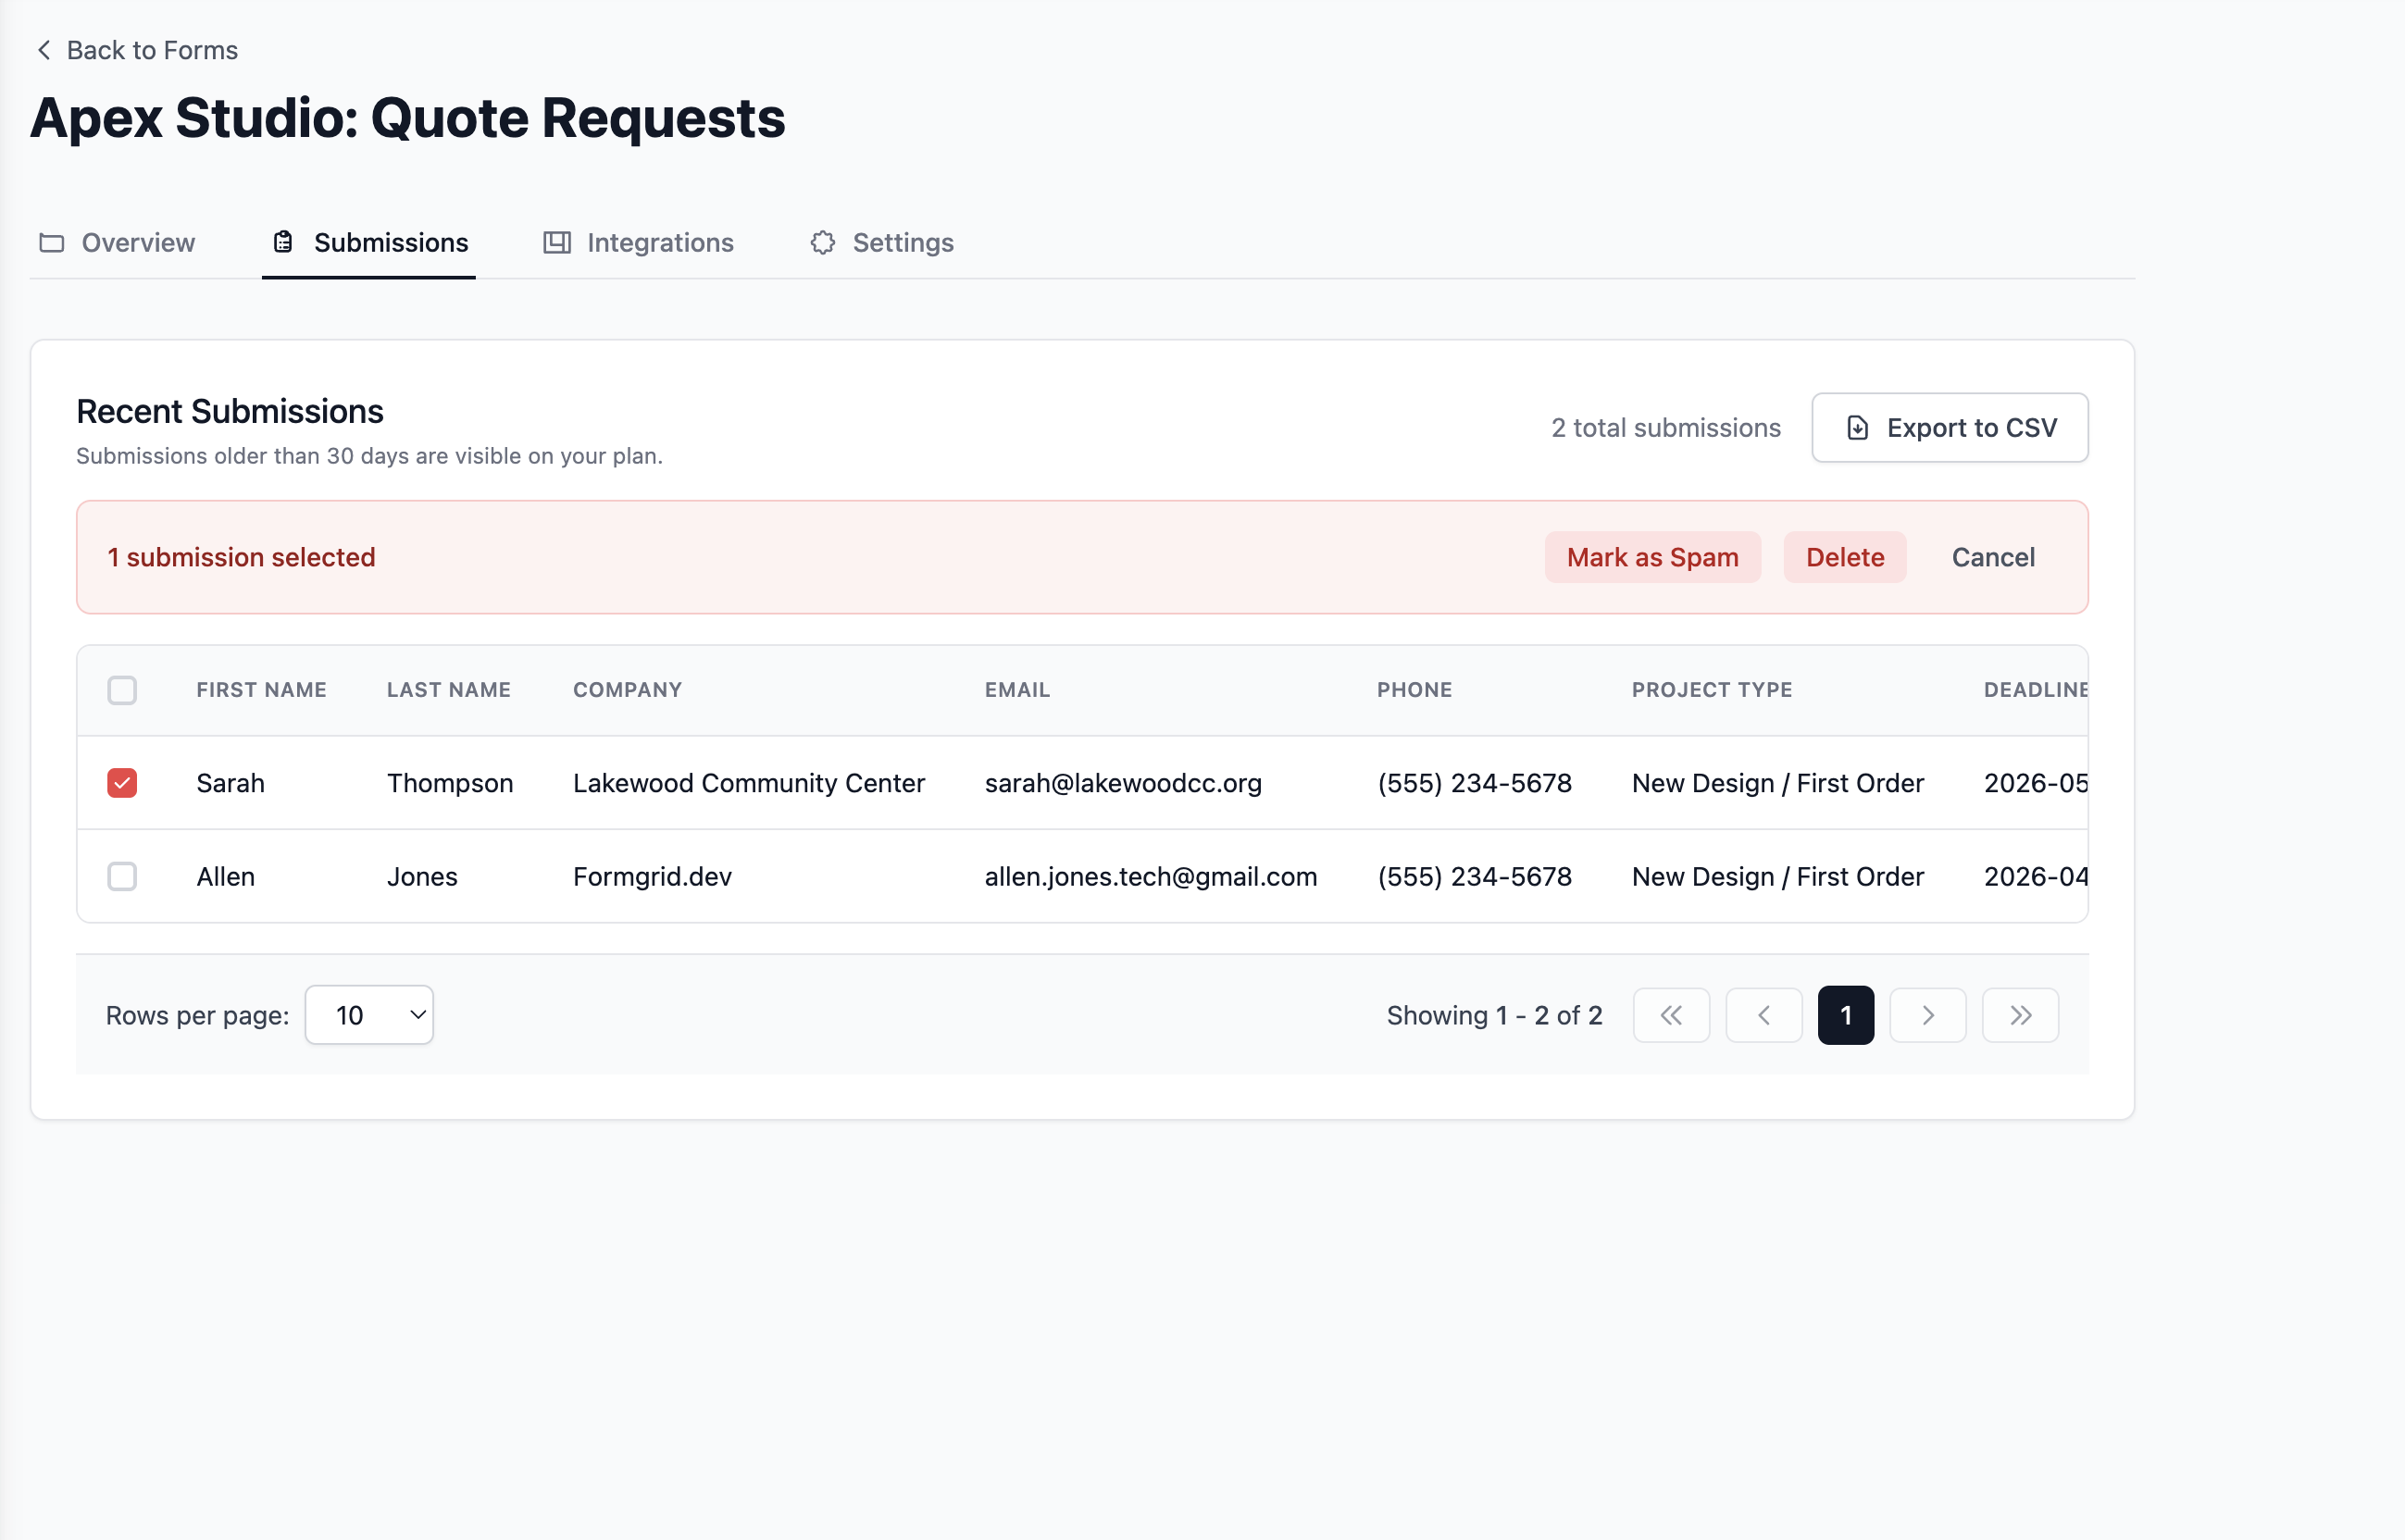
Open your form in a browser, fill it out with real test data, and click submit. Within seconds, you should receive an email notification at the address you signed up with.
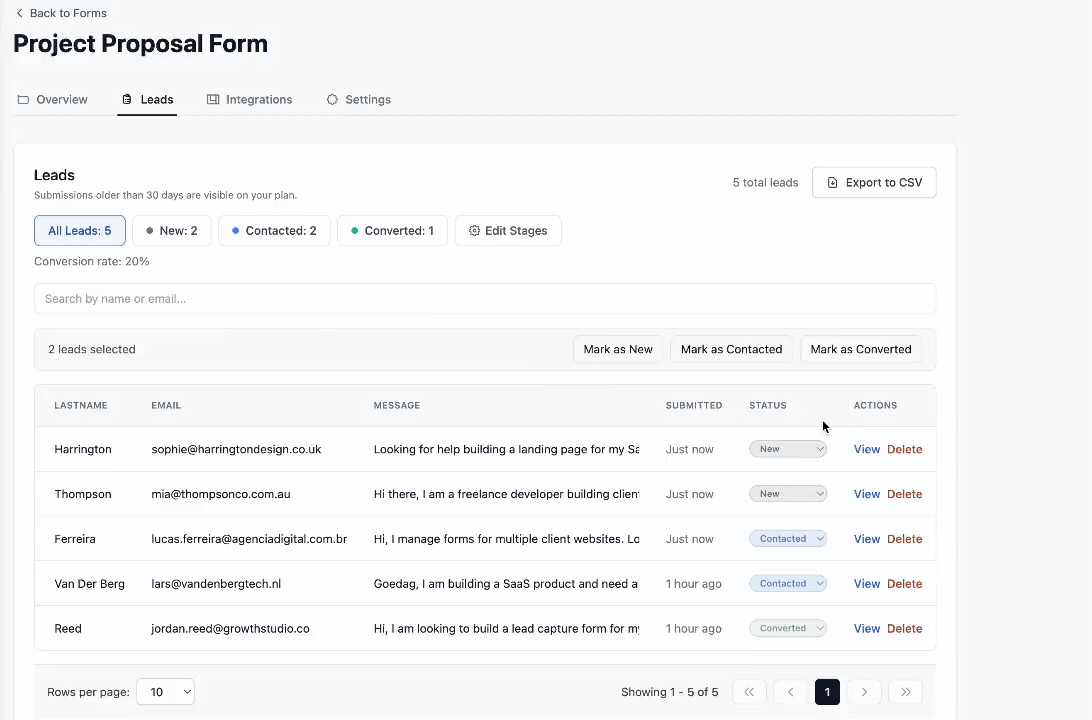
Open your Formgrid dashboard. You will see your test submission listed as a new lead with a status of New. That submission is now tracked. You can add notes to it, mark it as Contacted when you follow up, and mark it as Converted when it becomes a customer or sale.
Step 7: Connect Google Sheets
In your form settings, go to the Integrations tab and connect your Google account. Select or create a Google Sheet where you want submissions to land.
From this point on, every form submission appears as a new row in that sheet automatically. No Zapier. No extra tools. No additional monthly cost.
If you have a team or a business partner, they can view that sheet in real time without logging into anything new.
The Exact ChatGPT Prompt to Generate a Working Form
If you want to start from scratch, here is the prompt that generates a clean HTML form ready to connect to Formgrid: Build me a clean HTML contact form with these fields: name (text, required), email (email, required), message (textarea, required). Include a hidden honeypot field named "_honey" with style="display:none". Set the form method to POST. Leave the action attribute empty for now. Use clean semantic HTML with labels for every field. No CSS needed.
ChatGPT will generate something like this:
<form action="" method="POST">

  <label for="name">Your Name</label>
  <input
    type="text"
    id="name"
    name="name"
    required
  />

  <label for="email">Email Address</label>
  <input
    type="email"
    id="email"
    name="email"
    required
  />

  <label for="message">Your Message</label>
  <textarea
    id="message"
    name="message"
    rows="5"
    required
  ></textarea>

  <!-- Honeypot spam protection -->
  <input
    type="text"
    name="_honey"
    style="display:none"
    tabindex="-1"
    autocomplete="off"
  />

  <button type="submit">Send Message</button>

</form>
Replace the empty action attribute with your Formgrid endpoint URL and the form is fully functional.
A Real Example: The T-Shirt Business
One of the businesses using Formgrid today is a custom T-shirt printing shop. The owner needed a quote request form where clients could describe their order and upload their design files.
He used ChatGPT to generate the HTML form. It produced clean code with all the right fields in about a minute. He connected it to Formgrid, enabled file uploads on the Premium plan, and pointed out the Google Sheets integration at a shared spreadsheet that his team uses.
Now every quote request arrives in his inbox with the design file attached. The request appears in the shared sheet immediately, so his team can see it without checking email. He marks each request as Contacted when he follows up and Converted when the order is confirmed.
He went from managing everything through email to having a proper lead tracking system. No developer was involved. Total setup time was under 10 minutes. Total monthly cost is $12.
What Happens After Submission
This is the part most tutorials skip. Getting the form to submit is only half the problem. What happens to that data after it lands in your inbox matters just as much.
With a basic form backend, you get an email, and that is it. The email gets buried. You forgot to follow up. A potential customer moves on.
Formgrid approaches this differently. Every submission becomes a tracked lead with three states:
New means the submission just arrived and has not been actioned yet.
Contacted means you have reached out to this person.
Converted means they became a customer, a sale, or whatever outcome you are tracking.
You can also add notes to any lead after a conversation, set a follow-up date, and get an email reminder on that date with their details and your notes attached. Warm leads never go cold because you forgot to follow up.
When to Use a Form Backend vs Building Your Own
Use a form backend like Formgrid if you need a contact form, a quote request form, a registration form, or any simple lead capture on a static site or landing page. You want email notifications, spam protection, and a way to track submissions without maintaining a server.
Build your own backend if you need complex custom logic tied to your specific database, authentication that is deeply integrated with your own system, or you are building a full SaaS product where form handling is just one small piece of a larger application.
For 90% of landing pages, portfolios, and small businesses sites, and indie projects, a form backend handles everything you need without the overhead of a full server.
Final Thoughts
AI tools have made it easier than ever to build the front end of almost anything. A landing page, a portfolio, a business site, a quote request form. What they cannot do is give you the infrastructure behind it.
A form backend fills exactly that gap. You keep the HTML your AI-generated. You add one URL to the action attribute. Everything else is handled automatically.
If you want to get your ChatGPT-generated form working in the next five minutes, start free at formgrid.dev](https://formgrid.dev). No credit card required. No backend to build or maintain. Just a form that works and a lead tracking system built in from day one.
Comments
Leave a comment