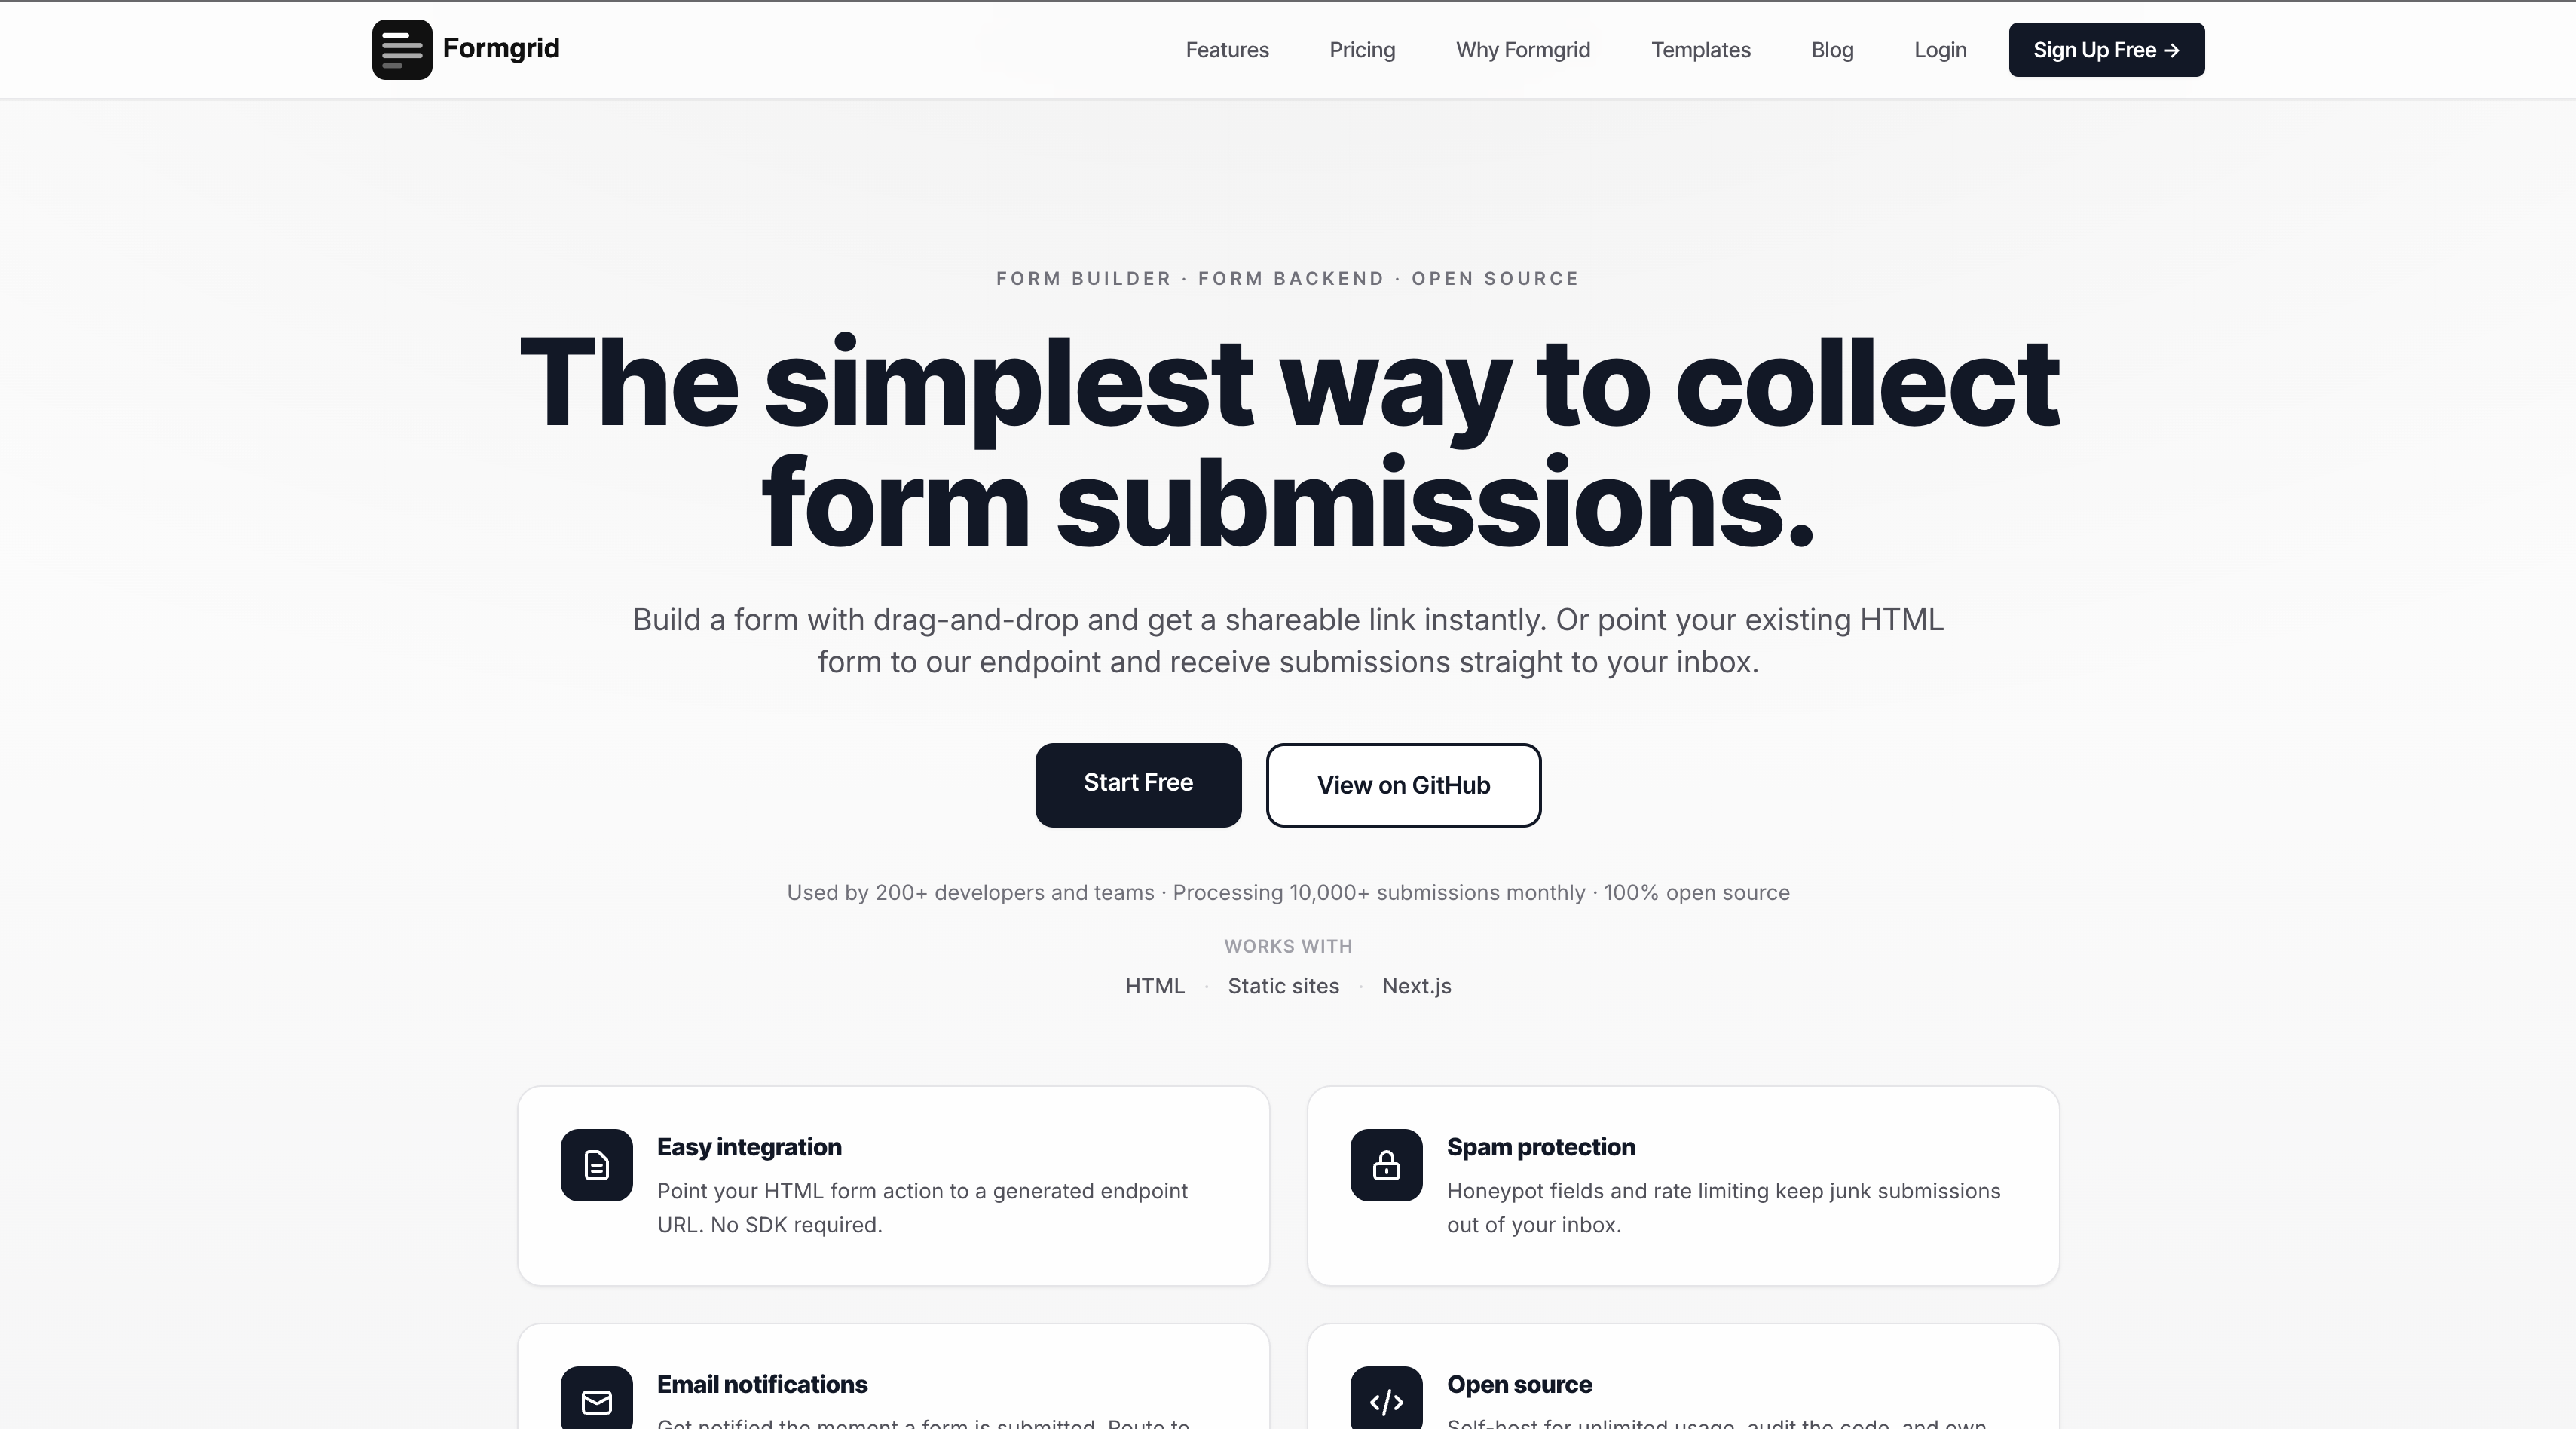
You have an event coming up, and you need a registration page.
Not a Google Form. Not an Eventbrite listing that takes a cut of every ticket. A real, beautiful, branded registration page that looks like your event deserves to be attended.
This guide shows you how to deploy a world-class event registration page using a free HTML template and Formgrid as the form backend. No coding experience required. No monthly fees to get started. No backend to build.
You will be live in under 20 minutes.
What You Will End Up With
By the end of this guide, you will have:
- A complete event registration landing page deployed live on the internet
- A working form that collects attendee details and sends them directly to your inbox
- A submissions dashboard where you can view and export all your registrations as CSV
- A professional page you are proud to share in WhatsApp groups, emails, and social media
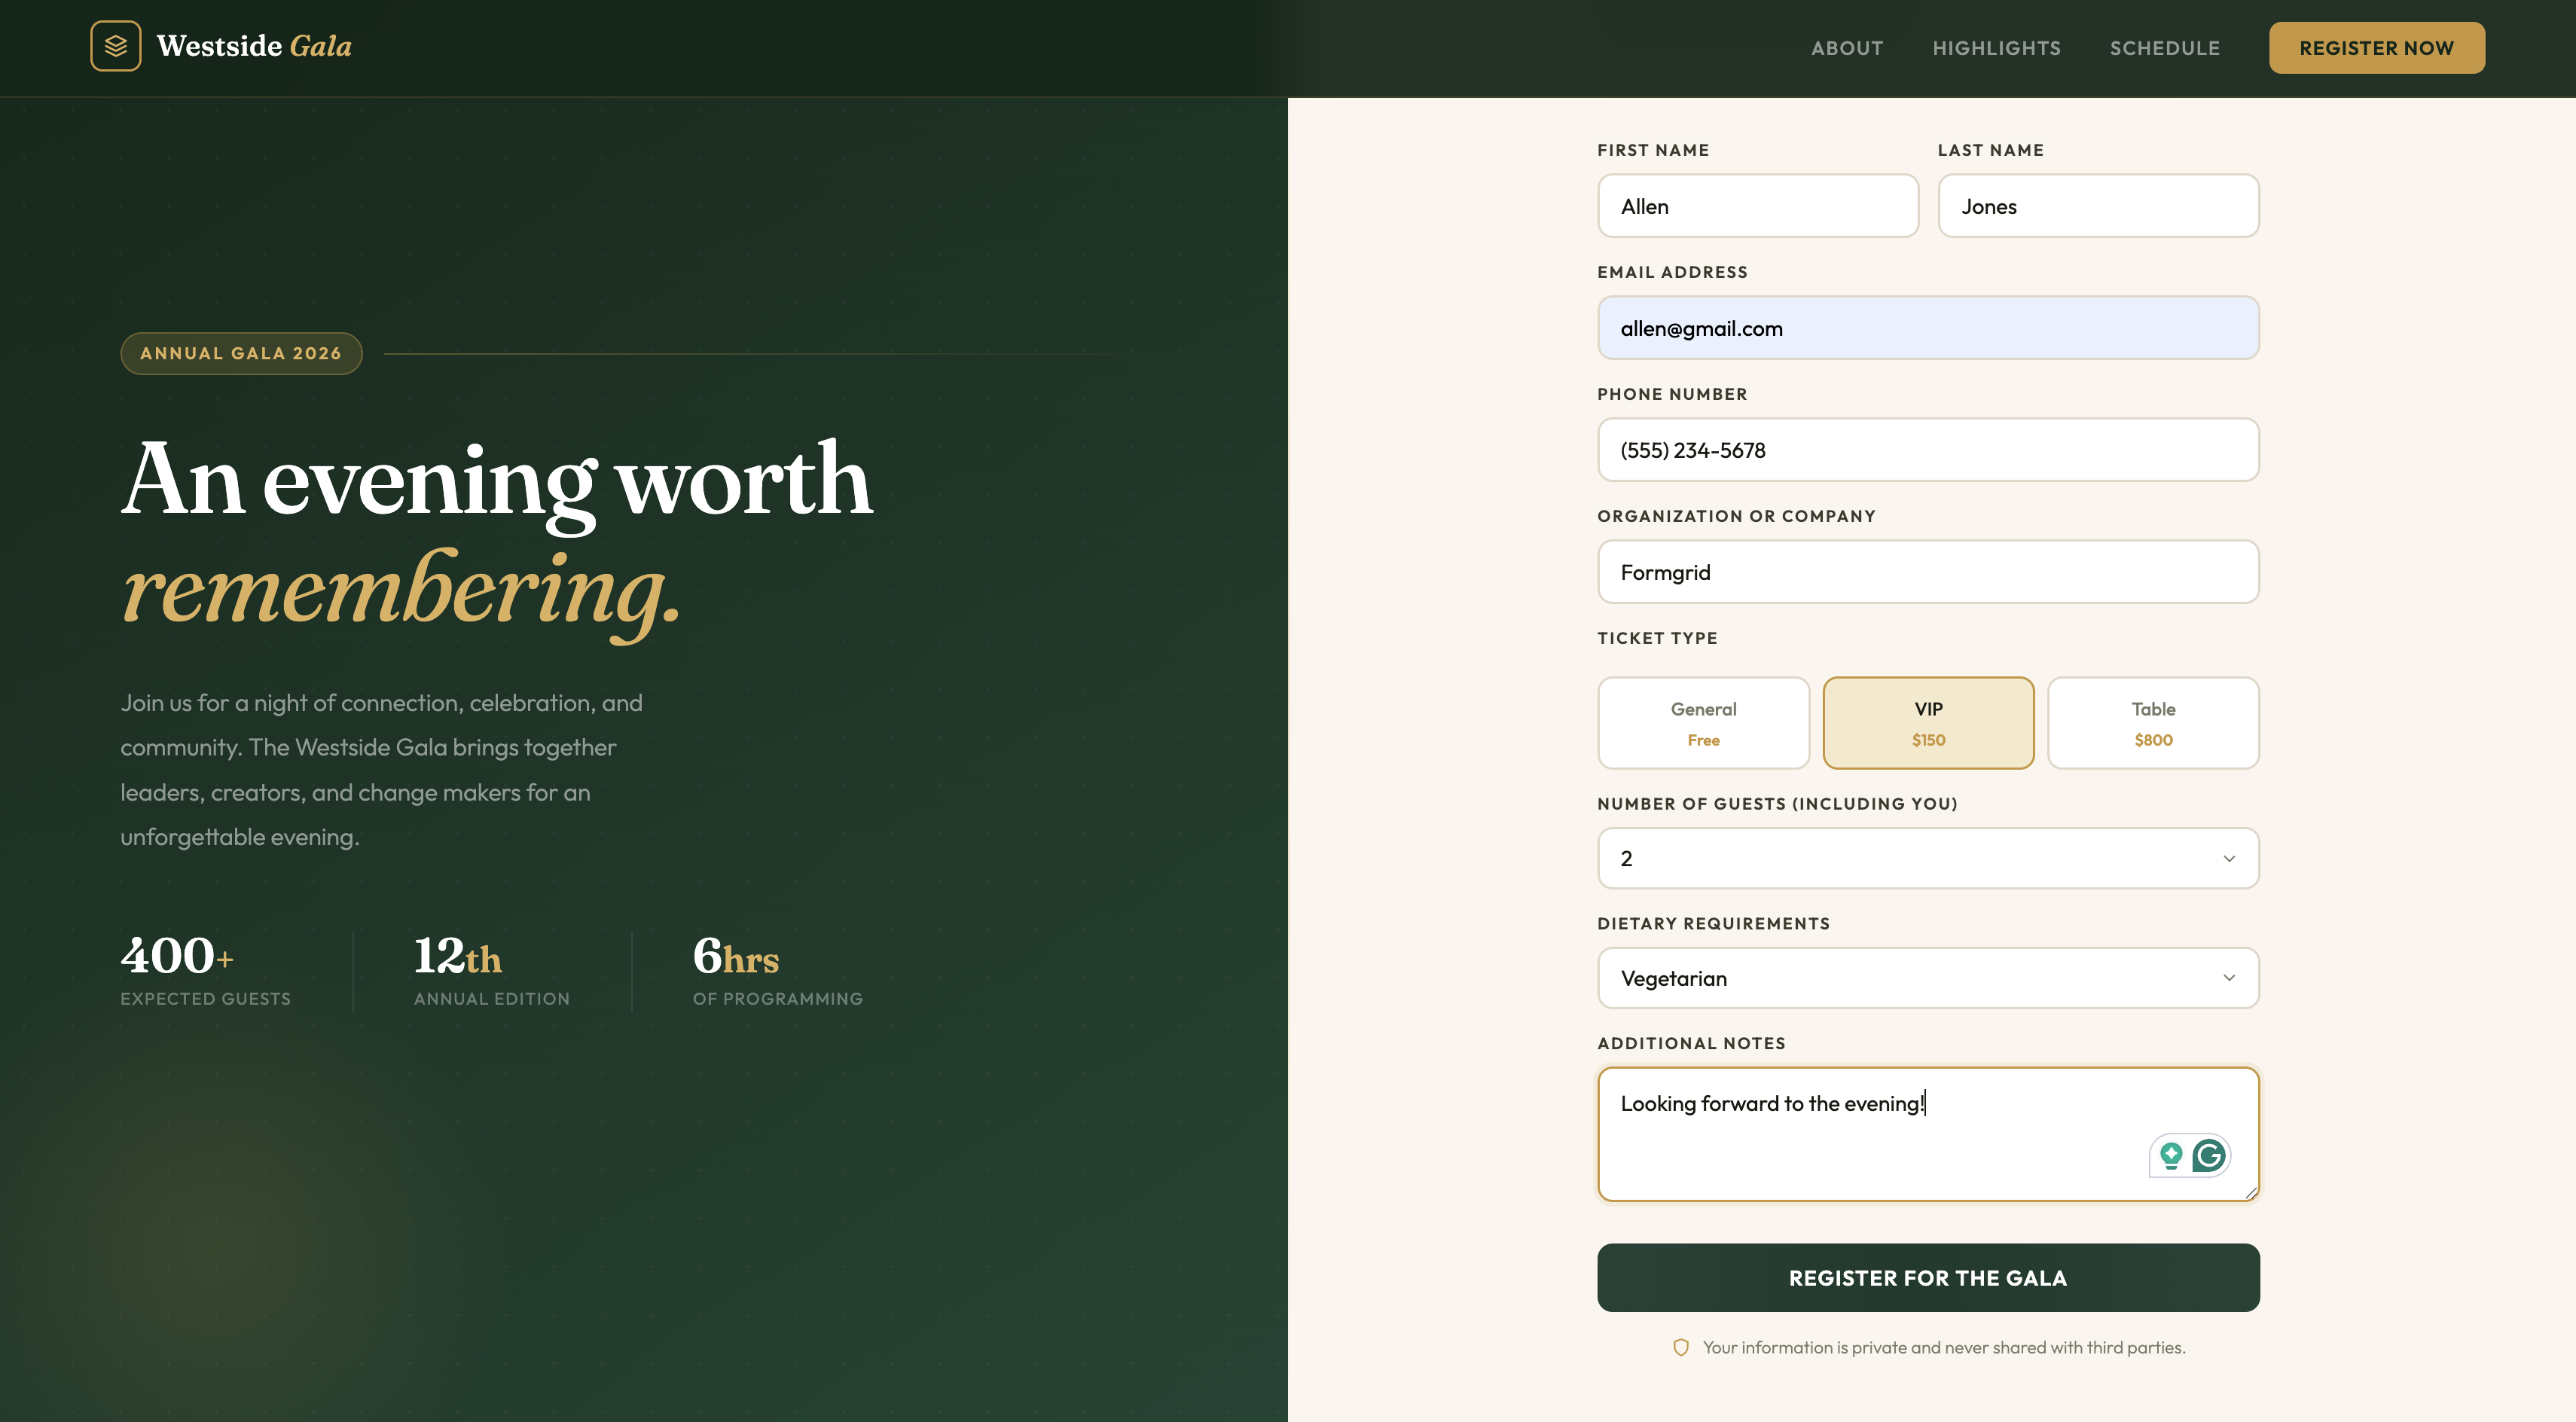
Here is what the finished page looks like:
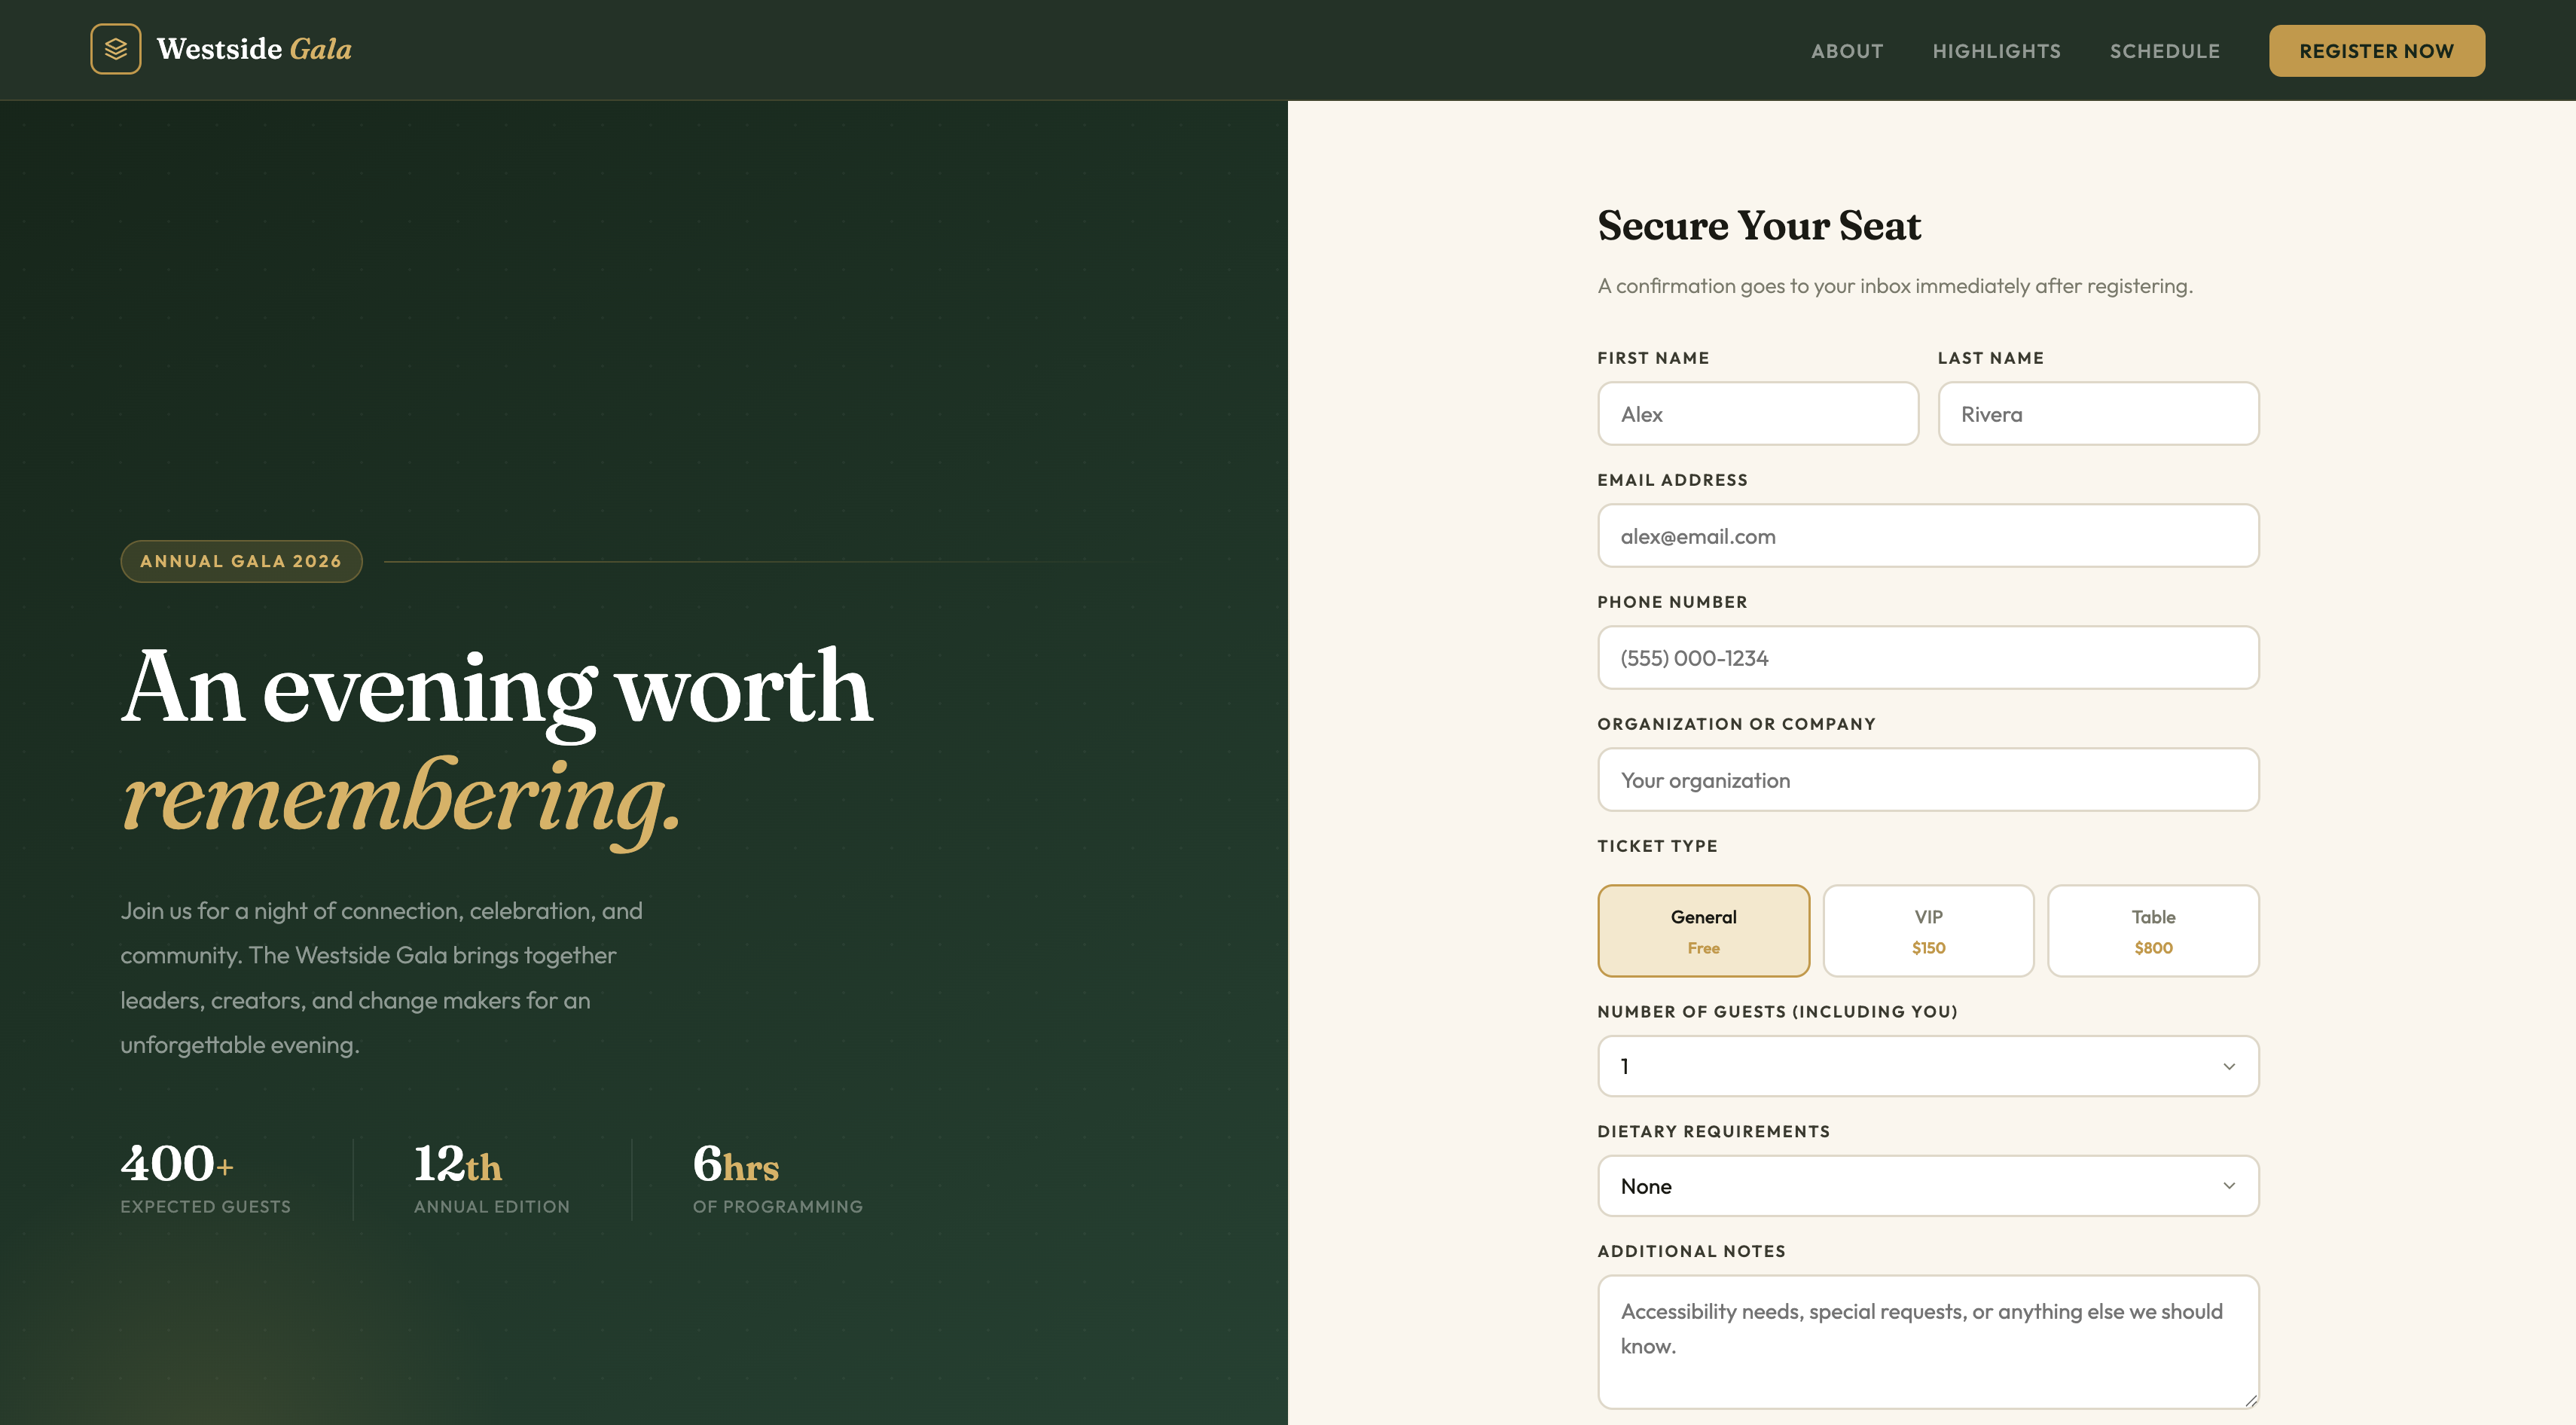
The template includes a hero section with your event name and stats, an animated ticker bar, a photo strip, an about section, event highlights, a full schedule timeline, and guest reviews, a how it works section, a CTA band, and a complete footer. All in one self-contained HTML file.
What You Need Before You Start
- A free Formgrid account at formgrid.dev
- A free Netlify account at netlify.com
- A text editor (VS Code, Sublime Text, or even Notepad works fine)
- About 20 minutes
That is it. No Node.js. No build tools. No command line required.
Step 1: Get the Template From GitHub
Go to the Formgrid examples repository:
👉 github.com/allenarduino/formgrid-examples
You will see a collection of free HTML templates built for different industries. Find the Event Registration template.
You have two options to get the files:
Option A: Clone with Git
If you have Git installed, open your terminal and run:
git clone https://github.com/allenarduino/formgrid-examples.gitThen navigate to the event registration template folder.
Option B: Download as ZIP
Click the green Code button on the GitHub page and select Download ZIP. Extract the folder to your desktop.
Open the folder and you will find a single another folder called event-registration, in that folder you will find a file called file: index.html If you want to copy the code directly, you can visit this link: https://github.com/allenarduino/formgrid-examples/blob/main/industries/event-registration/index.html
Open it in your browser right now by double-clicking it. You will see the full, beautiful registration page working locally on your computer. The only thing missing is a real form endpoint, so submissions go somewhere.
That is what Formgrid provides.
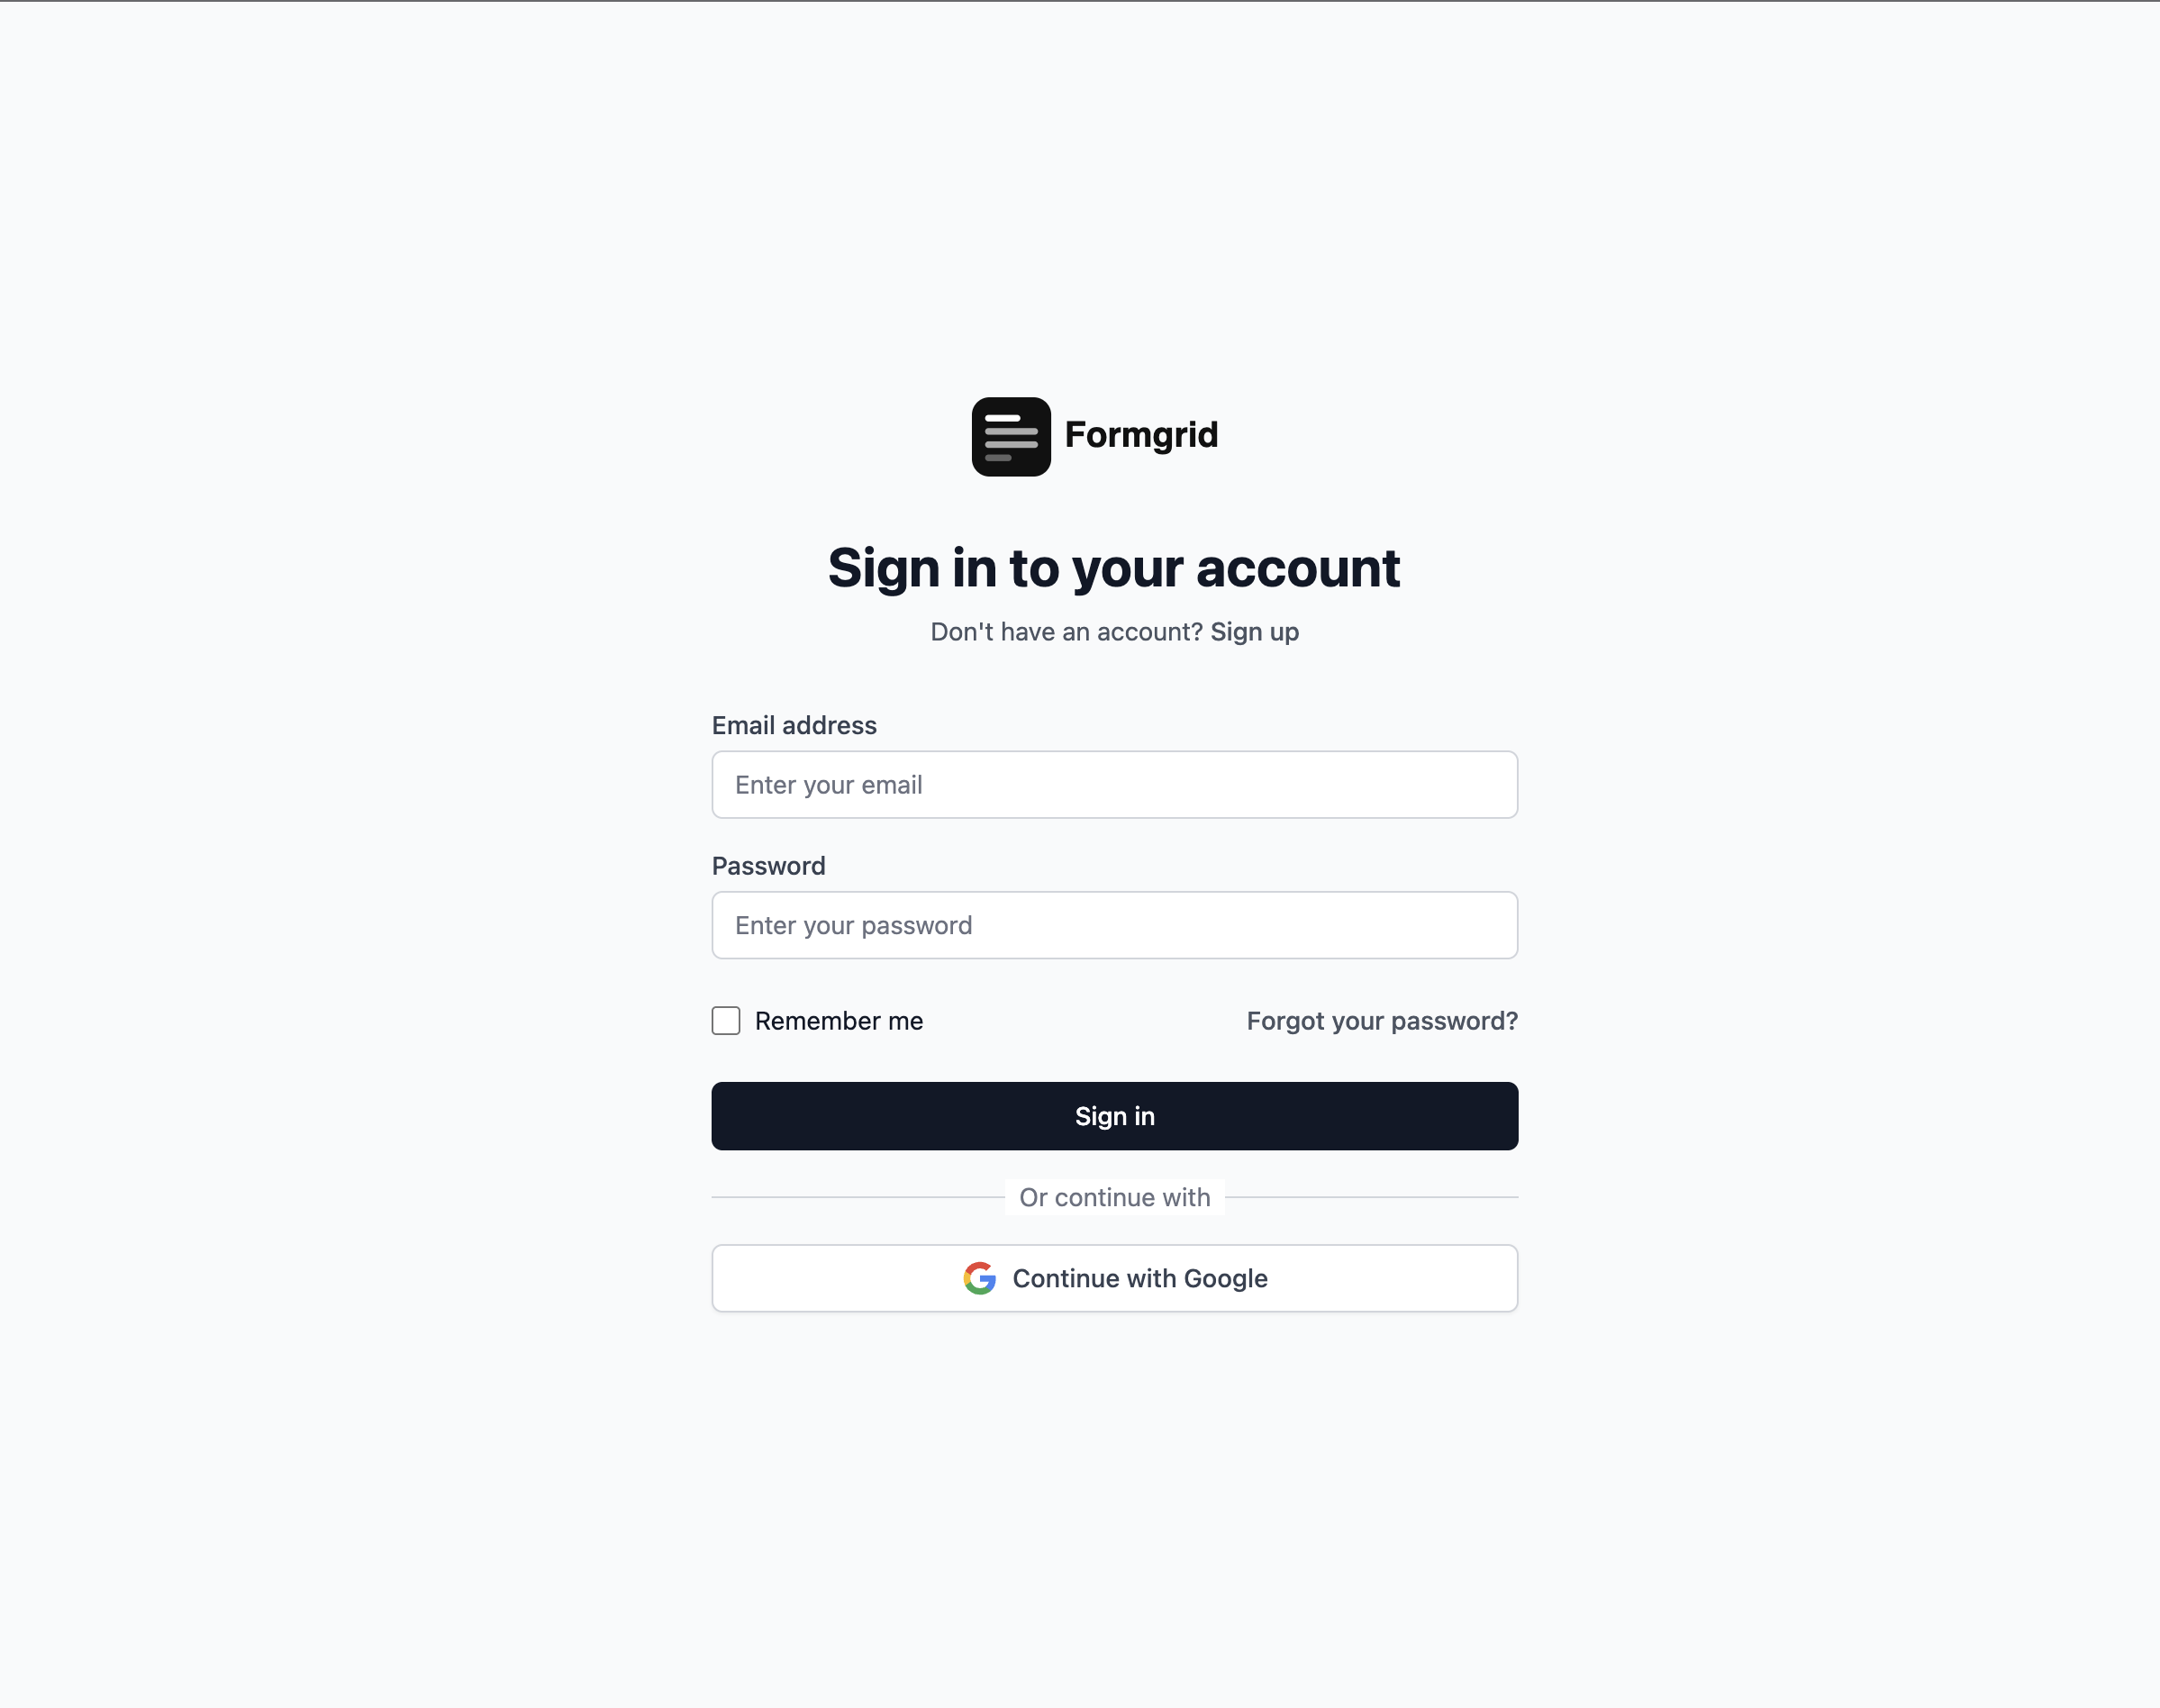
Step 2: Create Your Formgrid Account
Go to formgrid.dev and sign up with Google or your email address.
No credit card required. The free plan gives you 25 submissions per month, which is enough to test the whole setup and run a small event.
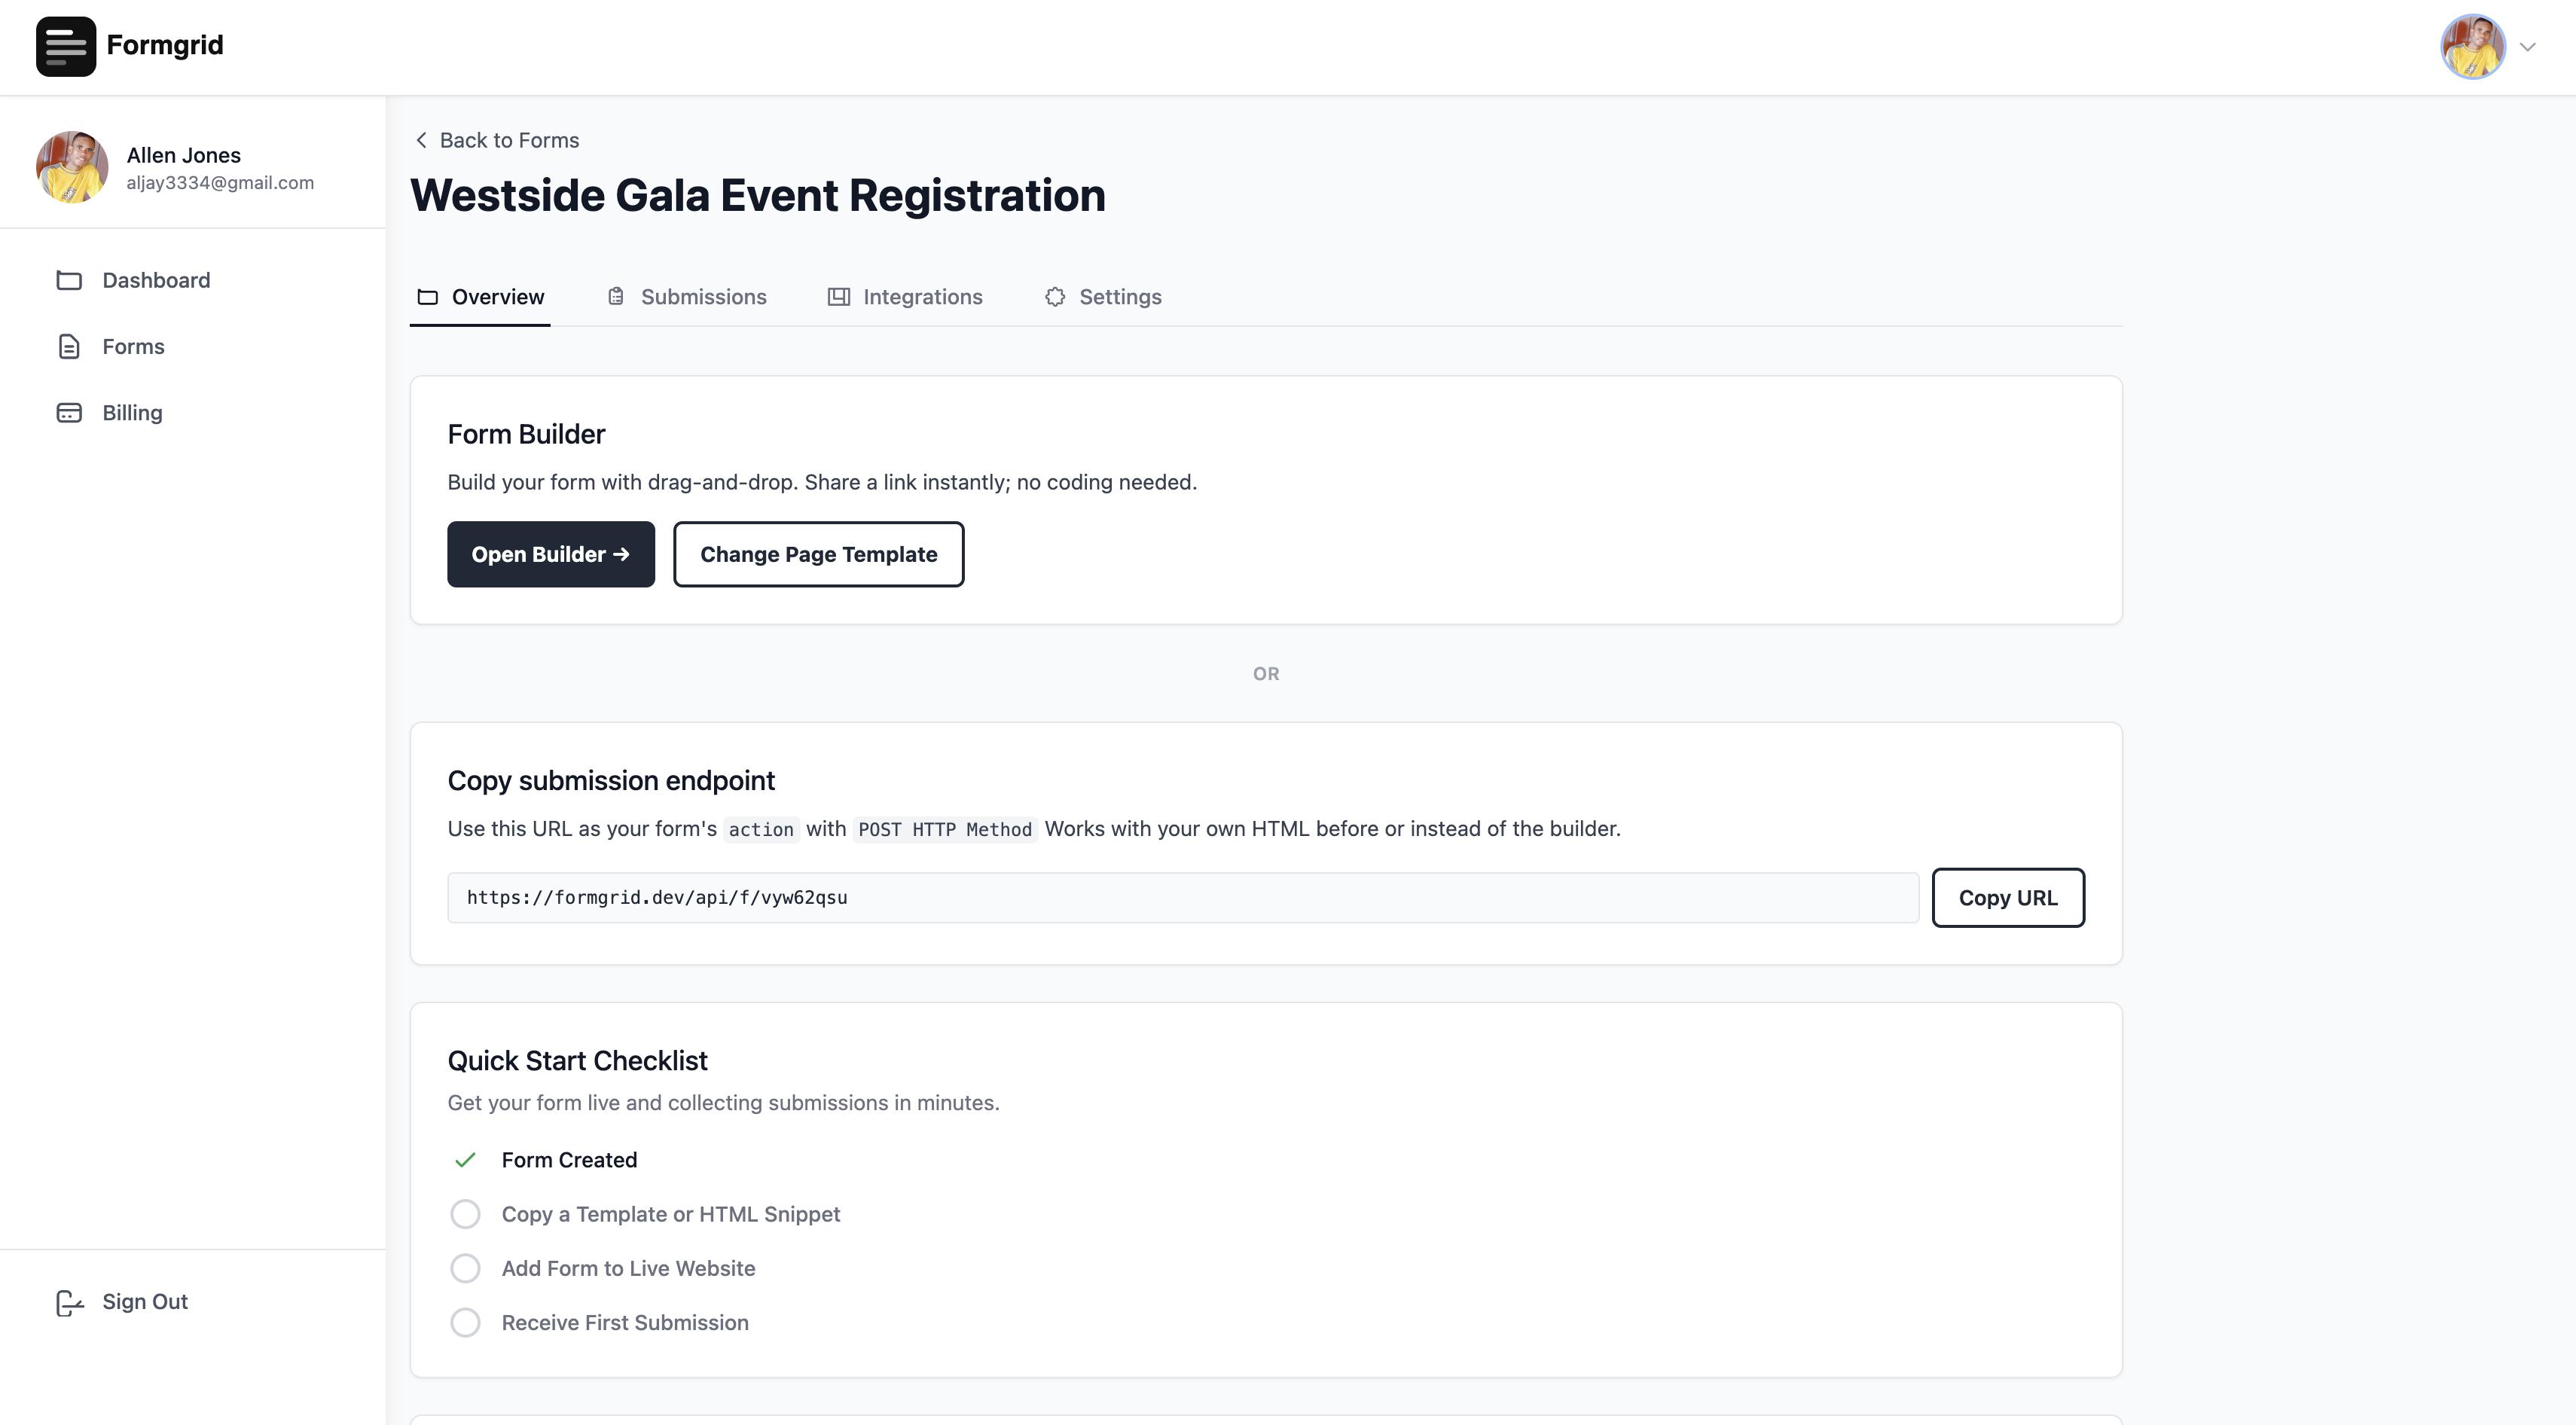
Once you sign up, you land on the Formgrid dashboard.
Step 3: Create a New Form
From the dashboard click New Form.
Give your form a name that matches your event. Something like:
- Westside Community Gala 2026
- Annual Members Meetup: Summer Edition
- Blue Ridge Photography Workshop 2026
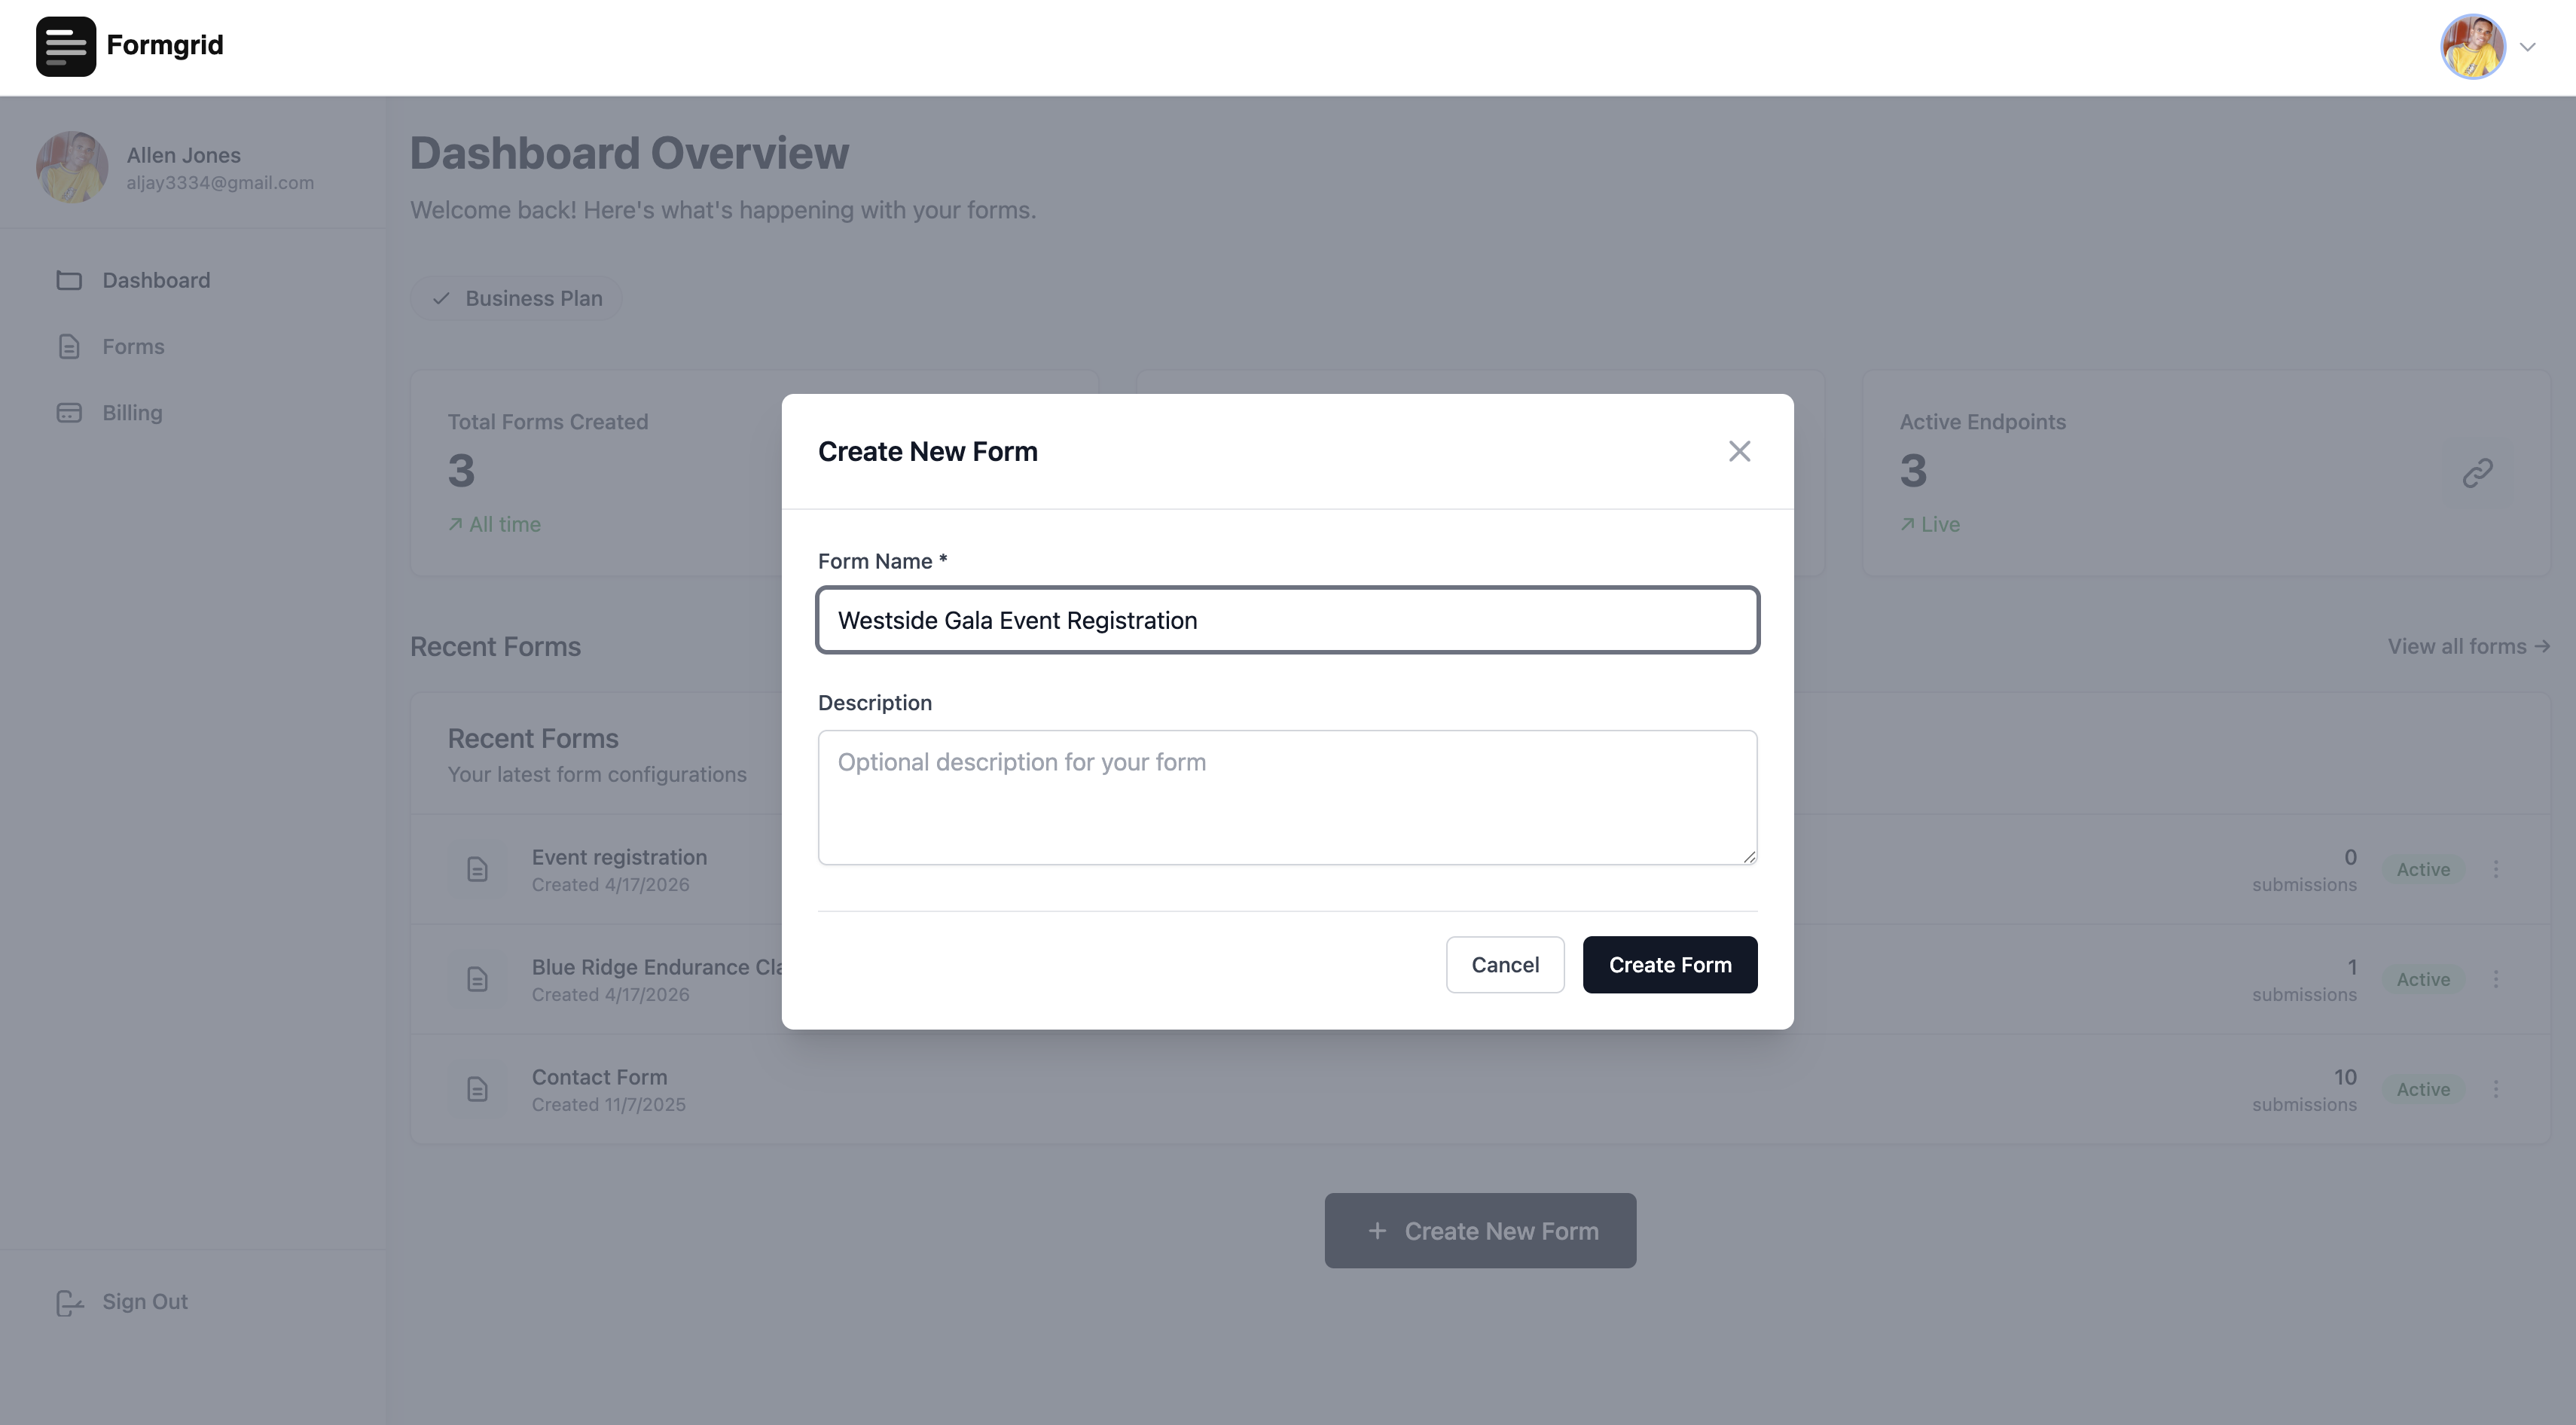
Click Create Form. You will be taken to the form details page.
Step 4: Copy Your Endpoint URL
On the form details page you will see a section called Endpoint Information.
Your endpoint URL looks like this:
https://formgrid.dev/api/f/your-form-idClick Copy next to the endpoint URL.
This URL is your form backend. When someone fills in the registration form on your page and hits submit, their details are sent to this URL. Formgrid receives the submission, stores it in your dashboard, and sends you an instant email notification.
Keep this URL copied. You need it in the next step.
Step 5: Add Your Endpoint URL to the Template
Open event-registration-template.html in your text editor.
Use the Find function (Ctrl+F or Cmd+F) and search for: YOUR_FORMGRID_ENDPOINT_URL
You will find it in the JavaScript section near the bottom of the file inside the form submit handler:
const res = await fetch('YOUR_FORMGRID_ENDPOINT_URL', {
  method: 'POST',
  body: new FormData(form)
});
Replace YOUR_FORMGRID_ENDPOINT_URL with your actual Formgrid endpoint URL. It should look like this after the change:
const res = await fetch(
  'https://formgrid.dev/api/f/your-form-id',
  {
    method: 'POST',
    body: new FormData(form)
  }
);
Save the file.
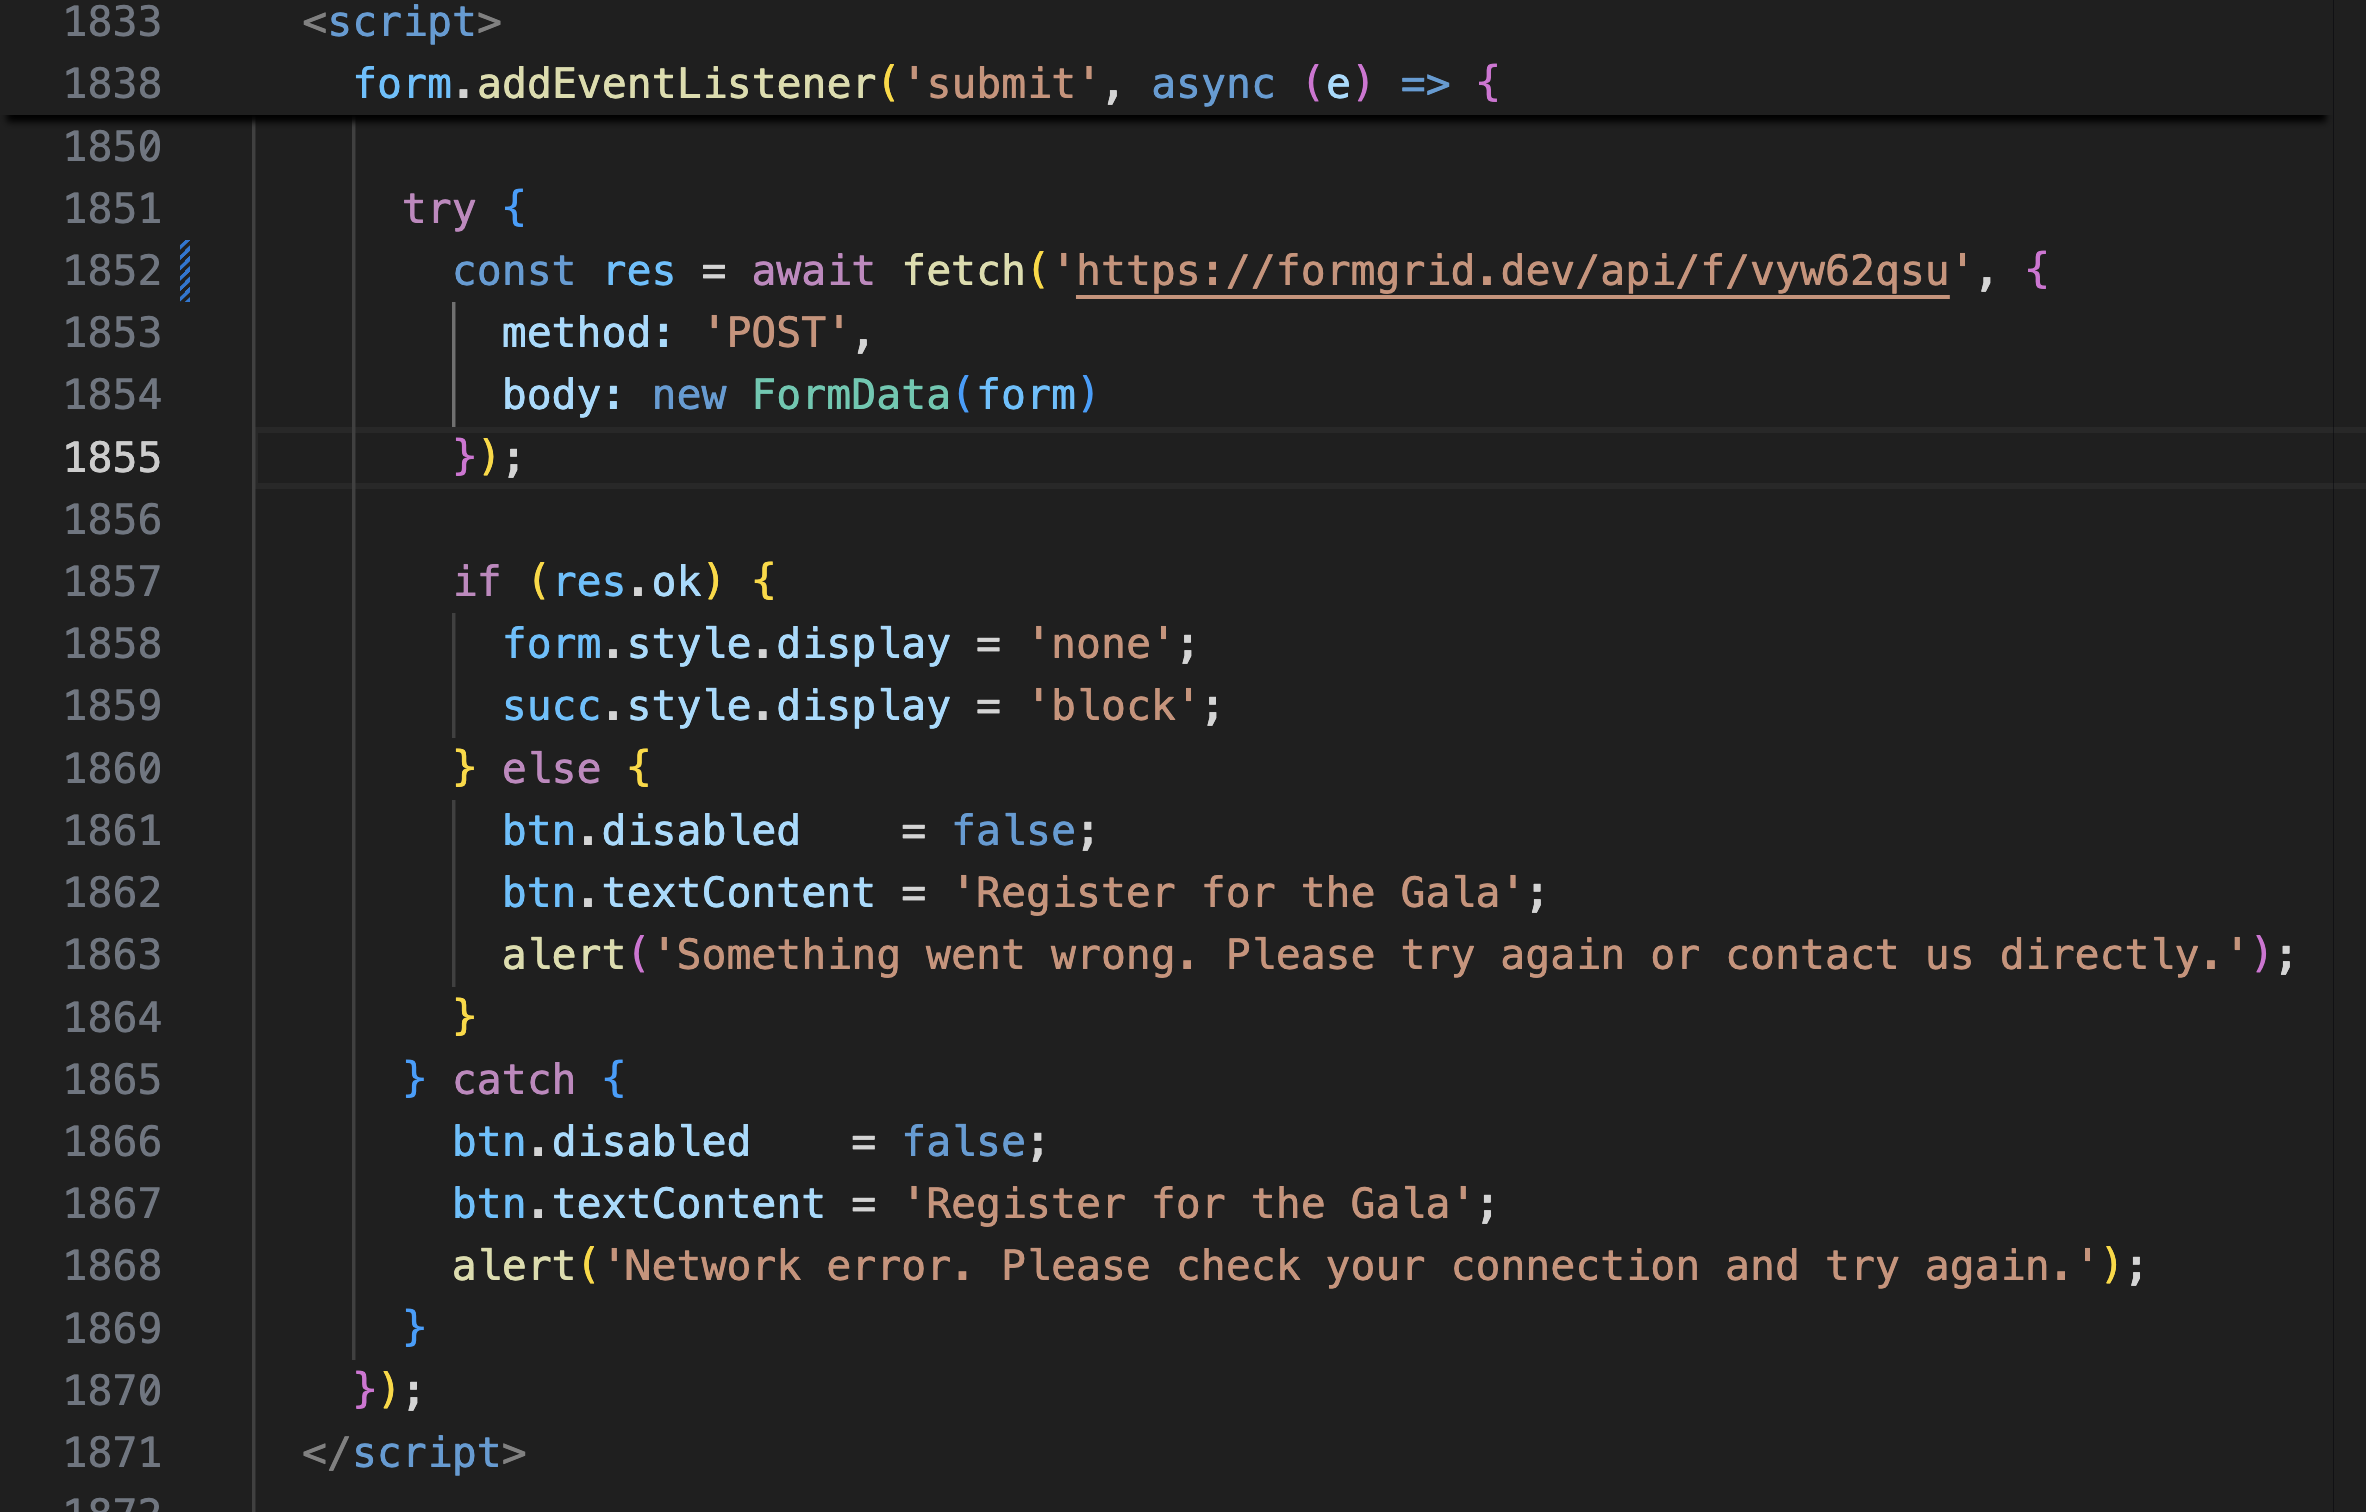
That one change connects your beautiful registration page to Formgrid. Every submission now goes directly to your inbox and your dashboard.
Step 6: Customize the Template for Your Event
Now open the file in your text editor and make the template your own. Everything is clearly labeled in the HTML comments.
Here are the key things to update:
The page title
Find this near the top of the file:
<title>Westside Gala 2026 — Register Now</title>Change it to your event name.
The hero headline
Find the hero section and update the h1:
<h1 class="anim-2">
  An evening worth<br />
  <em>remembering.</em>
</h1>
Change this to something that captures your event. For a photography workshop, it might be:
<h1 class="anim-2">
  Two days of learning<br />
  <em>and creating together.</em>
</h1>
The event description
Find the hero description paragraph and replace the placeholder text with a sentence about your actual event.
The event stats
Find the three stat boxes in the hero and update the numbers and labels to match your event:
<div class="stat-num">400<span>+</span></div>
<div class="stat-label">Expected Guests</div>
Change 400 to your expected attendance and update all three stats to reflect your event.
The ticker bar
Find the ticker section and update the items to match your event details:
<div class="ticker-item">
  <span class="ticker-dot"></span>
  Saturday June 14, 2026
</div>
Update the date, venue name, dress code, and other details.
The schedule timeline
Find the timeline section and replace the placeholder schedule with your actual event schedule. Each timeline item follows this pattern:
<div class="timeline-item">
  <div class="timeline-time">
    6:30 PM
    <span>Saturday</span>
  </div>
  <div class="timeline-content">
    <h4>Doors Open and Welcome Reception</h4>
    <p>Your description here.</p>
    <span class="timeline-tag">Your Tag</span>
  </div>
</div>
The footer contact details
Find the footer and update the email address and phone number:
<a href="mailto:hello@westsidegala.com">
  hello@westsidegala.com
</a>
The colors
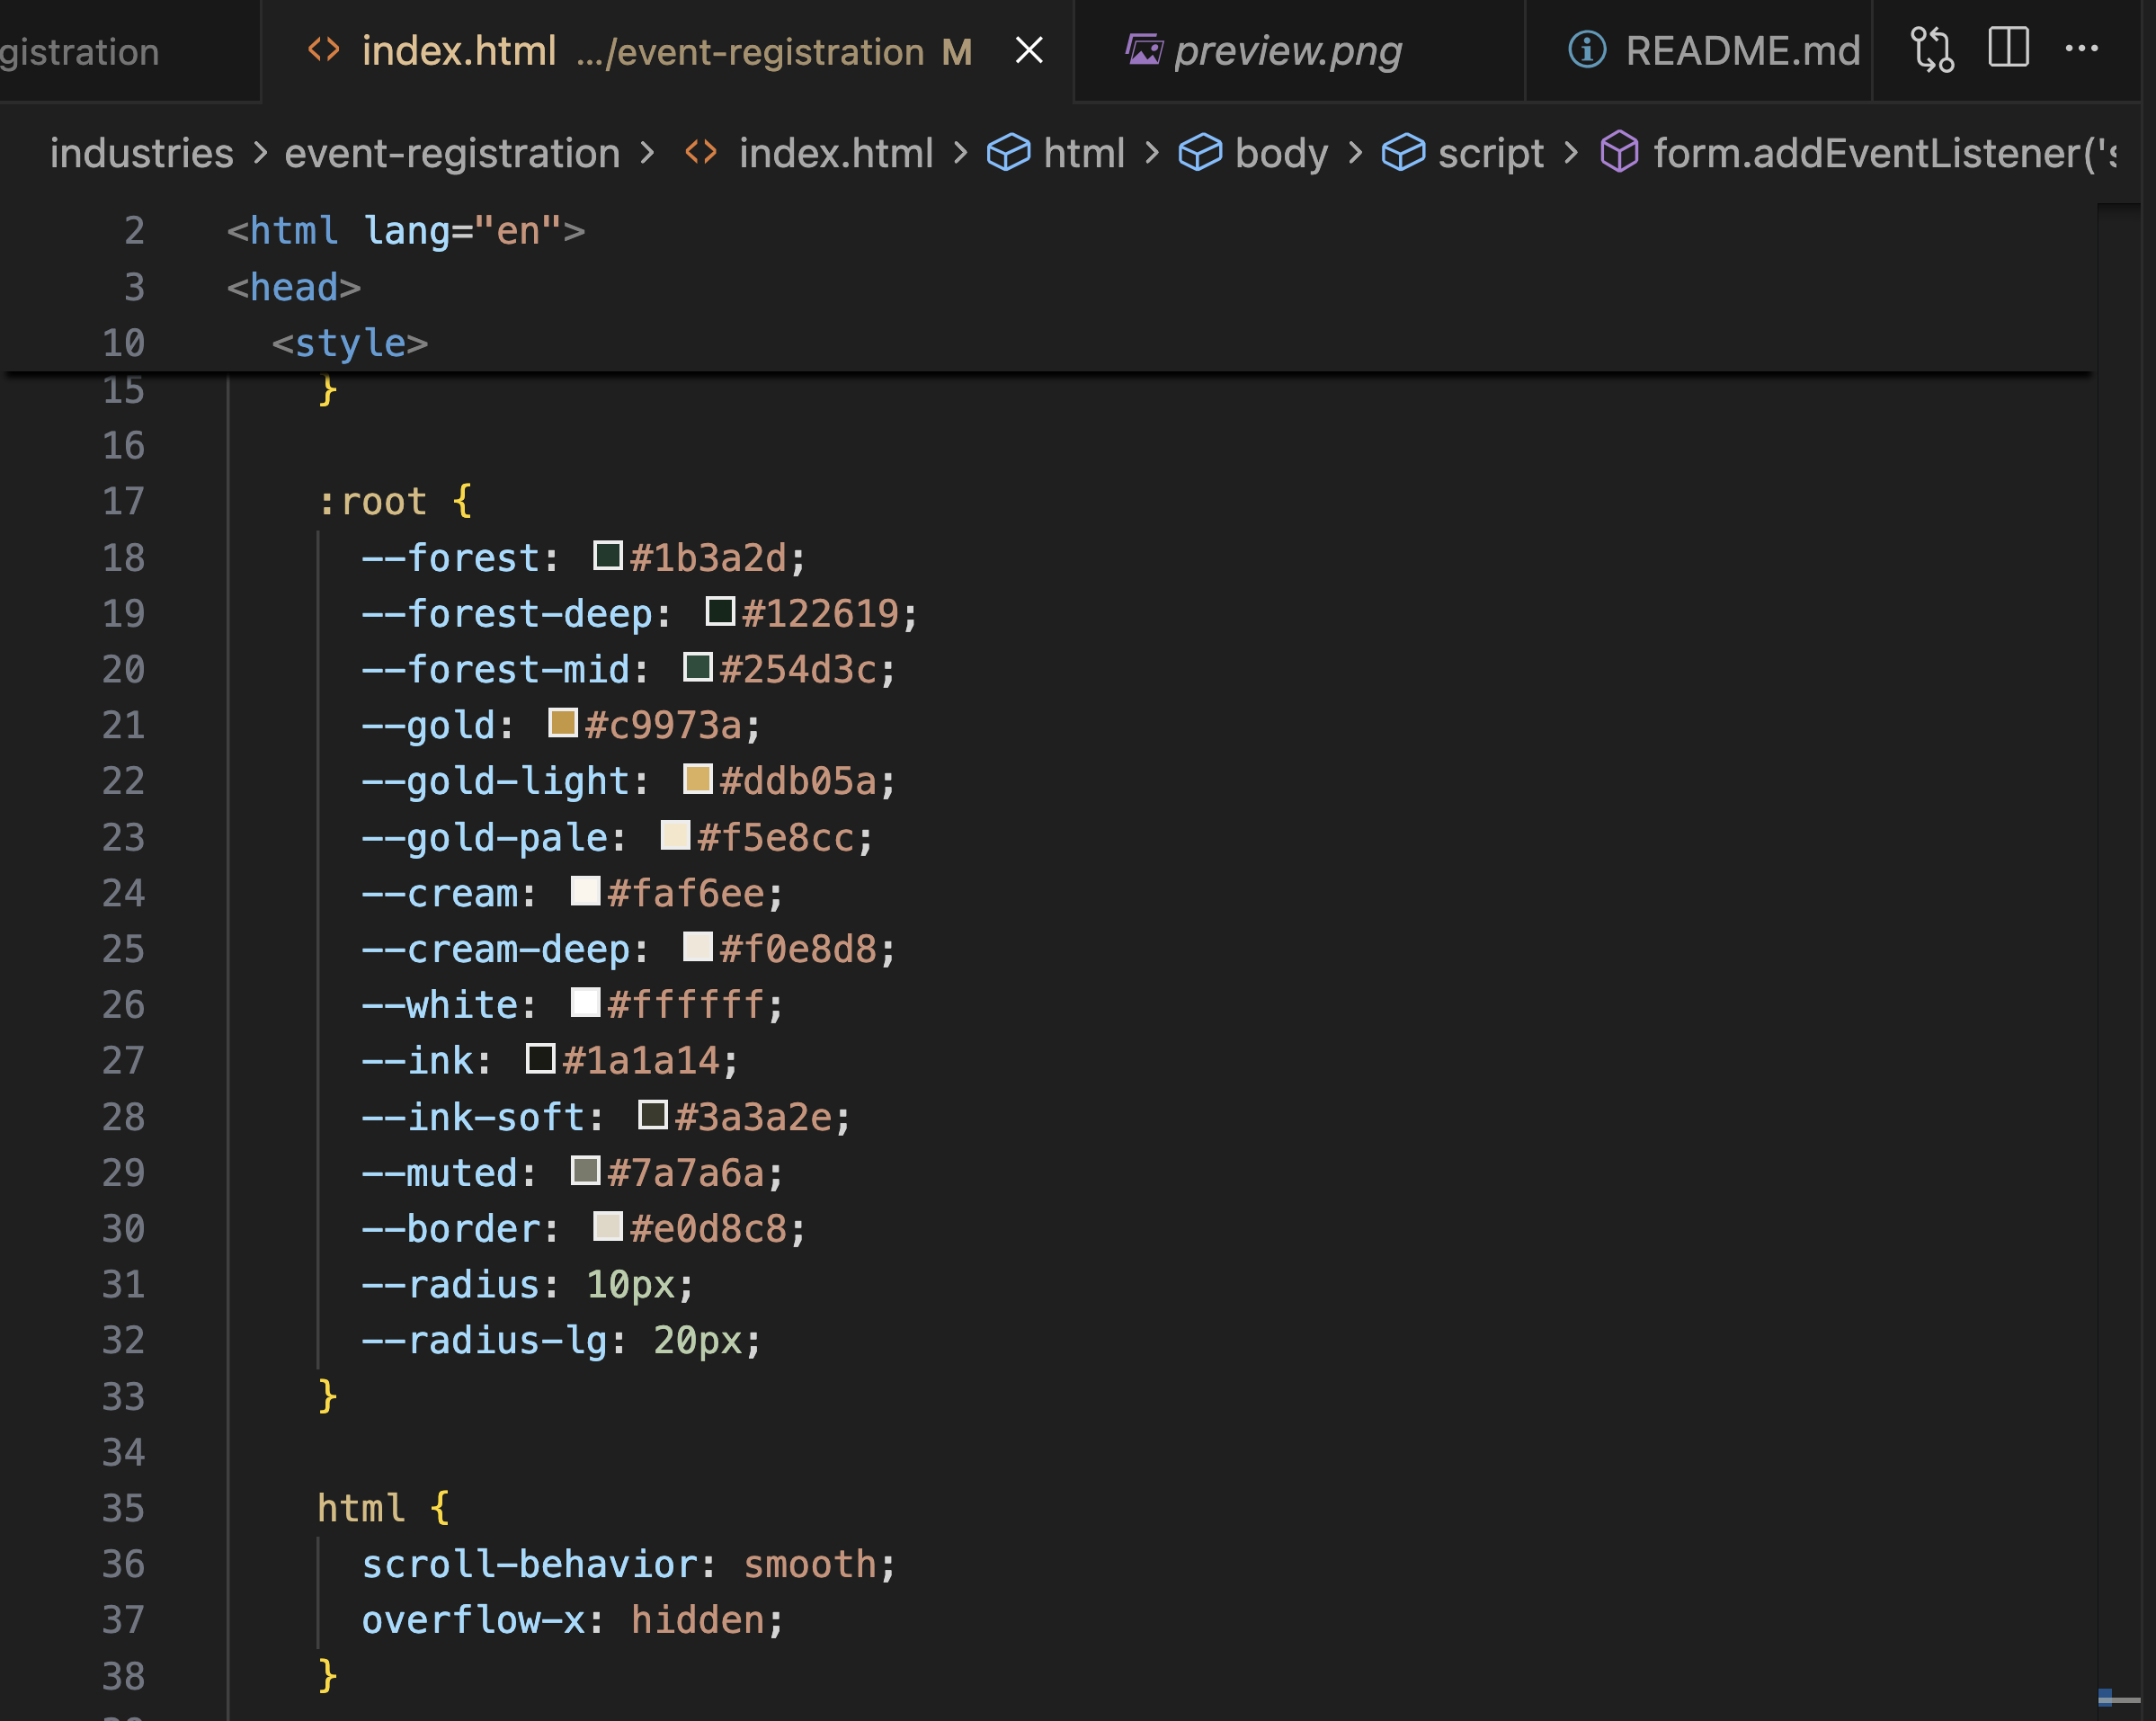
At the top of the file in the CSS variables section, you will find:
:root {
  --forest: #1b3a2d;
  --gold: #c9973a;
  --cream: #faf6ee;
}
Change these to match your event branding. The entire page updates automatically because every color reference in the file points back to these variables.
Step 7: Test Your Form Locally
Before you deploy, test that the form submission works.
Open the HTML file in your browser by double-clicking it. Fill in the form with your own details and hit submit.
Check two things:
Your Formgrid inbox
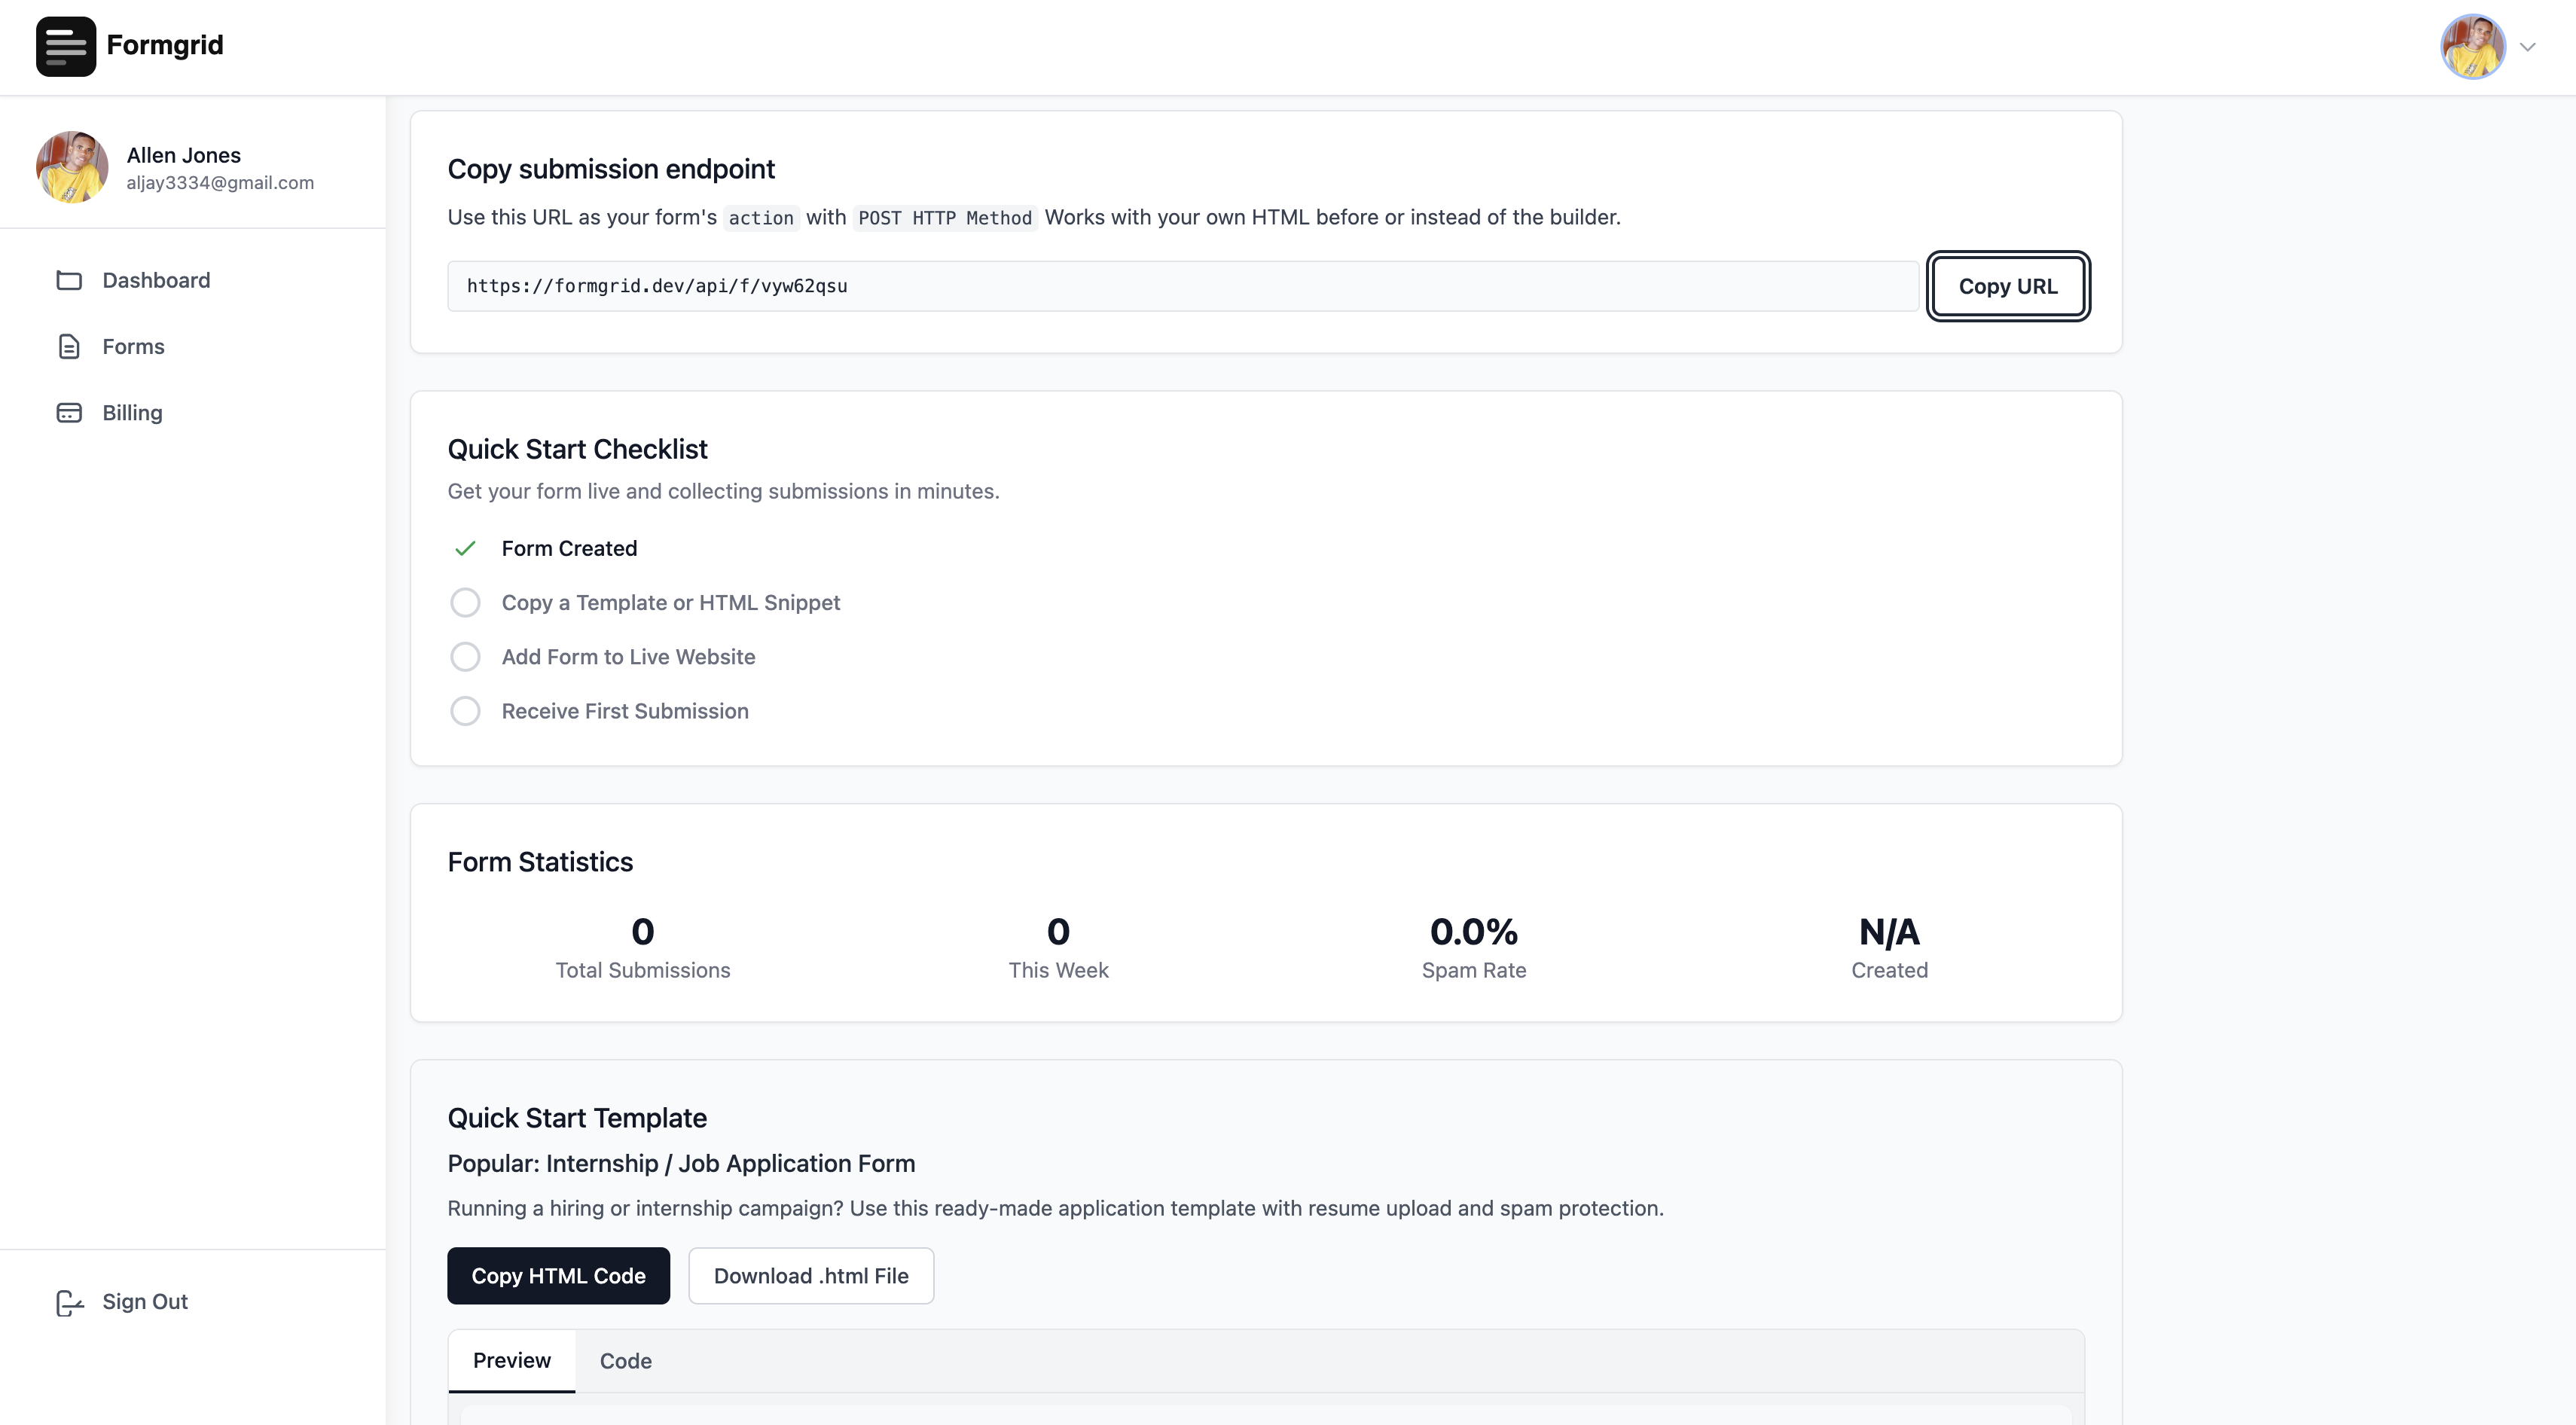
Go to your form details page on formgrid.dev and click the Submissions tab. You should see your test submission appear there.
Your email
Check the email address you signed up with. You should have received an instant notification with all the details you submitted.
 If both of those worked, your template is connected and ready to deploy.
Step 8: Deploy to Netlify
Netlify is the simplest way to get a static HTML file live on the internet for free.
Go to netlify.com and create a free account if you do not have one already.
Once you are logged in to the Netlify dashboard, you will see a large drag and drop area that says:
"Want to deploy a new site without connecting to Git? Drag and drop your site output folder here."
Take the folder containing your event-registration-template.html file and drag it directly onto that area.
Netlify uploads your file and gives you a live URL in about 30 seconds. It looks something like: https://random-name-abc123.netlify.app
Click the URL, and your event registration page is live on the internet.
Step 9: Give Your Site a Better URL
The random Netlify URL works but it is not the kind of link you want to share in a WhatsApp group with 200 riders.
Option A: Custom Netlify subdomain (free)
In your Netlify site settings go to Site Configuration then Change site name.
You can change it to something like: westside-gala-2026.netlify.app
That is a much cleaner link to share.
Option B: Your own domain (if you have one)
If you already own a domain you can point it to Netlify in the Domain Management section of your site settings. Netlify handles the SSL certificate automatically.
What Happens When Someone Registers
The moment an attendee submits the form on your live page two things happen.
You receive an instant email notification: New Registration: Westside Gala 2026 Name: Allen Jones Email: allen@gmail.com Phone: (555) 234-5678 Ticket Type: VIP Number of Guests: 2 Dietary Requirements: Vegetarian Notes: Looking forward to the evening!
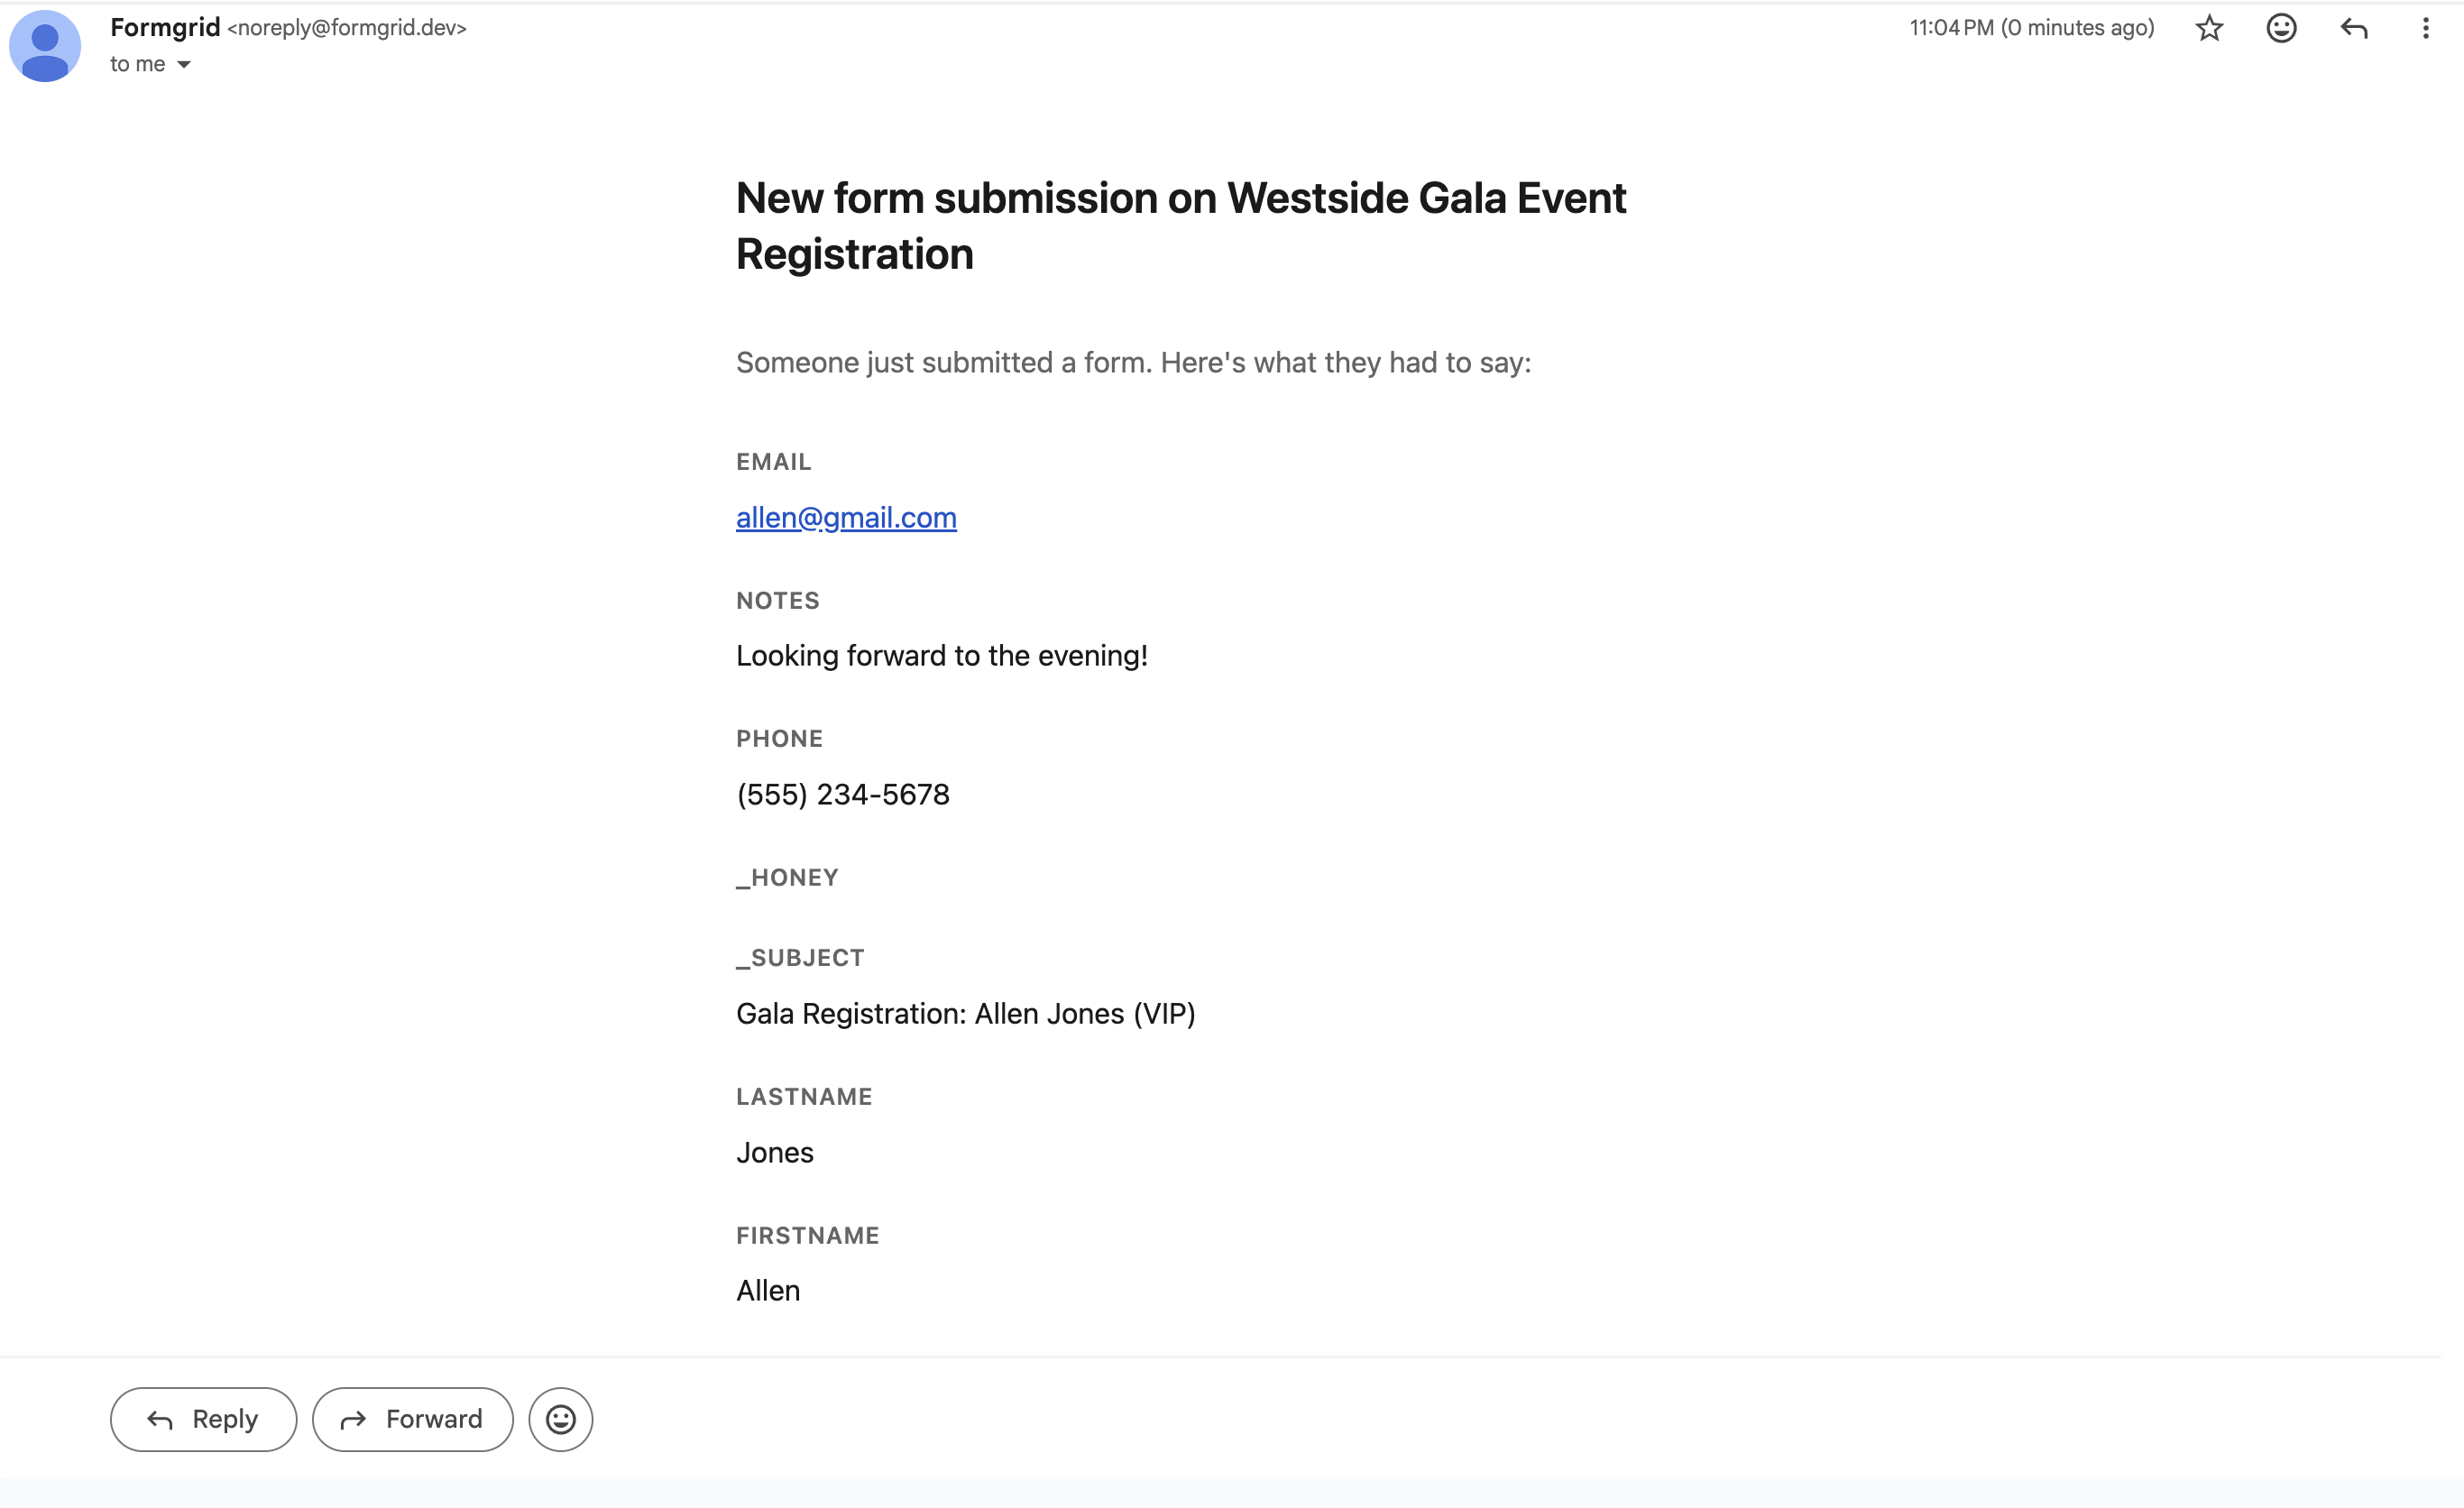
No inbox archaeology. No reply threads to dig through. Every registration arrives formatted and ready to read.
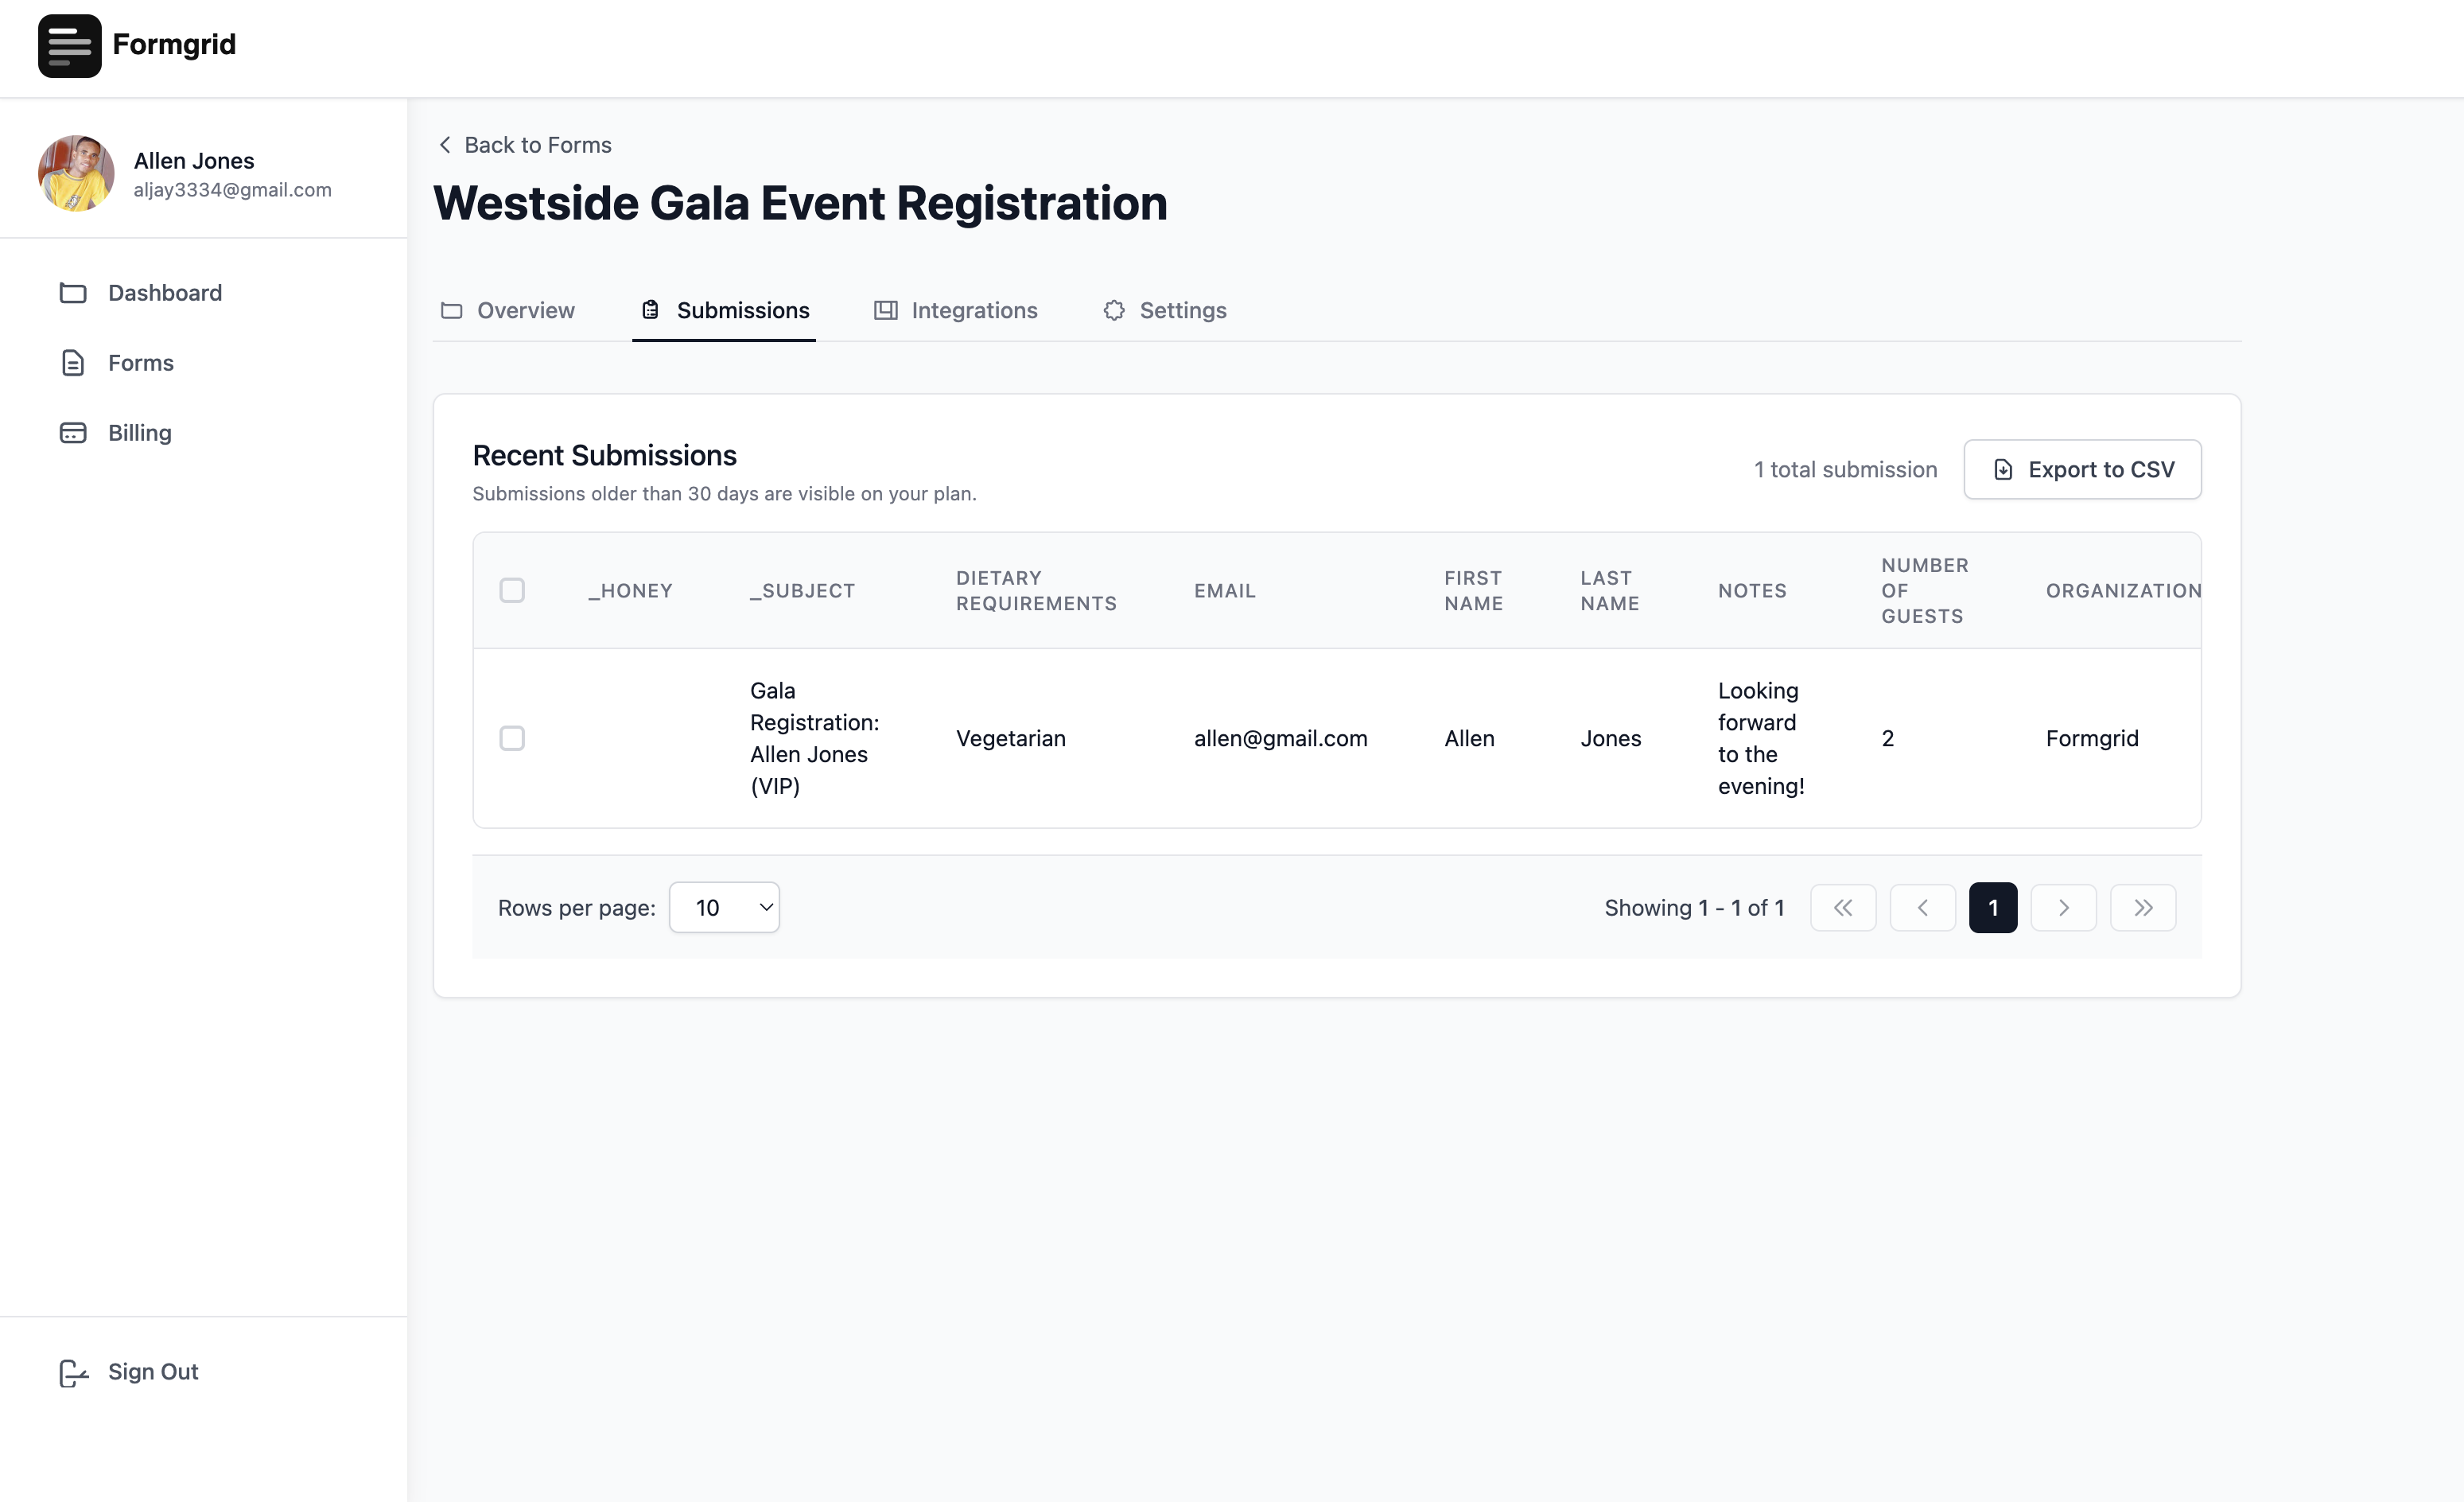
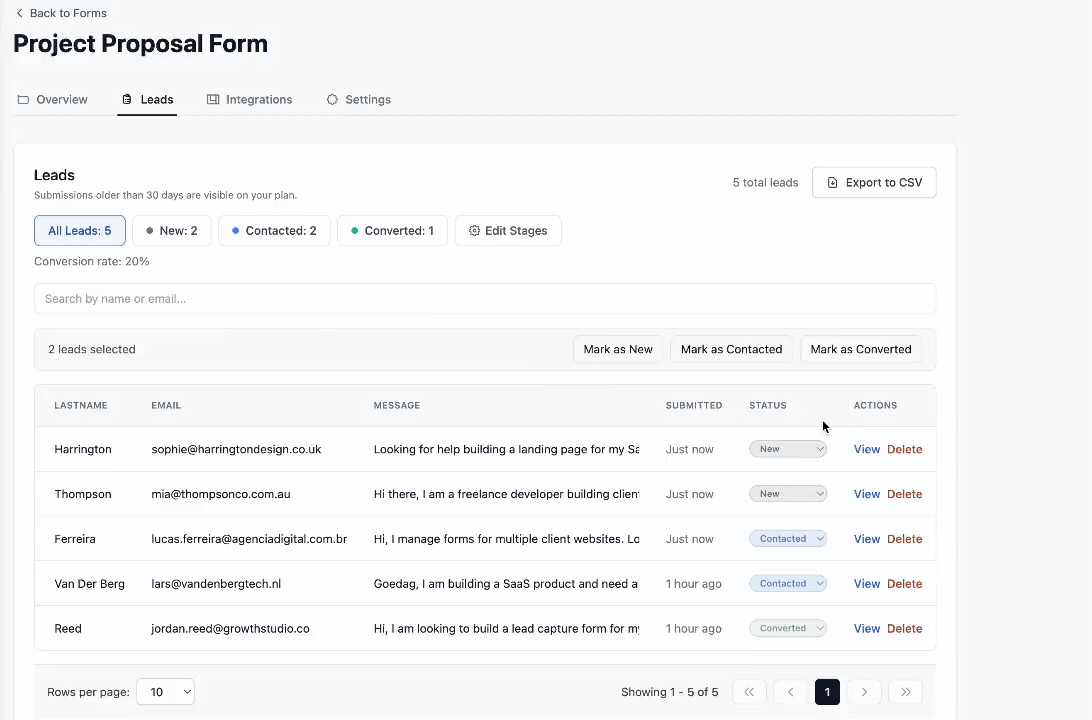
The submission is saved to your dashboard:
Go to your form on formgrid.dev and click the Submissions tab to see every registration. Search by name, view individual submissions, and export the complete attendee list as a CSV file with one click.

Upgrading When Your Registrations Open
The free plan gives you 25 submissions per month, which is enough for testing and small events.
When your registrations open, you will want to upgrade:
Premium at $12 per month gives you 1,000 submissions per month. Enough for most community events and workshops.
Business at $29 per month gives you 15,000 submissions per month, plus auto-responder emails so every registrant automatically receives a confirmation message from you.
The auto-responder is worth the upgrade on its own. Instead of manually replying to every registration confirmation request, every attendee gets an instant email the moment they submit:
Thank you for registering for the Westside Gala 2026. We have received your registration for 2 guests on the VIP plan. Doors open at 6:30 PM on Saturday June 14 at the Grand Westside Ballroom. We look forward to seeing you on the night.
One automated email. Zero inbox clutter.
Why This Approach Beats Every Alternative
Eventbrite
Eventbrite charges a service fee per ticket plus a payment processing fee. For a free community event, you still pay Eventbrite to host your page. For a paid event, they take a percentage of every ticket you sell.
With this approach, you pay nothing to Eventbrite. Your registrations go directly to your inbox and dashboard.
Google Forms
Google Forms is free and functional, but it gives you a bare form on a white page with Google branding. There is no hero section, no event details, no schedule, no photos, and no customization that makes the page look like your event.
This template gives you a complete event website in a single HTML file.
Building from scratch
Building a registration page from scratch takes days or weeks. This template is ready in 20 minutes.
Get the Template
The event registration template and all other Formgrid HTML templates are available for free on GitHub:
👉 github.com/allenarduino/formgrid-examples
Star the repo to stay updated as new templates are added.
Templates currently available:
- Event Registration (this guide)
- Horse Ride Registration
- Wedding RSVP
- Photography Booking
- Cleaning Service Booking
- Personal Trainer Enquiry
- Real Estate Enquiry
- Plumbing Quote Request
Each template follows the same pattern. Clone it, add your Formgrid endpoint URL, and customize the text and colors, and deploy.
Start Your Registration Page Today
Your event deserves a registration page that matches the effort you have put into organizing it.
Clone the template. Sign up for Formgrid. Deploy to Netlify. Share the link.
Your attendees get a registration experience that looks and feels professional. You get a clean attendee list in your inbox and dashboard. No chasing reply-all email threads to find out who is coming.
No credit card required. Free plan available. Upgrade when your registrations open.
Have questions about the template or the Formgrid setup? Email allen@formgrid.dev and I will help you get live before your event opens.
Comments
Leave a comment