Netlify Forms Getting Expensive?
Switch to Formgrid in under 5 minutes. Works on any host, unlimited forms, built-in lead tracking, no credit card required.
If you have been using Netlify Forms for your static site, you have probably noticed something uncomfortable. The moment your site starts getting real traffic, the costs and confusion start fast.
Netlify's free plan gives you just 100 form submissions per month. That sounds reasonable until your contact form actually starts working.
And here is the part that frustrates most developers: Netlify recently migrated to a credit-based billing system. Form submissions now consume credits shared across your entire account. If one site exceeds its limits, all projects on your account get paused, not just the one that went over.
That is a stressful way to run a website.
Short Version
If you want to leave Netlify Forms behind with the least friction and get a form that also tracks who filled it out and whether you followed up, use Formgrid. The setup guide below takes under five minutes.
If your only goal is the highest number of free submissions and you do not need a dashboard, Web3Forms and Basin both offer more free volume than Formgrid.
If you are staying on Netlify but want predictable costs, there is no good workaround. The credit system applies account-wide.
How Netlify Forms Pricing Actually Works
Let's be specific, because the Netlify docs are genuinely confusing.
On the legacy free plan:
- 100 submissions per month per site
- Once you hit 100, Netlify automatically upgrades you to Forms Level 1 (1,000 submissions) and charges you at the end of the billing cycle
- Every level upgrade is automatic. You do not have to approve it
On the new credit-based plans:
- Form submissions consume credits from a shared monthly pool
- There is no longer a separate free tier for forms on new credit-based accounts
- If your credit pool runs out, all your projects, not just the one with the form, get paused until the next billing cycle
The unpredictability is the real problem. A traffic spike, a contact form going slightly viral, or a bot hitting your form could burn through your credits and take down your entire Netlify account.
For something as simple as a contact form, that is a lot of risk to accept.
Ready to stop worrying about Netlify credits? Create your free Formgrid account.
The Other Problem: You Are Locked Into Netlify
Netlify Forms only works if your site is deployed on Netlify. The moment you want to move to Vercel, Render, GitHub Pages, Cloudflare Pages, or your own VPS, your forms stop working entirely, and you would have to find a new solution anyway at that point.
Switch from Netlify Forms without rewriting your frontend. Point your existing form at a new endpoint and keep everything else exactly as it is, so a hosting change never breaks your forms again.
The Best Netlify Forms Alternatives in 2026
Here are the most reliable alternatives, starting with the best overall option.
1. Formgrid.dev: Best Overall Alternative
Formgrid is a form backend that works with any HTML form on any website, regardless of where it is hosted, and it is the only option on this list that turns submissions into leads you can actually follow up on.
Free plan includes:
- Unlimited forms
- 50 submissions per month
- Email notifications on every submission
- Built-in spam protection
- A lead pipeline dashboard: mark each submission New, Contacted, or Converted
- Follow-up reminders on individual leads
Premium plan: $12/month
- Higher submission limits
- File uploads
- Custom redirect after submission
- Webhook support
- Google Sheets sync
Unlike Netlify Forms, Formgrid works on Vercel, GitHub Pages, Render, Cloudflare, or any custom server. You are never locked in, and moving hosts later will not break your forms.
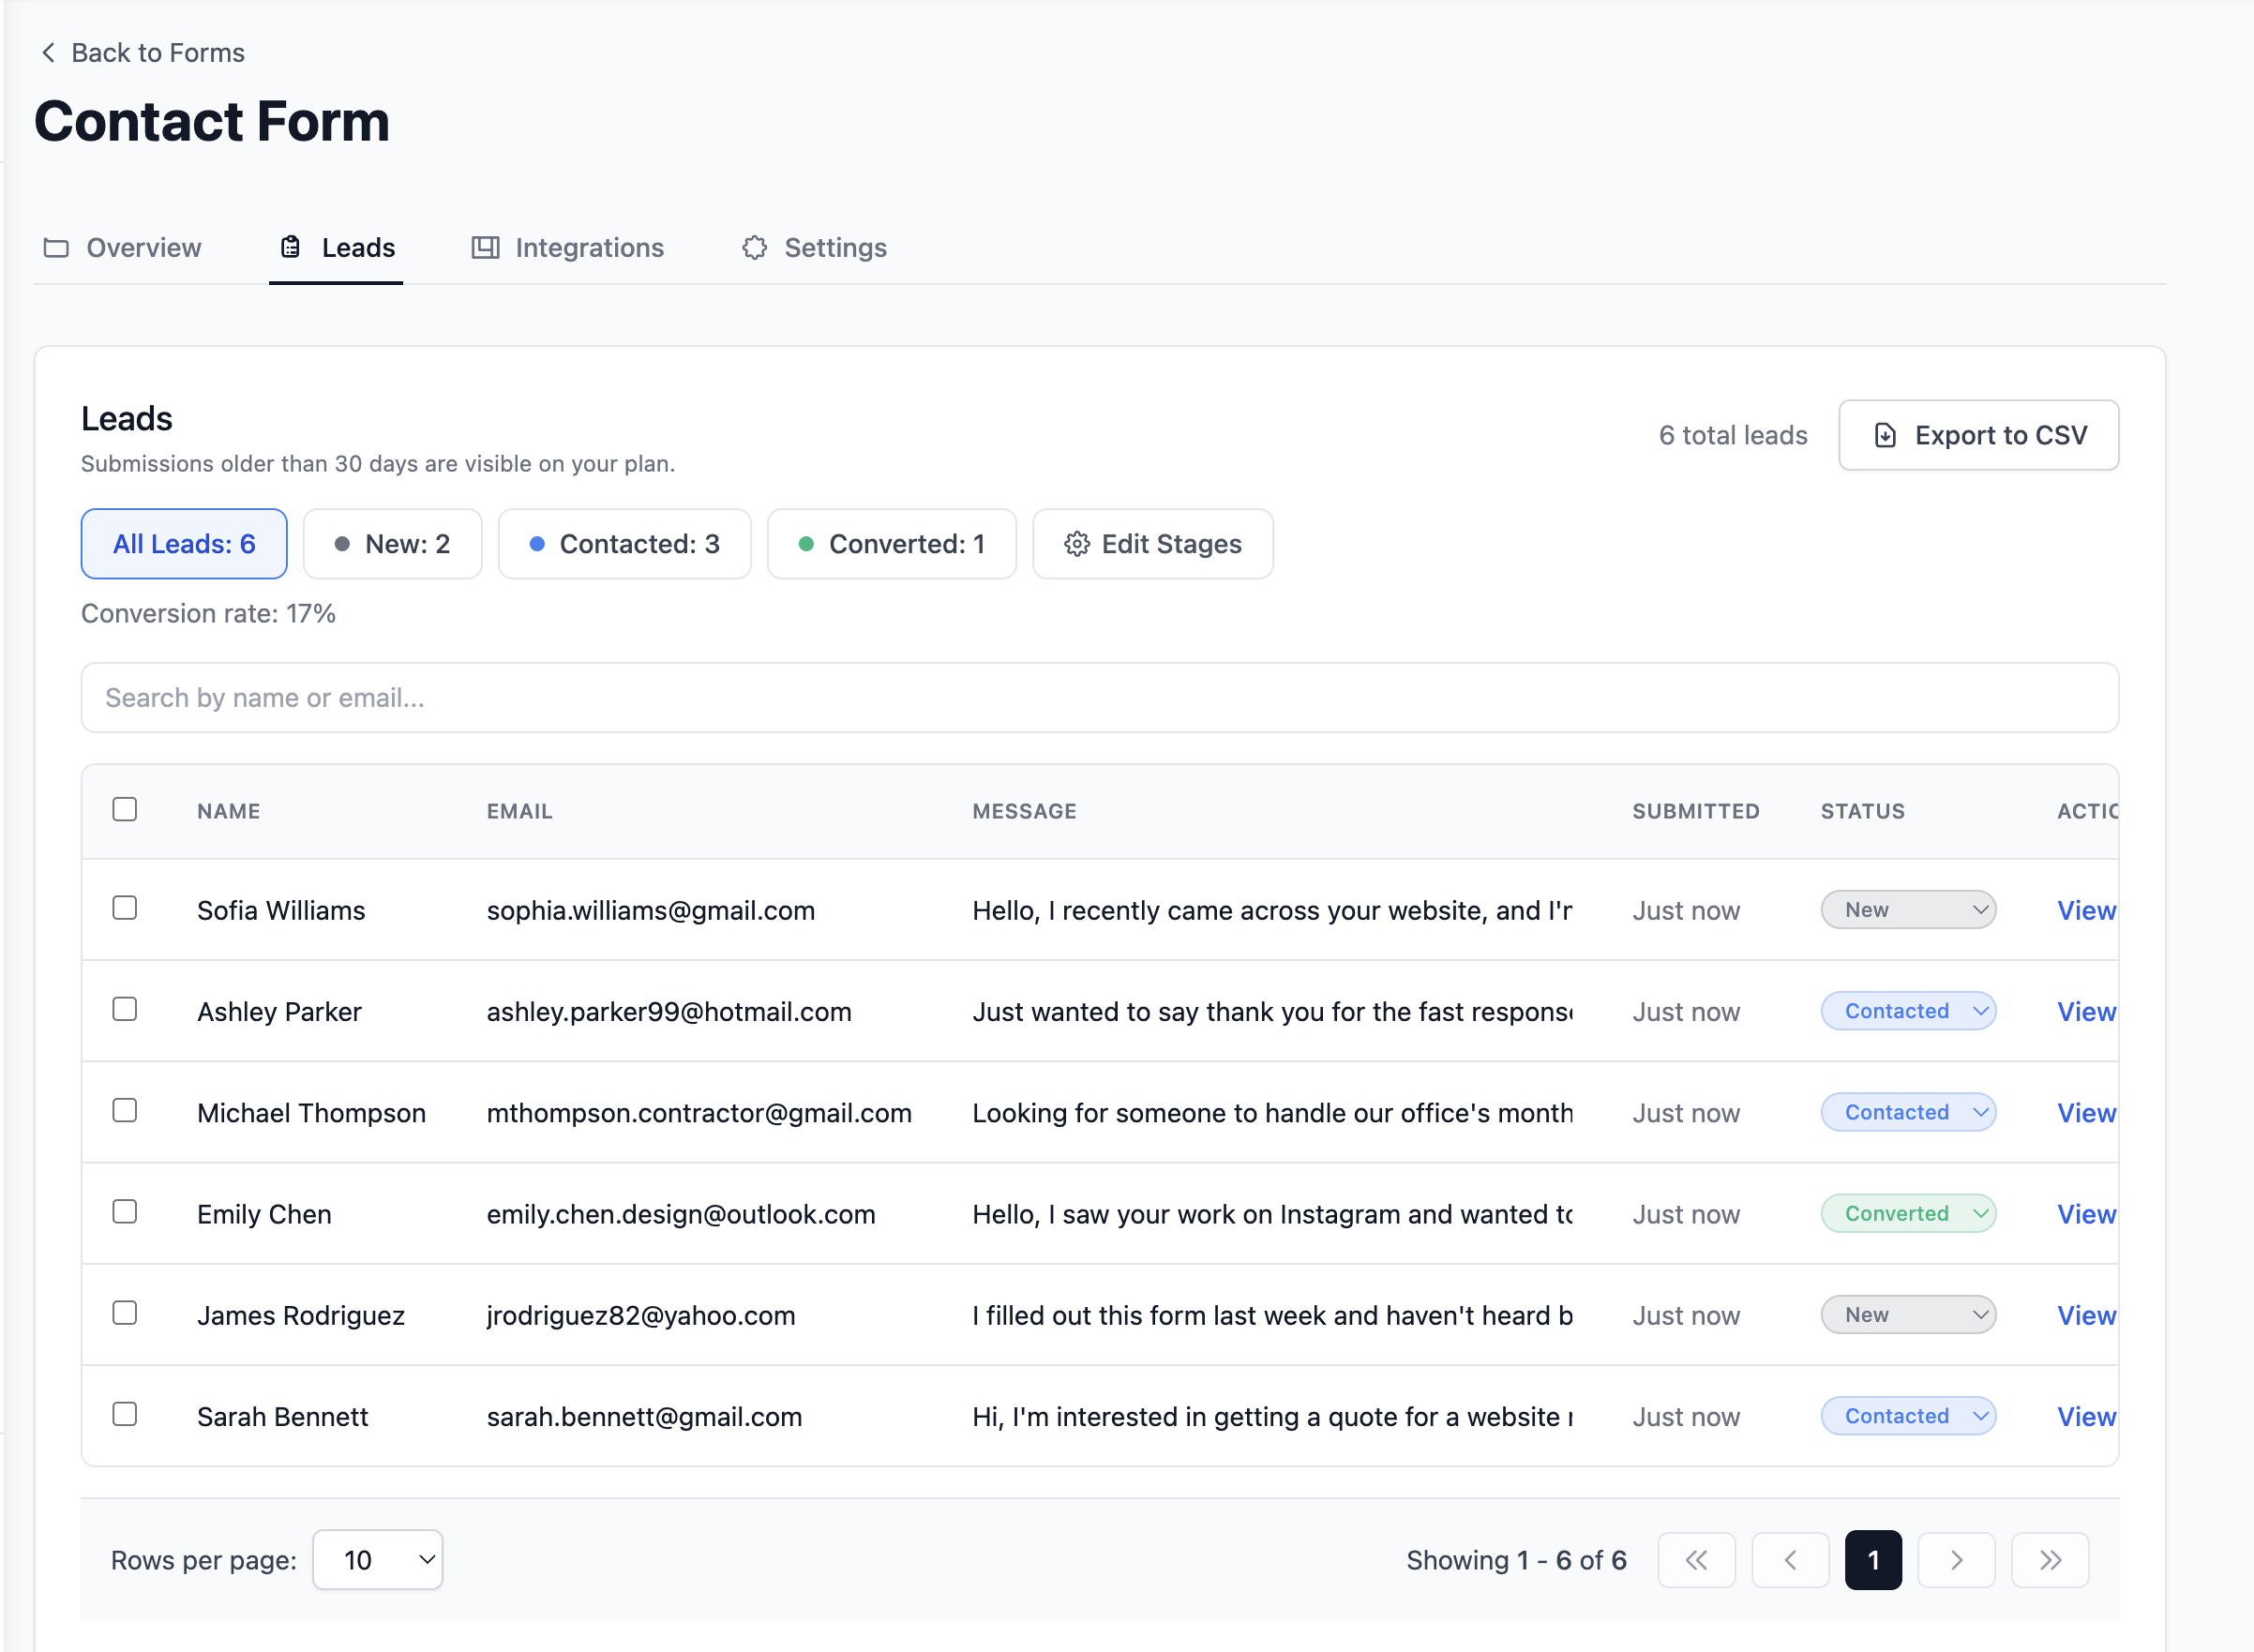
What actually happens when someone fills out your form
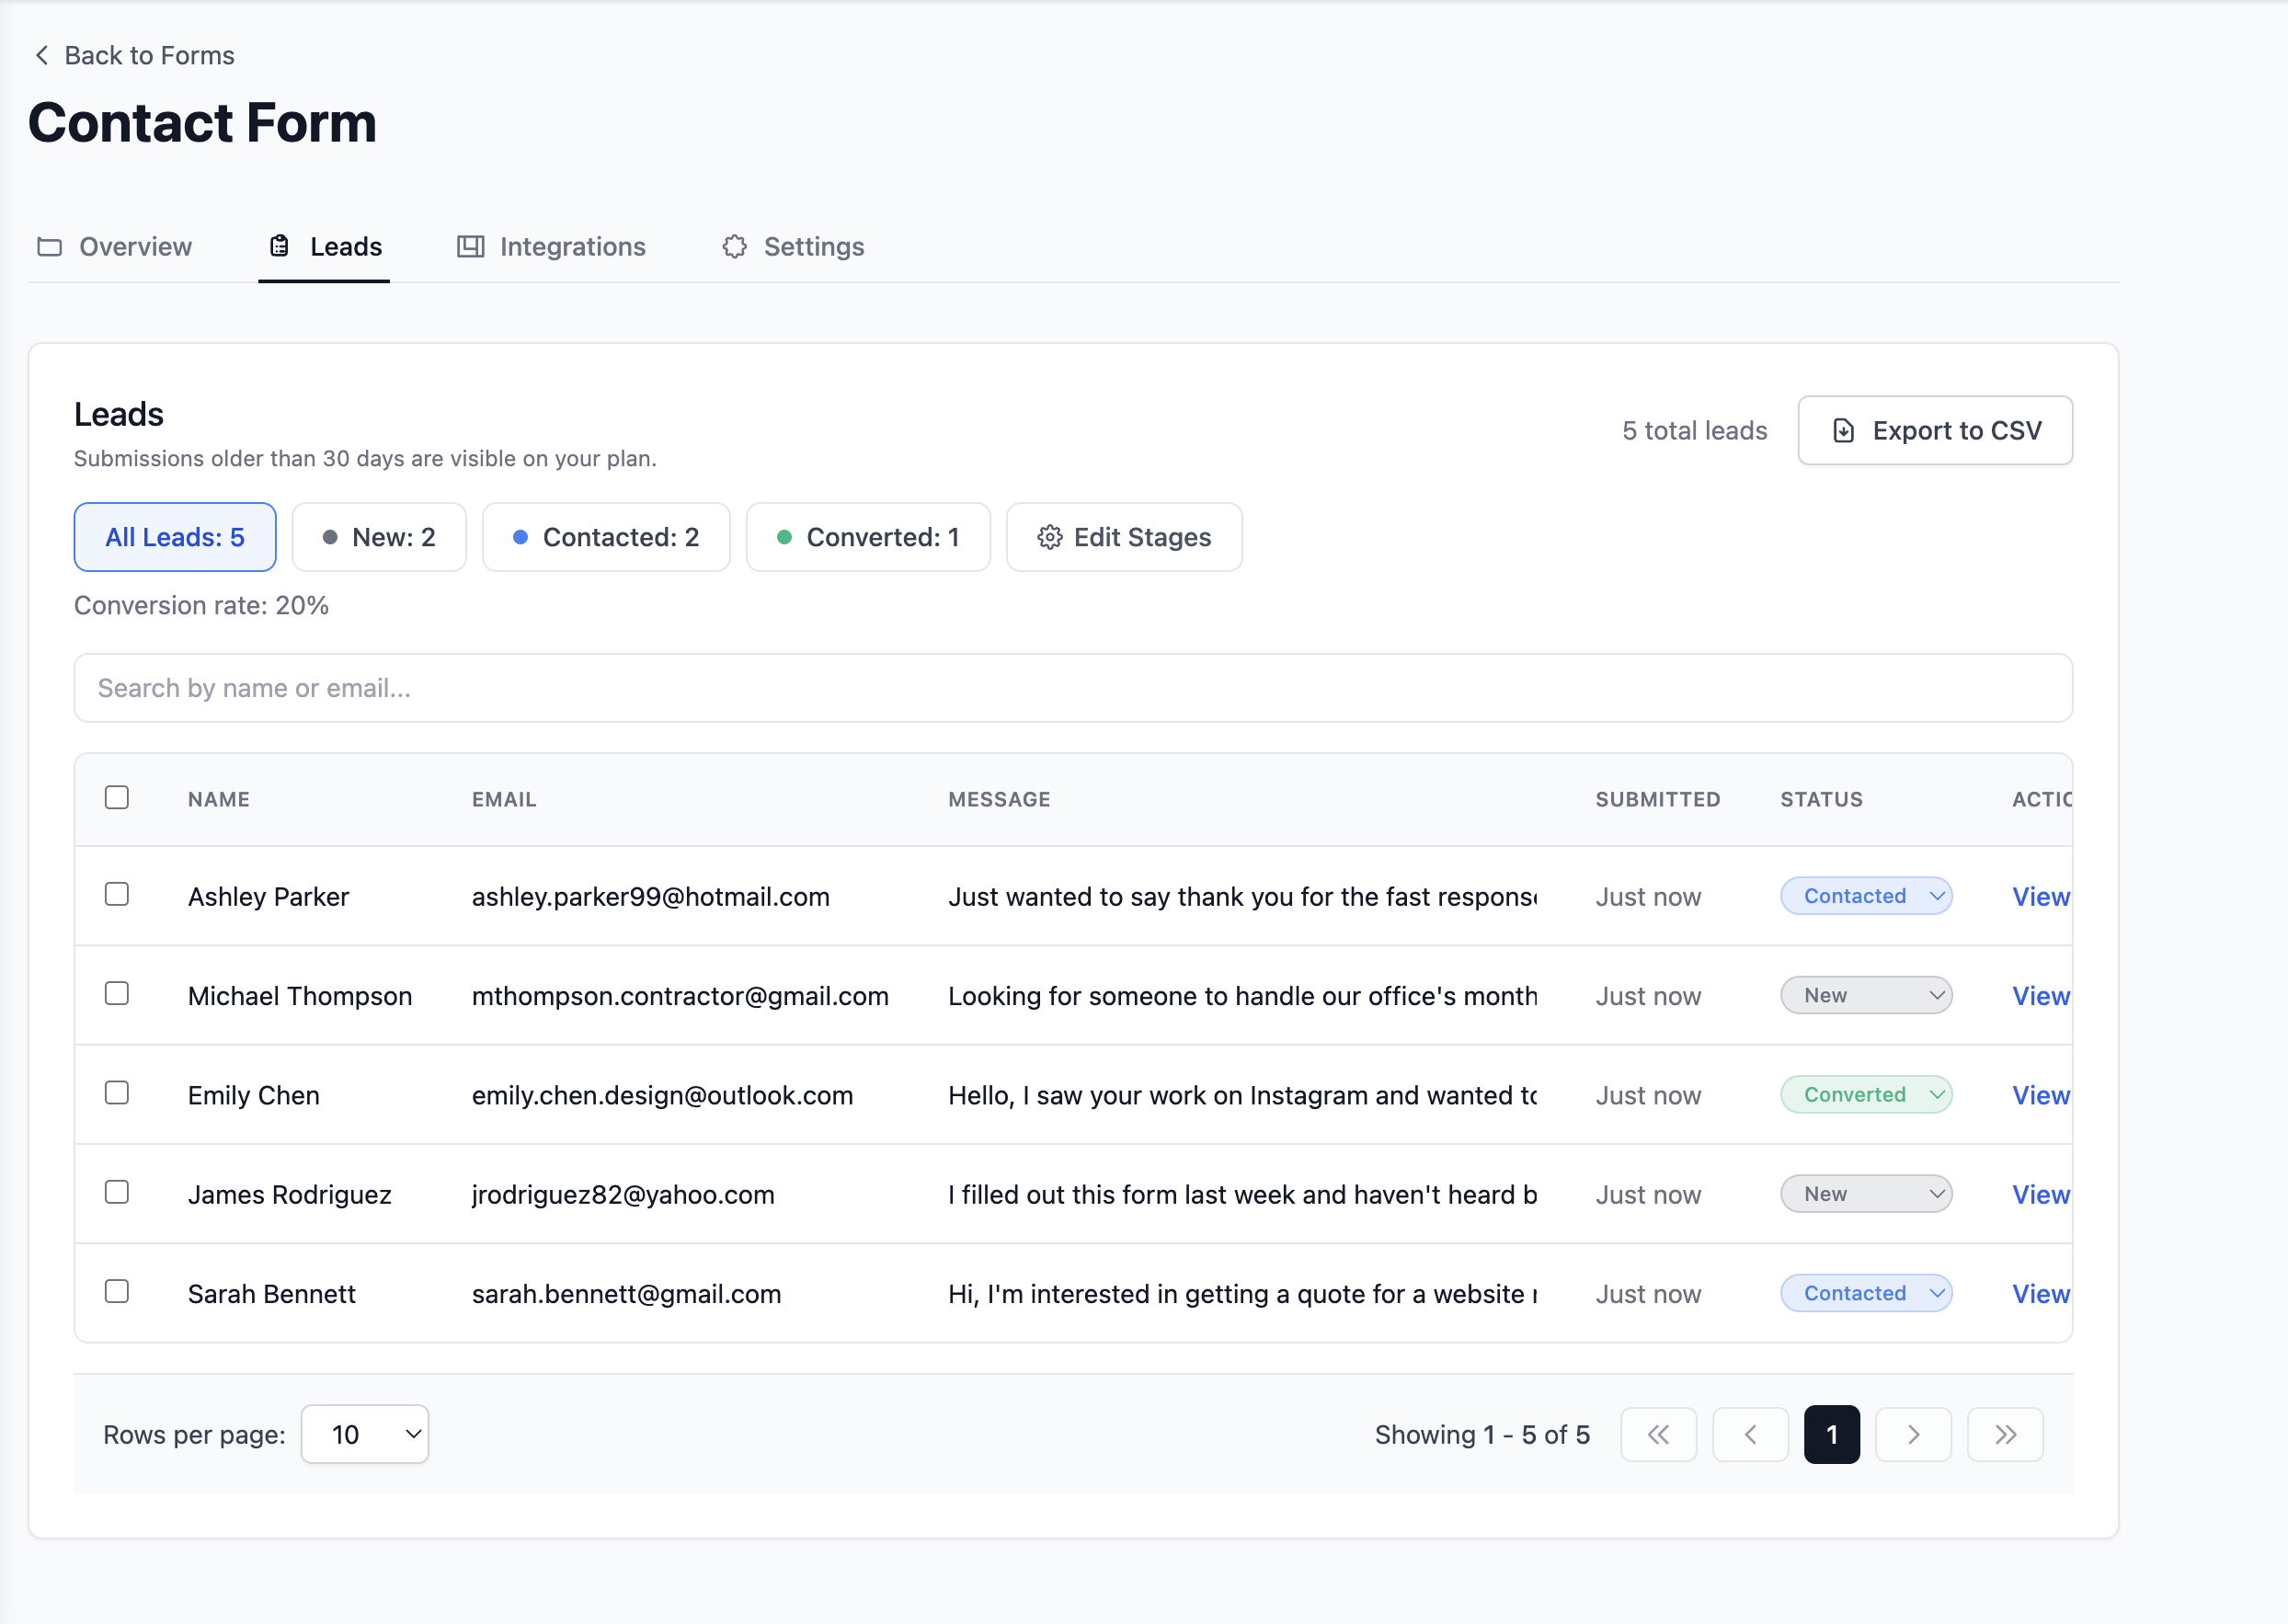
Netlify Forms hands you a list. Formgrid hands you a workflow:
Someone submits your contact form
You get an instant email notification
The submission appears in your dashboard as a new lead
You mark it Contacted once you reply
You add a note about what was discussed
You mark it Converted once it becomes a customer
That is the difference between a form that just collects data and one that helps you act on it. Here is what it looks like in practice:
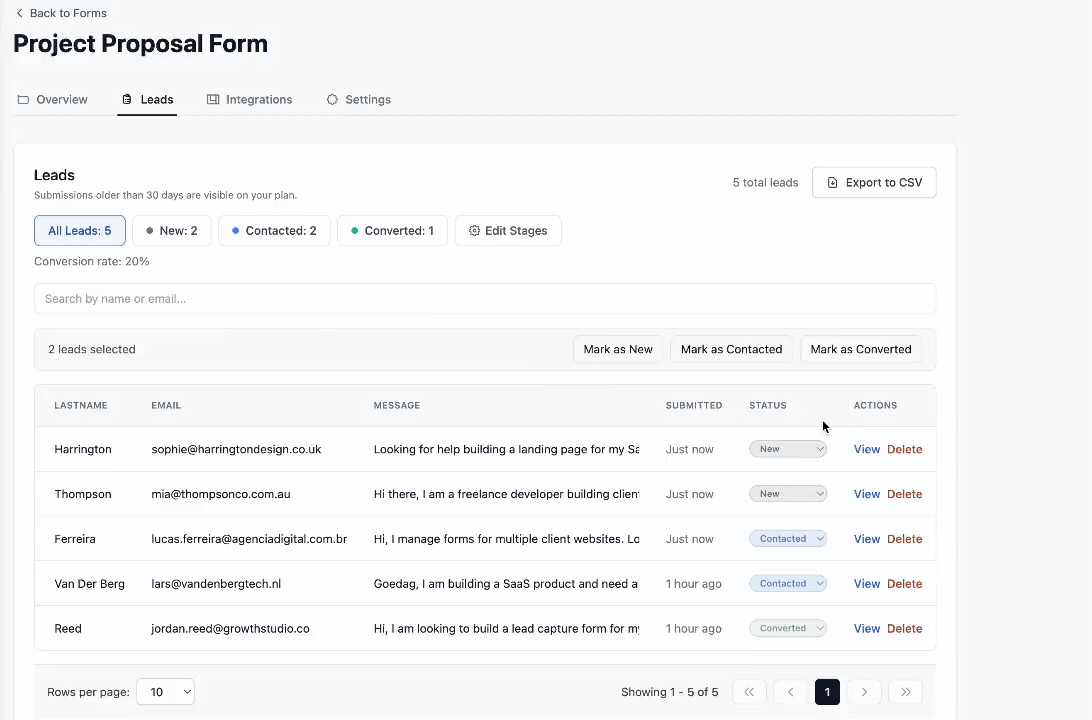
On each lead, you can also set a follow-up date and get an email reminder on that day, see where the lead came from by UTM source, medium, and campaign, and export everything as CSV at any time. The leads tab shows your conversion rate at the top, so you always know how your form is actually performing, not just how many submissions came in.
See what a tracked lead looks like, try Formgrid free. No credit card required.
2. Formspree: Most Established
Formspree has been the go-to form backend since 2013. Battle-tested, reliable, and widely documented.
Free plan: 50 submissions per month Paid plan: starts at $15 per month
The downside is that paid plans get expensive if you are managing forms across multiple client sites. For a single project, it is a solid, well-documented choice.
3. Web3Forms: Most Generous Free Plan
Web3Forms offers the most generous free tier on this list: unlimited forms and up to 250 submissions per month at no cost.
Setup takes about two minutes. No account required to get started, just an API key sent to your email. Worth a serious look if raw free volume matters more to you than a dashboard or lead tracking.
4. Basin: Clean and Simple
Basin is a straightforward form backend with a clean dashboard and solid spam filtering. Their free plan allows 100 submissions per month, matching Netlify's old free tier but without the platform lock-in.
5. Formspark: Good for High Volume
Formspark offers a one-time payment model instead of a monthly subscription. You buy a bundle of submissions and use them at your own pace, a good fit if your form traffic is unpredictable and you would rather not think about monthly limits at all.
Side by Side Comparison
| Feature | Netlify Forms | Formgrid | Formspree | Web3Forms | Basin |
|---|---|---|---|---|---|
| Email notifications | Yes | Yes | Yes | Yes | Yes |
| Works on any host | No, Netlify only | Yes | Yes | Yes | Yes |
| Lead pipeline | No | Yes | No | No | No |
| Follow-up reminders | No | Yes | No | No | No |
| Submission status tracking | No | Yes | No | No | No |
| Free submissions | 100/month | 50/month | 50/month | 250/month, most generous | 100/month |
| Starting paid price | Credit based, account wide risk | $12/month | $15/month | $15/month | $8/month, cheapest here |
Web3Forms and Basin both beat Formgrid on raw free submission count. If that number is your main constraint right now, either is a reasonable pick. But neither tells you which submissions turned into real conversations and which ones still need a reply. That is the row worth paying attention to if you have been burned by losing track of a Netlify submission before.
You can have your first form working in under five minutes. Start free.
Step by Step: Setting Up Formgrid on Any Static Site
Let's replace Netlify Forms with Formgrid right now. This takes under five minutes.
Step 1: Create Your Formgrid Account
Head to https://formgrid.dev and sign up using Google or email.

The free plan requires no credit card. You get unlimited forms and 50 submissions per month immediately.
Step 2: Create a New Form
Once logged in, you will land on your dashboard. Click New Form.
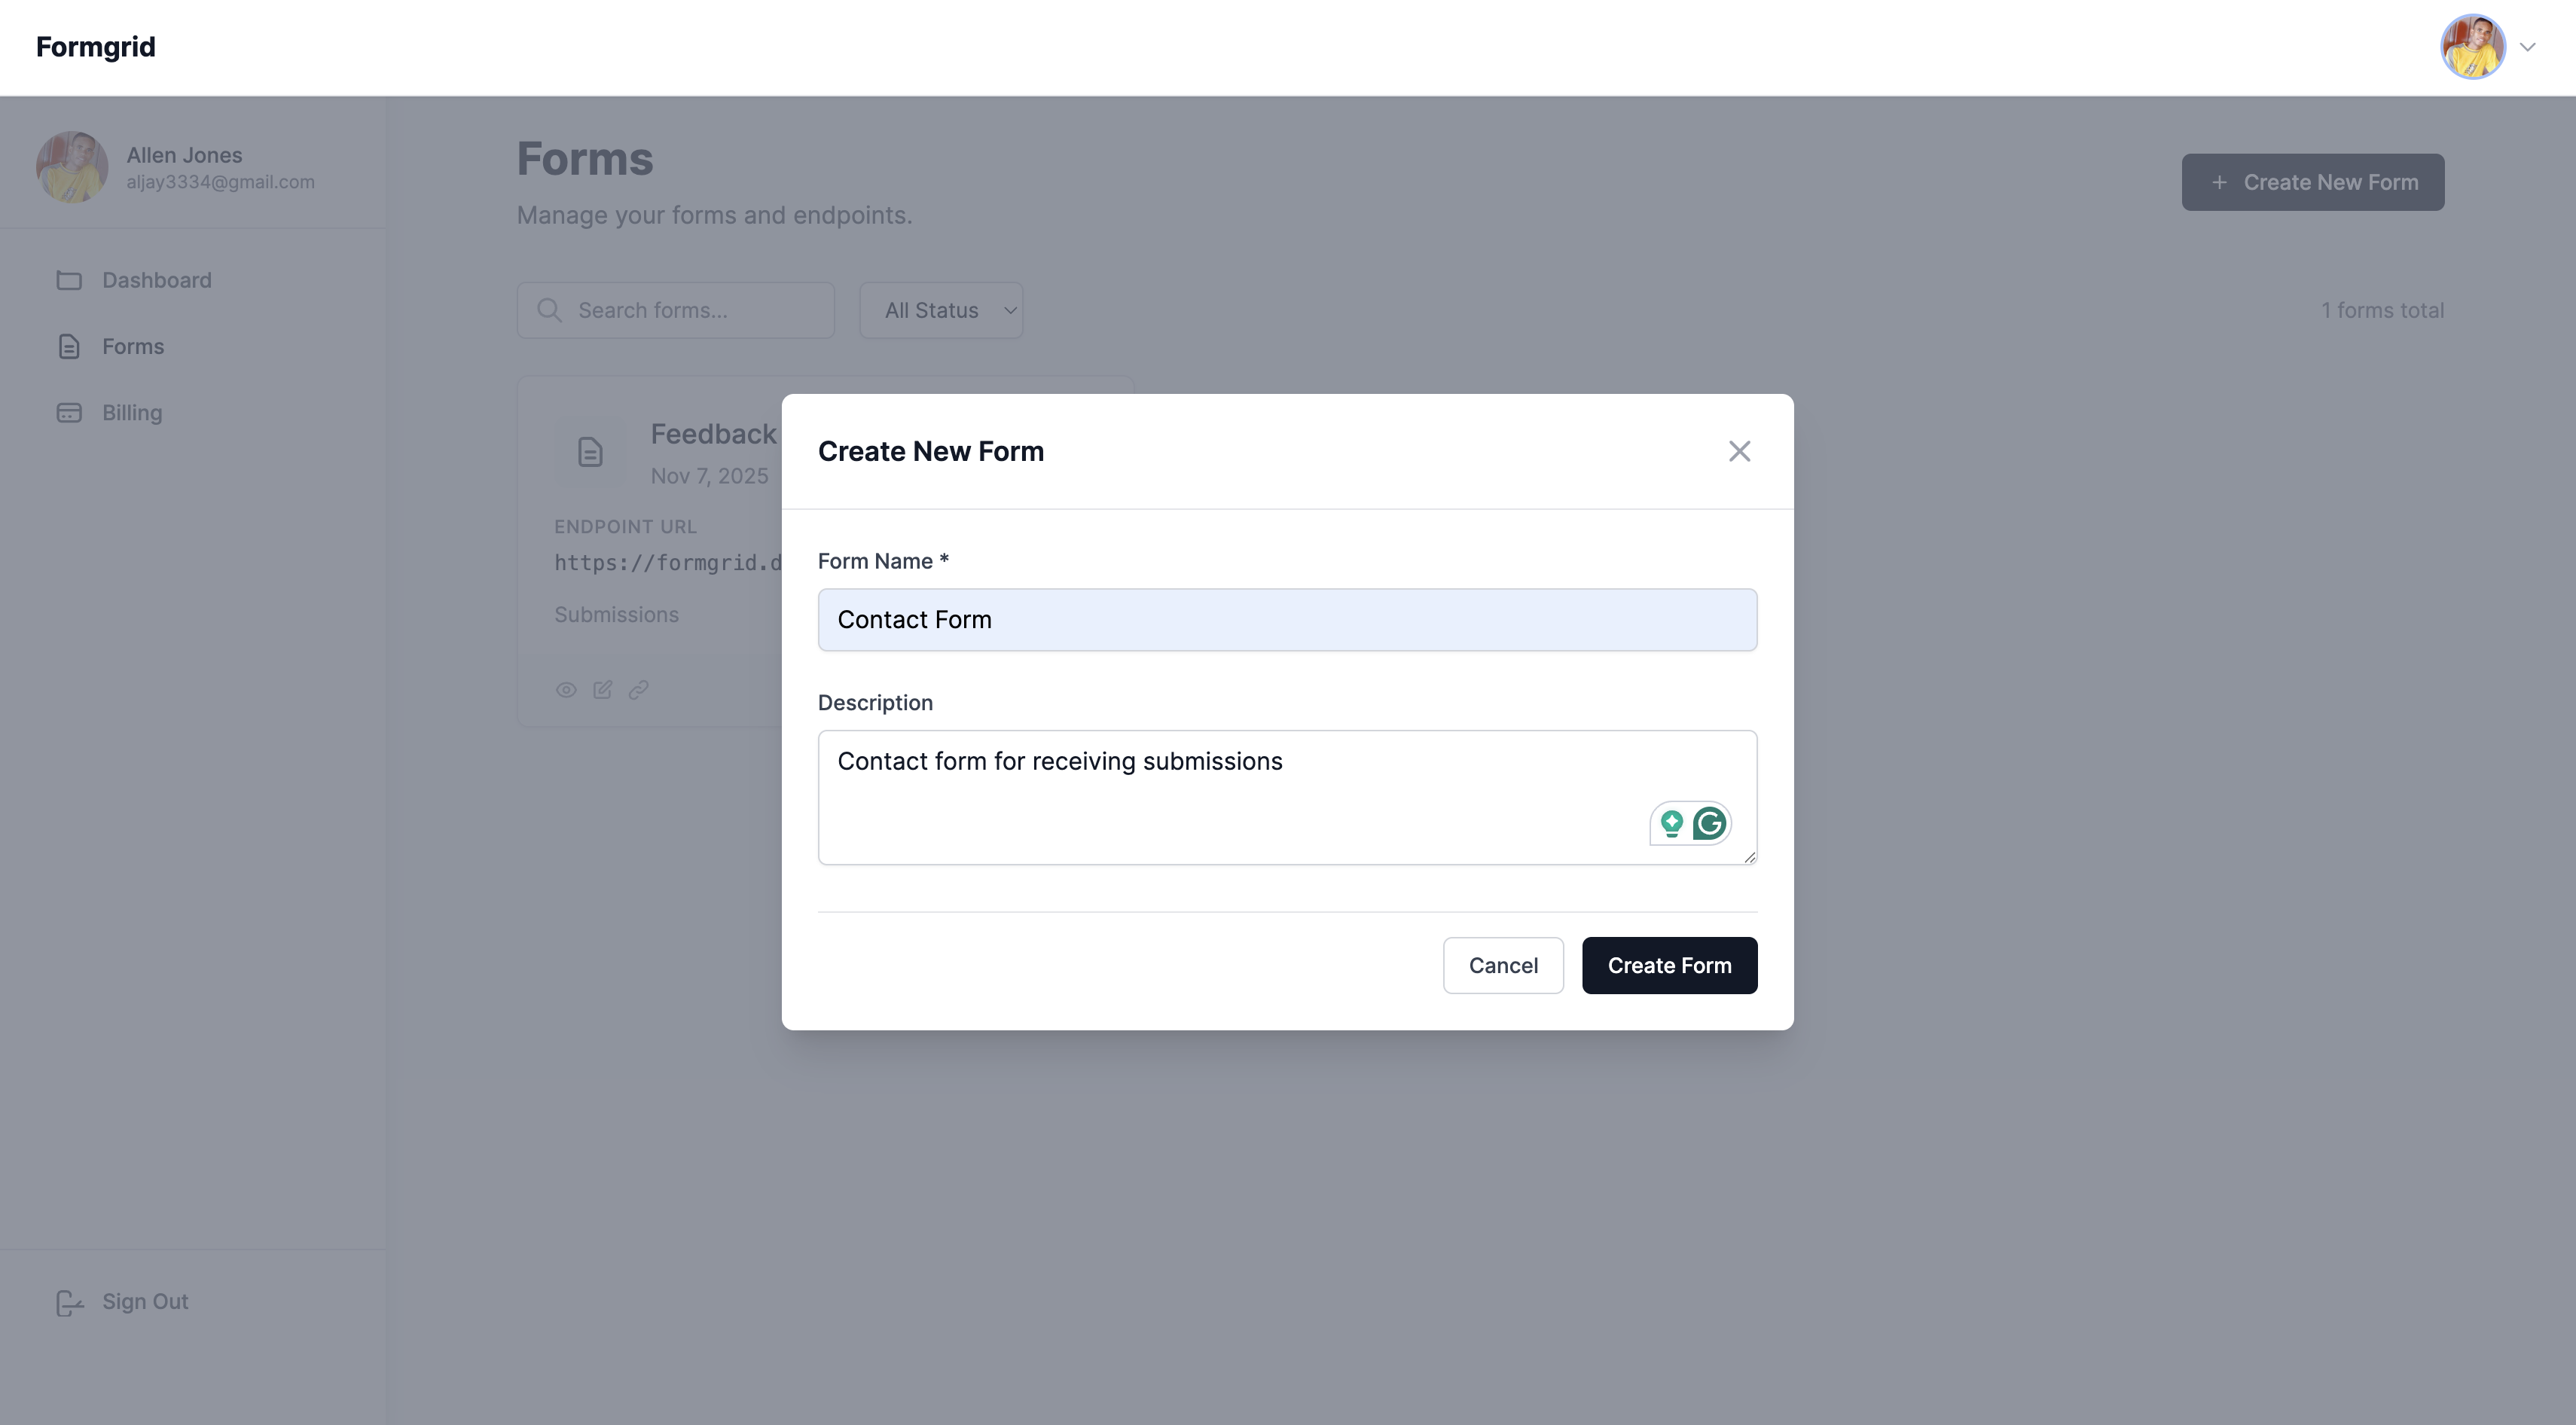
Give your form a name. Something descriptive works well: Contact Form, Portfolio Enquiry, Landing Page Leads.
Click Create Form.
Do not have an account yet? Create one here.
Step 3: Copy Your Endpoint URL
After creating your form, you will be taken to the form's overview page. Click the Overview tab and copy your unique endpoint URL.
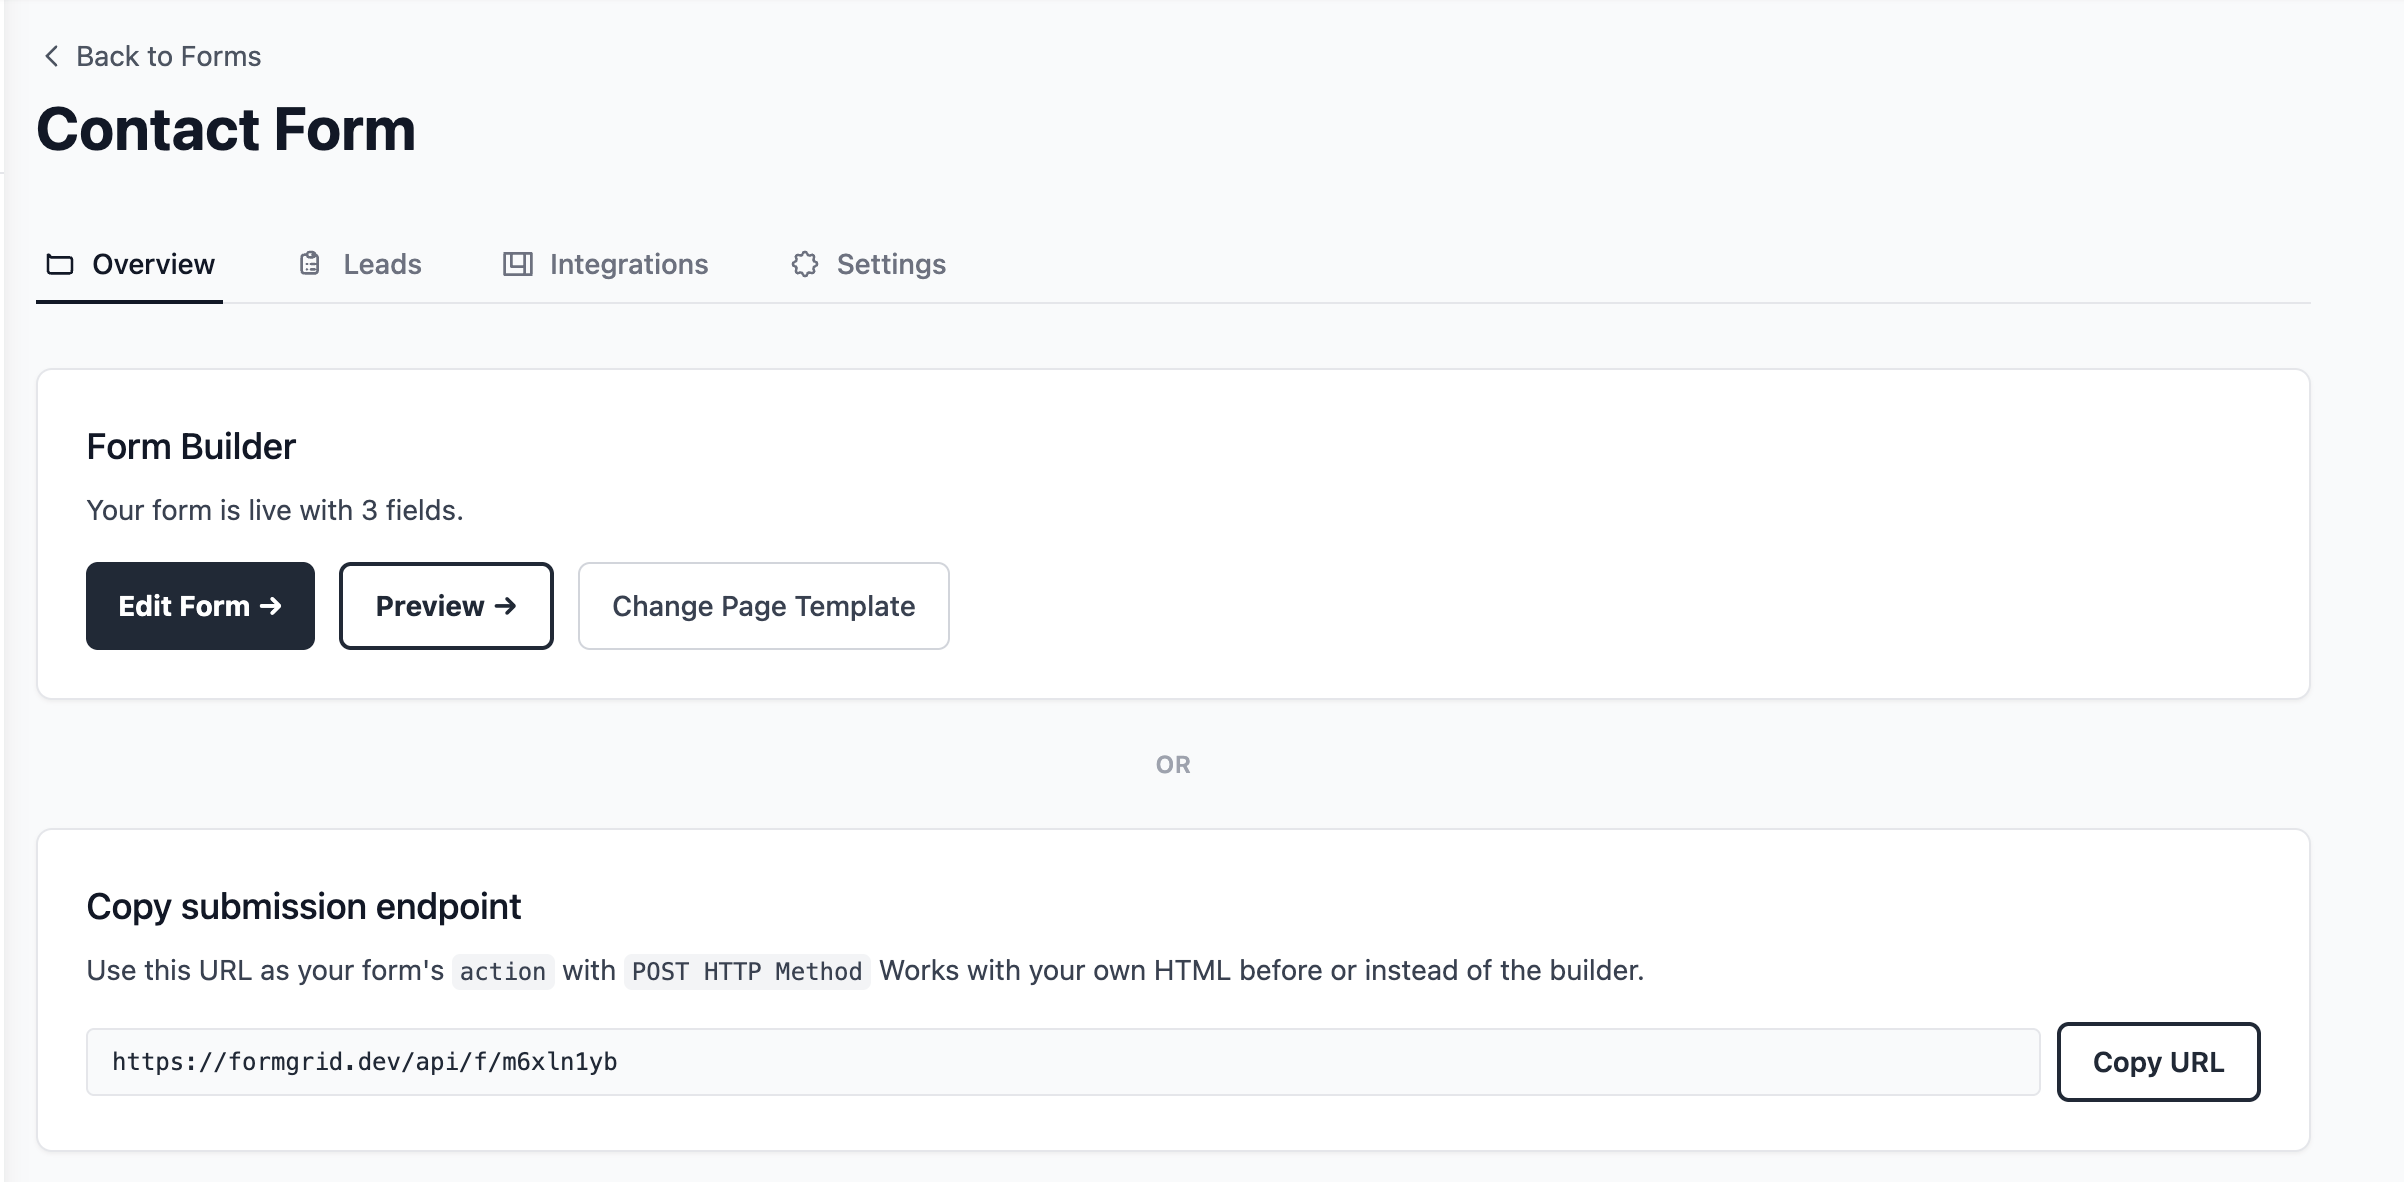
It will look something like this:
https://formgrid.dev/api/f/dcffghhnjjThis is the URL your HTML form will submit to.
Step 4: Add the Form to Your HTML
If you already have a Netlify form, this step is genuinely all that changes. Copy your endpoint, replace the action URL, and you are done; no rewrite of your frontend required.
Here is a complete, copy-paste-ready contact form. Replace YOUR_ENDPOINT_URL with the URL you just copied:
<form action="YOUR_ENDPOINT_URL" method="POST">

  <label for="name">Your Name</label>
  <input
    type="text"
    id="name"
    name="name"
    placeholder="John Doe"
    required
  />

  <label for="email">Email Address</label>
  <input
    type="email"
    id="email"
    name="email"
    placeholder="john@example.com"
    required
  />

  <label for="message">Your Message</label>
  <textarea
    id="message"
    name="message"
    rows="5"
    placeholder="How can I help you?"
    required
  ></textarea>

  <!-- Honeypot: keeps bots out, invisible to real users -->
  <input
    type="text"
    name="_honey"
    style="display:none"
  />

  <!-- Optional: redirect after submission -->
  <input
    type="hidden"
    name="_redirect"
    value="https://yoursite.com/thank-you"
  />

  <button type="submit">Send Message</button>

</form>
That is your entire form. No server, no PHP, no backend code.
Replace Netlify Forms now. No credit card required, and you will have this exact form live in under two minutes.
Step 5: Notifications Are Already Set Up, and Every Submission Becomes a Lead
You do not have to configure anything here. Formgrid automatically uses the email address you signed up with as your default notification email. The moment someone submits your form, the alert goes straight to your inbox.
If you would like submissions sent to a different address, for example a client's email or a team inbox, go to your form's Settings tab, find Email Notifications, and update it there.
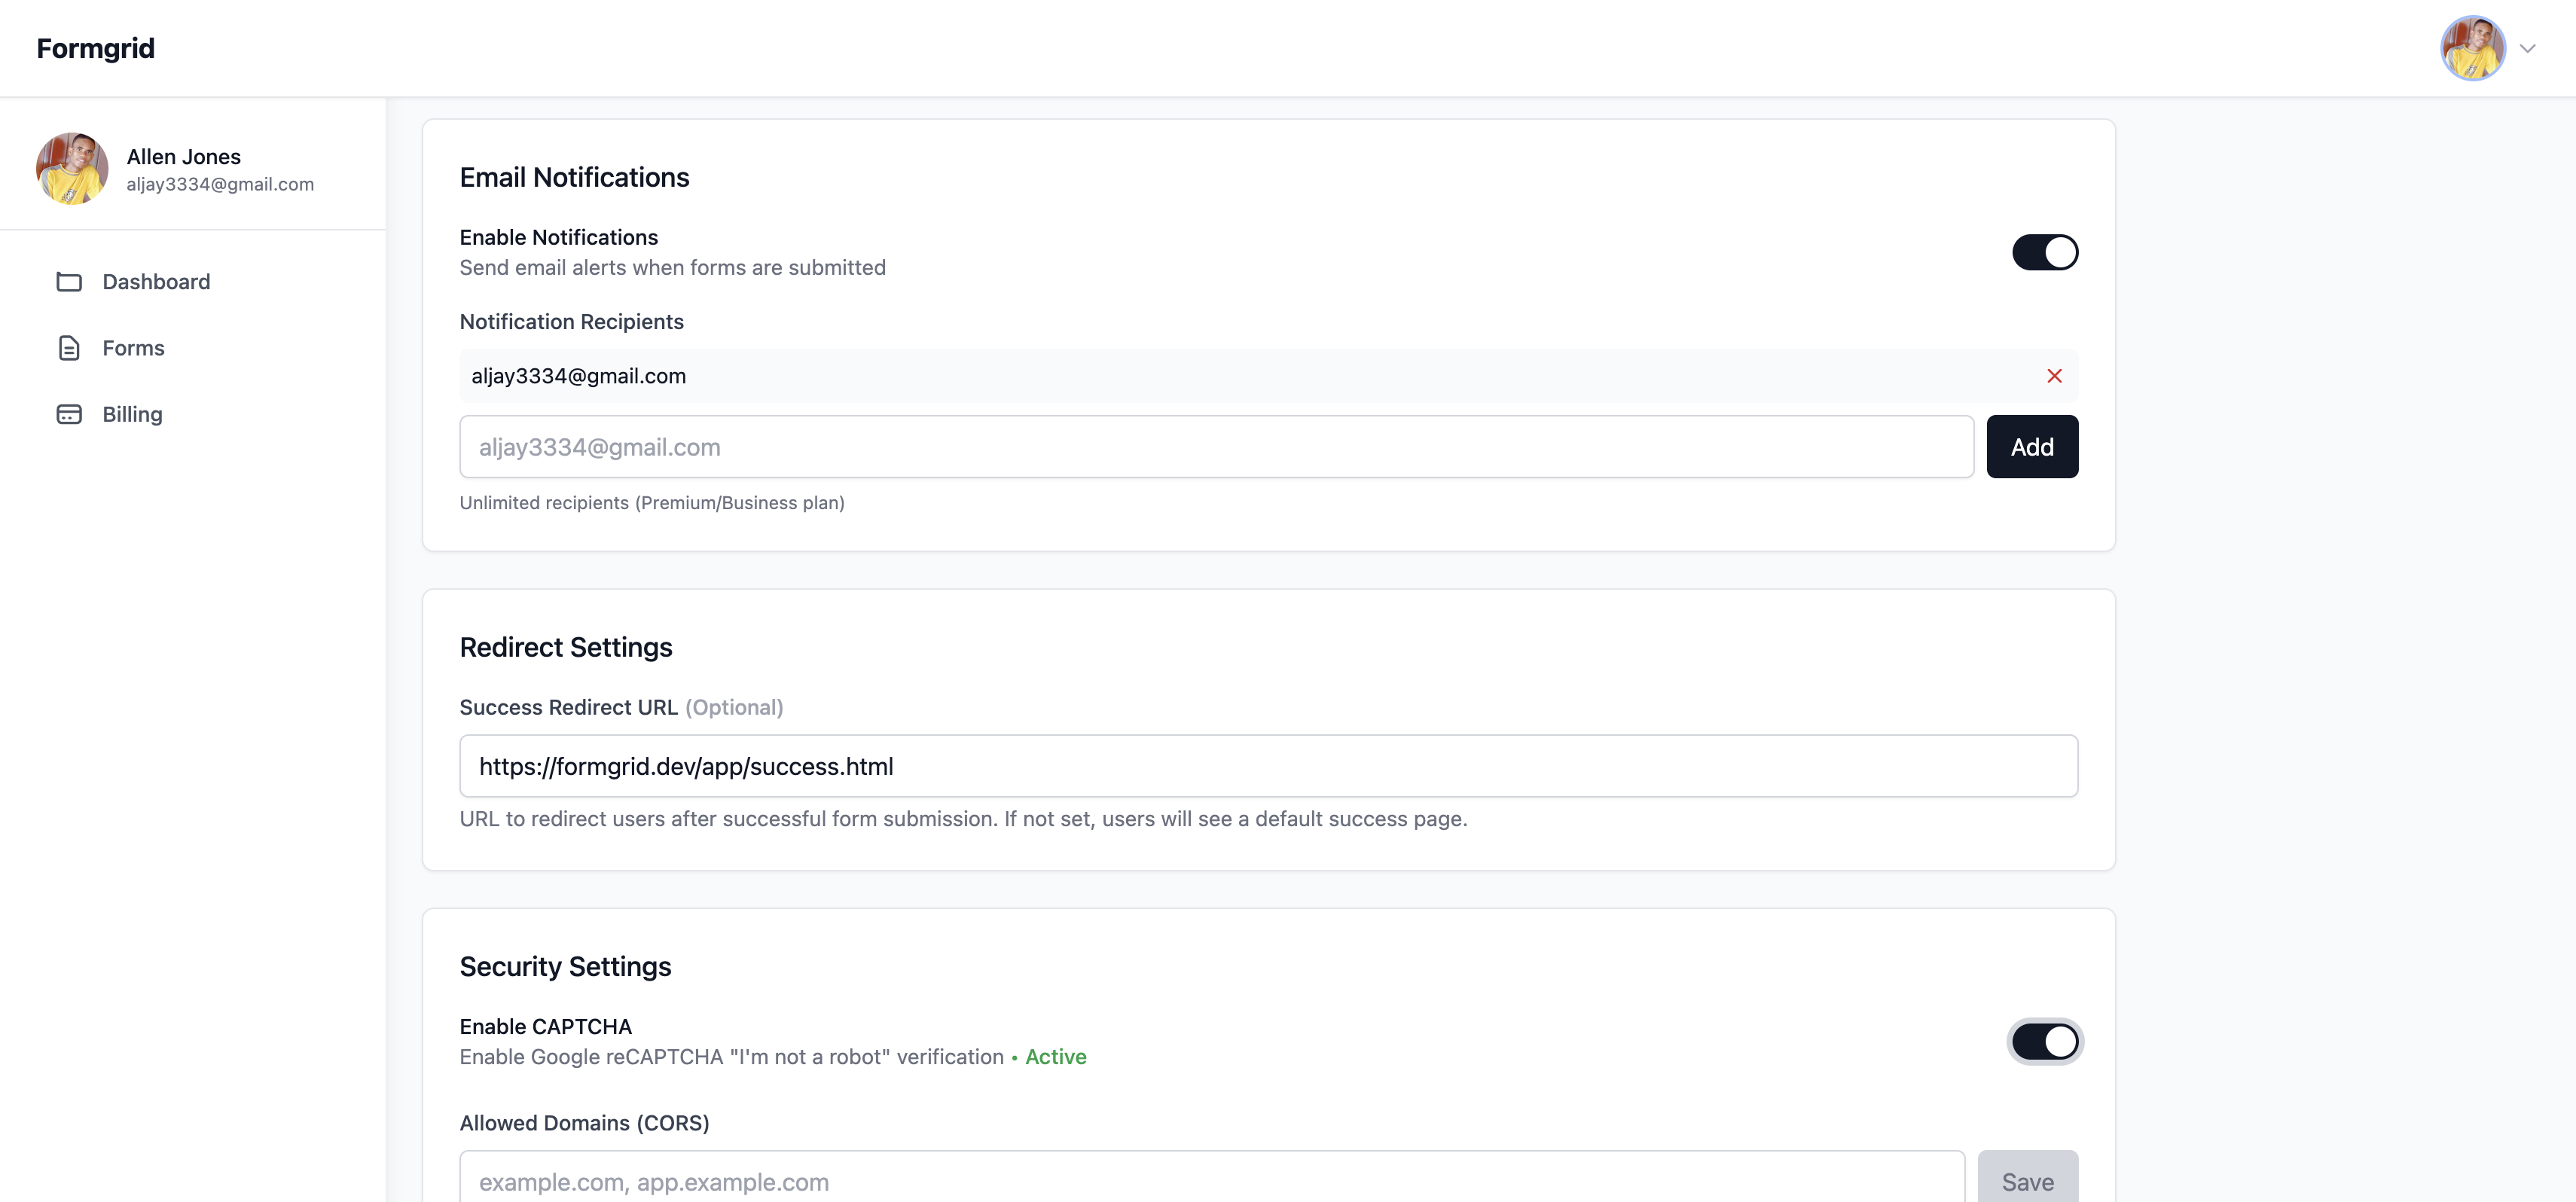
From this point on, every submission also lands in your dashboard as a lead you can move through the pipeline described above, not just a one-off email you have to remember to act on.
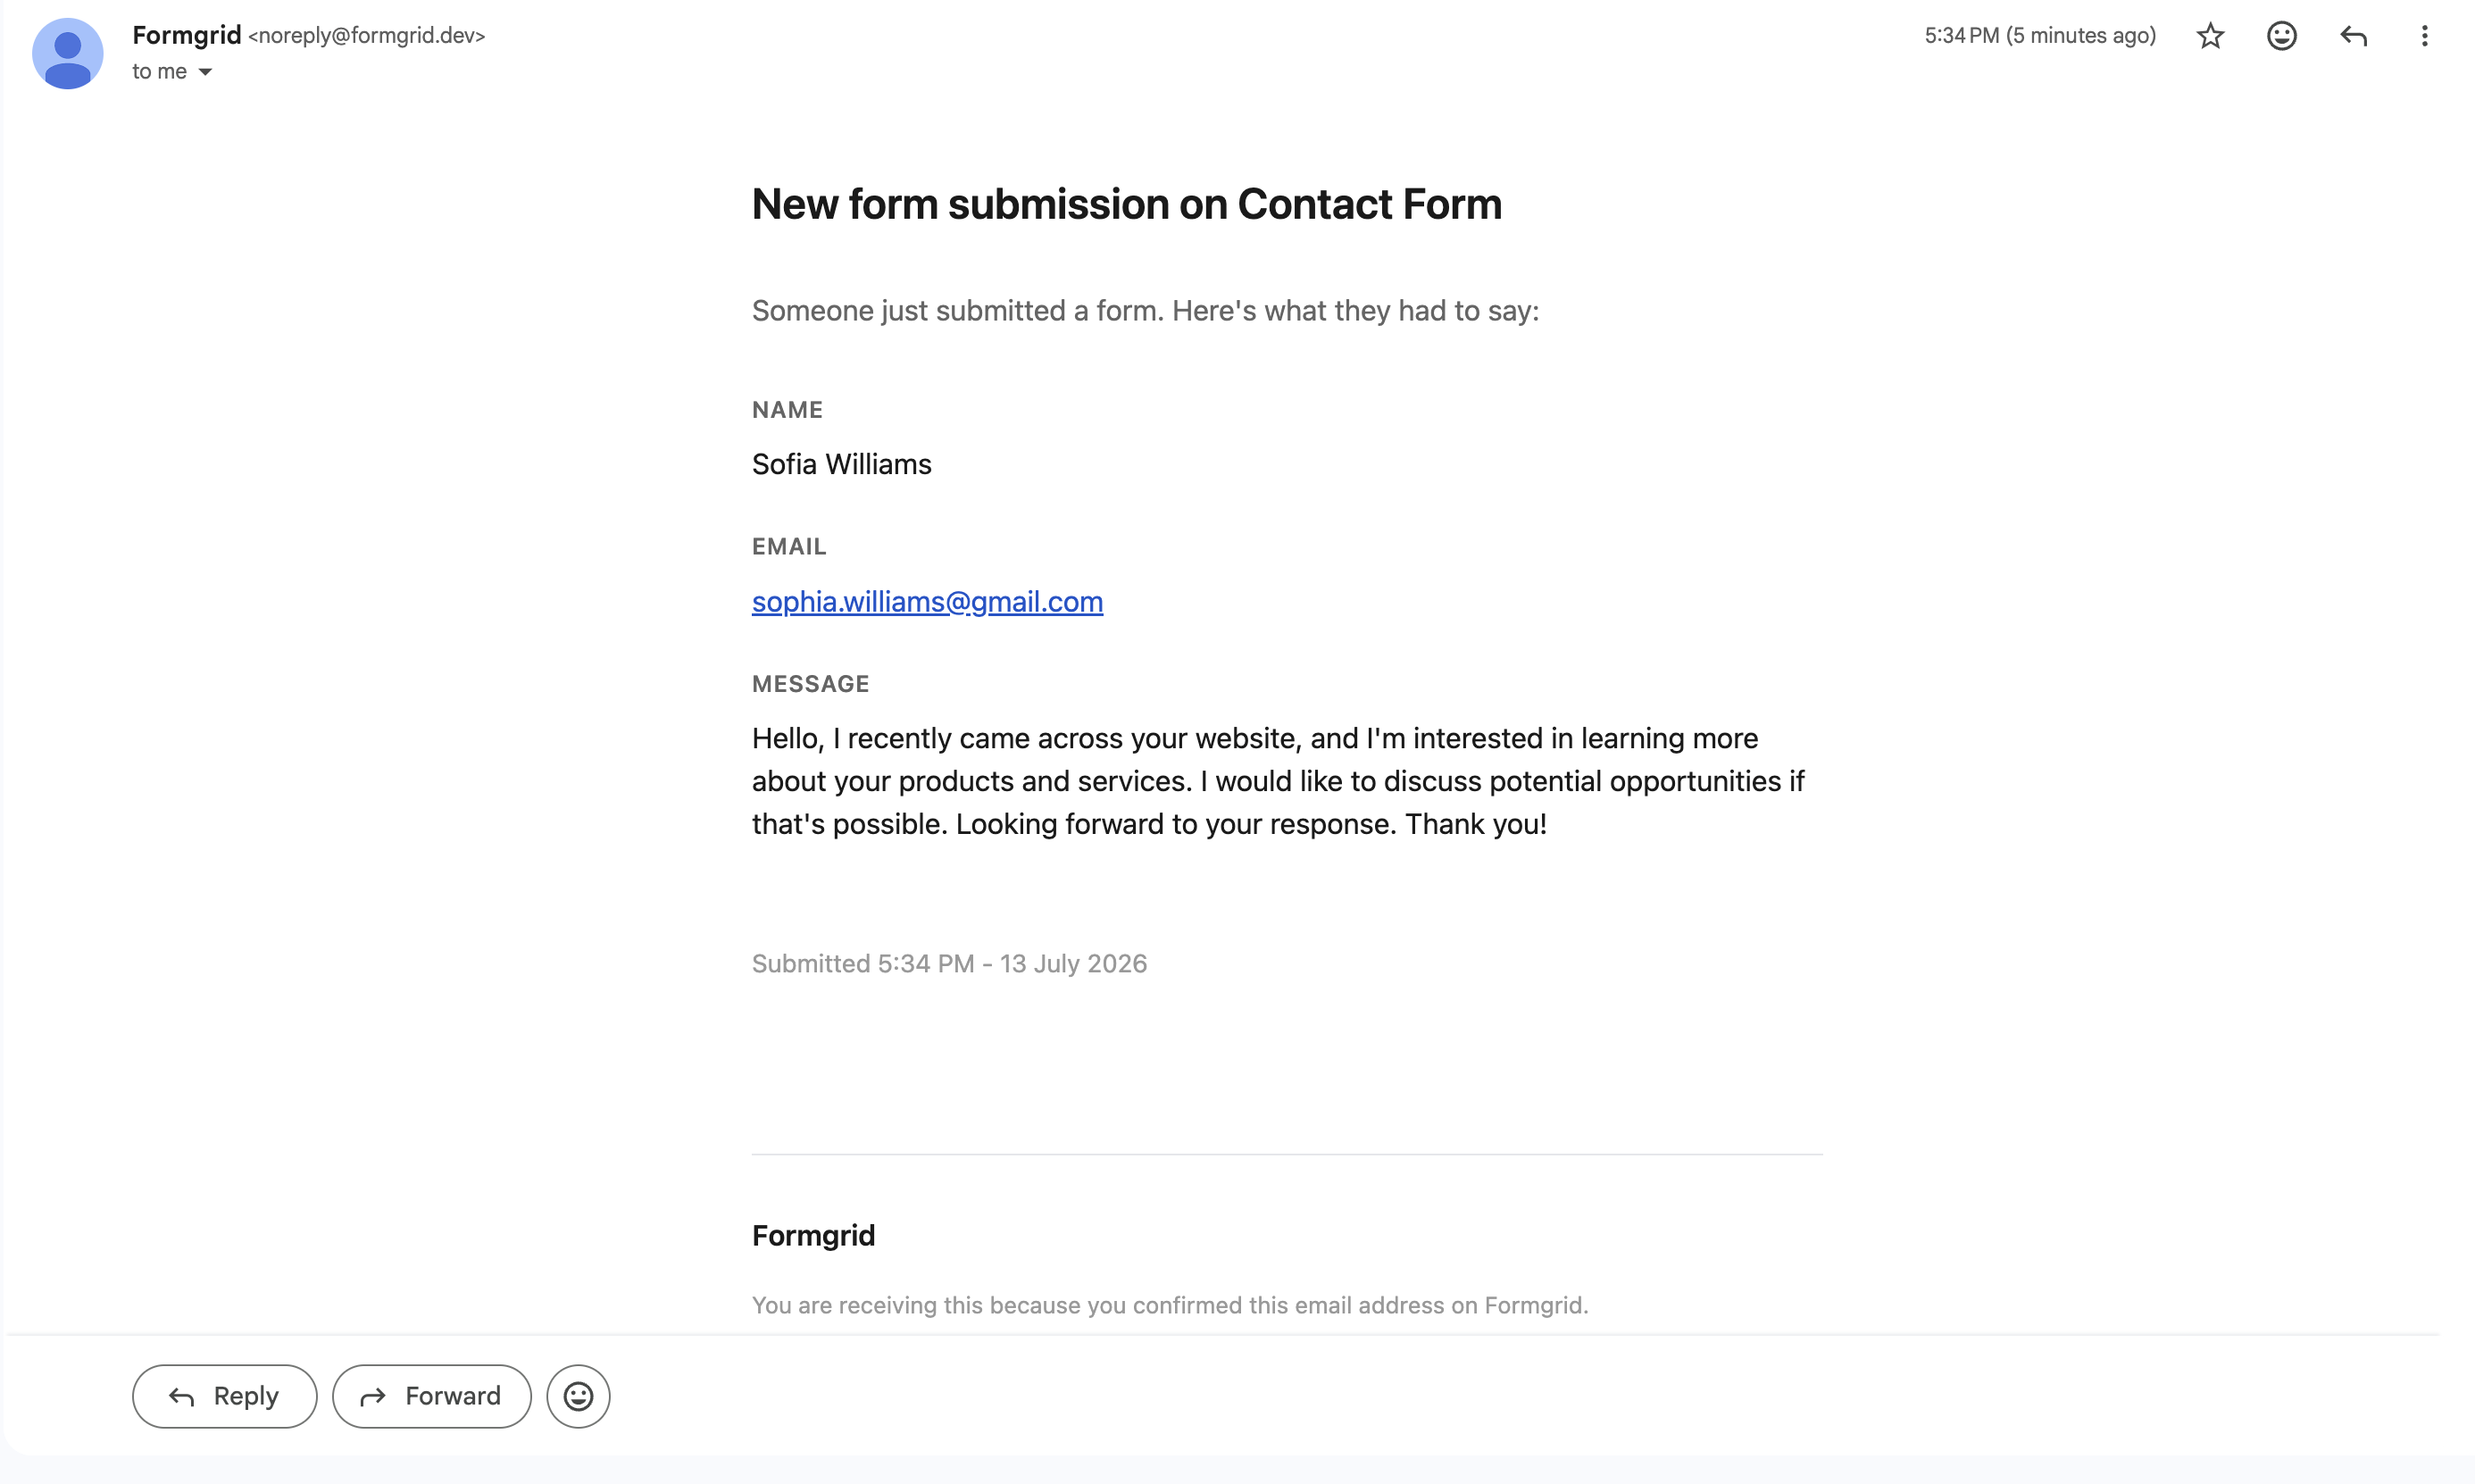
You will see the submitter's name, their email address, their message, and the timestamp, both in the email and in the dashboard. So even if a notification email slips into spam, nothing is lost.
Step 6: Test Your Form
Fill out your own form and submit it. Within seconds, you should see a confirmation email in your inbox and the submission logged in your Formgrid dashboard as a new lead.
If you do not receive the email, check your spam folder and make sure you saved the correct notification email in settings.
Optional: Using JavaScript for a Better UX
If you want to submit the form without a full page reload, here is a clean fetch-based approach:
const form = document.getElementById('contact-form');

form.addEventListener('submit', async (e) => {
  e.preventDefault();

  const formData = new FormData(form);

  try {
    const response = await fetch('YOUR_ENDPOINT_URL', {
      method: 'POST',
      body: formData,
    });

    if (response.ok) {
      form.innerHTML = '<p>Thanks! Your message was sent.</p>';
    } else {
      form.innerHTML = '<p>Something went wrong. Please try again.</p>';
    }
  } catch (error) {
    form.innerHTML = '<p>Network error. Please try again.</p>';
  }
});
Add id="contact-form" to your form element, and this script handles the rest. No page redirect, clean user experience.
When to Use a Form Service vs Building Your Own Backend
Use Formgrid or a form service if:
- You need a contact, enquiry, or waitlist form
- You are building a static site, landing page, or portfolio
- You want instant email notifications without configuring SMTP
- You want spam protection without implementing it yourself
- You want to know which submissions you have followed up with, not just receive them
Build your own backend if:
- You need custom business logic on form submission
- You need to write data to your own database directly
- You are building a full SaaS product with complex flows
- You need custom authentication tied to submissions
For most landing pages, portfolios, and indie projects, a form service is more than enough. You do not need a backend for a contact form.
Final Thoughts
Netlify Forms was a great idea that got complicated. Credit-based billing, platform lock-in, and the risk of your entire account getting paused over a form submission spike make it hard to recommend for anything serious in 2026.
The good news is that switching takes less than ten minutes.
With Formgrid.dev, you get flat, predictable pricing, a backend that works on any hosting platform, instant email notifications, built-in spam protection, and a dashboard that tracks each submission as a lead and your conversion rate over time, instead of just an email you eventually lose track of.
If you are building on GitHub Pages, Vercel, Render, Cloudflare Pages, or any static site generator like Hugo, Jekyll, Astro, or Eleventy, Formgrid plugs in with a single line change to your form's action attribute.
Switch from Netlify Forms in under 5 minutes. No credit card required.

Comments
Leave a comment